d
Redux (legacy)
So far, we have followed the state management conventions recommended by React. We have placed the state and the functions for handling it in the higher level of the component structure of the application. Quite often most of the app state and state altering functions reside directly in the root component. The state and its handler methods have then been passed to other components with props. This works up to a certain point, but when applications grow larger, state management becomes challenging.
Flux-architecture
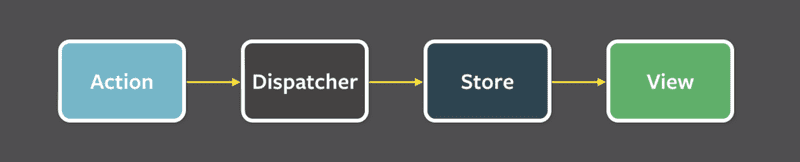
Already years ago Facebook developed the Flux-architecture to make state management of React apps easier. In Flux, the state is separated from the React components and into its own stores. State in the store is not changed directly, but with different actions.
When an action changes the state of the store, the views are rerendered:
If some action on the application, for example pushing a button, causes the need to change the state, the change is made with an action. This causes re-rendering the view again:
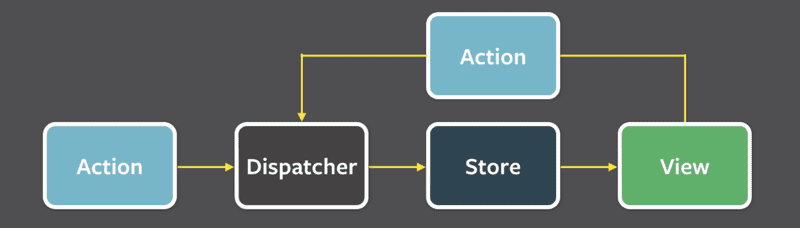
Flux offers a standard way for how and where the application's state is kept and how it is modified.
Redux
Facebook has an implementation for Flux, but we will be using the Redux library. It works with the same principle but is a bit simpler. Facebook also uses Redux now instead of their original Flux.
We will get to know Redux by implementing a counter application yet again:

Create a new Vite application and install redux with the command
npm install reduxAs in Flux, in Redux the state is also stored in a store.
The whole state of the application is stored in one JavaScript object in the store. Because our application only needs the value of the counter, we will save it straight to the store. If the state was more complicated, different things in the state would be saved as separate fields of the object.
The state of the store is changed with actions. Actions are objects, which have at least a field determining the type of the action. Our application needs for example the following action:
{
  type: 'INCREMENT'
}
If there is data involved with the action, other fields can be declared as needed. However, our counting app is so simple that the actions are fine with just the type field.
The impact of the action to the state of the application is defined using a reducer. In practice, a reducer is a function that is given the current state and an action as parameters. It returns a new state.
Let's now define a reducer for our application at main.jsx. The file initially looks like this:
const counterReducer = (state, action) => {
  if (action.type === 'INCREMENT') {
    return state + 1
  } else if (action.type === 'DECREMENT') {
    return state - 1
  } else if (action.type === 'ZERO') {
    return 0
  }

  return state
}
The first parameter is the state in the store. The reducer returns a new state based on the action type. So, e.g. when the type of Action is INCREMENT, the state gets the old value plus one. If the type of Action is ZERO the new value of state is zero.
Let's change the code a bit. We have used if-else statements to respond to an action and change the state. However, the switch statement is the most common approach to writing a reducer.
Let's also define a default value of 0 for the parameter state. Now the reducer works even if the store state has not been primed yet.
const counterReducer = (state = 0, action) => {  switch (action.type) {
    case 'INCREMENT':
      return state + 1
    case 'DECREMENT':
      return state - 1
    case 'ZERO':
      return 0
    default: // if none of the above matches, code comes here
      return state
  }
}
The reducer is never supposed to be called directly from the application's code. It is only given as a parameter to the createStore function which creates the store:
import { createStore } from 'redux'
const counterReducer = (state = 0, action) => {
  switch (action.type) {
    case 'INCREMENT':
      return state + 1
    case 'DECREMENT':
      return state - 1
    case 'ZERO':
      return 0
    default:
      return state
  }
}

const store = createStore(counterReducer)
The code editor may warn that createStore is deprecated. Let's ignore this for now; there is a more detailed explanation about this further below.
The store now uses the reducer to handle actions, which are dispatched or 'sent' to the store with its dispatch method.
store.dispatch({ type: 'INCREMENT' })You can find out the state of the store using the method getState.
For example the following code:
// ...

const store = createStore(counterReducer)

console.log(store.getState())store.dispatch({type: 'INCREMENT'})store.dispatch({type: 'INCREMENT'})store.dispatch({type: 'INCREMENT'})console.log(store.getState())store.dispatch({type: 'ZERO'})store.dispatch({type: 'DECREMENT'})console.log(store.getState())
would print the following to the console
0
3
-1
because at first, the state of the store is 0. After three INCREMENT actions the state is 3. In the end, after the ZERO and DECREMENT actions, the state is -1.
The third important method that the store has is subscribe, which is used to create callback functions that the store calls whenever an action is dispatched to the store.
If, for example, we would add the following function to subscribe, every change in the store would be printed to the console.
store.subscribe(() => {
  const storeNow = store.getState()
  console.log(storeNow)
})
so the code
// ...

const store = createStore(counterReducer)

store.subscribe(() => {  const storeNow = store.getState()  console.log(storeNow)})
store.dispatch({ type: 'INCREMENT' })store.dispatch({ type: 'INCREMENT' })store.dispatch({ type: 'INCREMENT' })store.dispatch({ type: 'ZERO' })store.dispatch({ type: 'DECREMENT' })
would cause the following to be printed
1
2
3
0
-1
The code of our counter application is the following. All of the code has been written in the same file, so store is directly available for the React code. We will get to know better ways to structure React/Redux code later. The file main.jsx looks as follows:
import ReactDOM from 'react-dom/client'
import { createStore } from 'redux'

const counterReducer = (state = 0, action) => {
  switch (action.type) {
    case 'INCREMENT':
      return state + 1
    case 'DECREMENT':
      return state - 1
    case 'ZERO':
      return 0
    default:
      return state
  }
}

const store = createStore(counterReducer)

const App = () => {
  return (
    <div>
      <div>{store.getState()}</div>
      <button onClick={() => store.dispatch({ type: 'INCREMENT' })}>
        plus
      </button>
      <button onClick={() => store.dispatch({ type: 'DECREMENT' })}>
        minus
      </button>
      <button onClick={() => store.dispatch({ type: 'ZERO' })}>
        zero
      </button>
    </div>
  )
}

const root = ReactDOM.createRoot(document.getElementById('root'))

const renderApp = () => {
  root.render(<App />)
}

renderApp()
store.subscribe(renderApp)
There are a few notable things in the code. App renders the value of the counter by asking it from the store with the method store.getState(). The action handlers of the buttons dispatch the right actions to the store.
When the state in the store is changed, React is not able to automatically re-render the application. Thus we have registered a function renderApp, which renders the whole app, to listen for changes in the store with the store.subscribe method. Note that we have to immediately call the renderApp method. Without the call, the first rendering of the app would never happen.
A note about the use of createStore
The most observant will notice that the name of the function createStore is overlined. If you move the mouse over the name, an explanation will appear
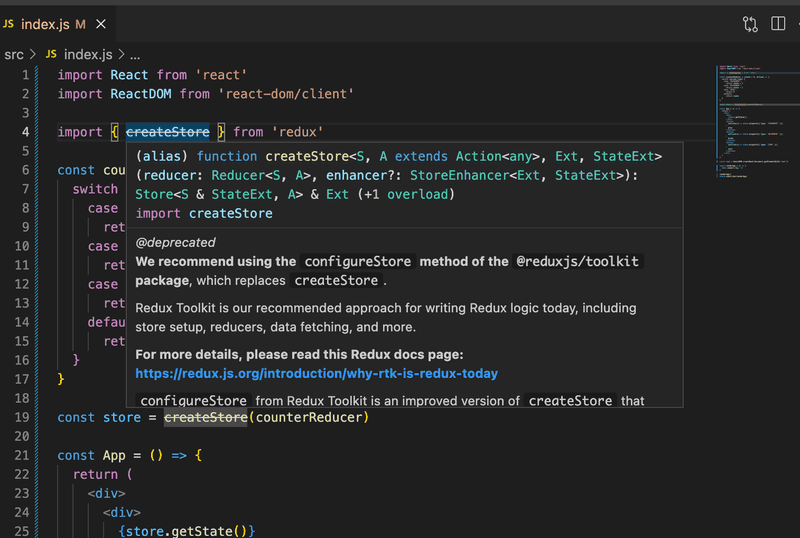
The full explanation is as follows
We recommend using the configureStore method of the @reduxjs/toolkit package, which replaces createStore.
Redux Toolkit is our recommended approach for writing Redux logic today, including store setup, reducers, data fetching, and more.
For more details, please read this Redux docs page: https://redux.js.org/introduction/why-rtk-is-redux-today
configureStore from Redux Toolkit is an improved version of createStore that simplifies setup and helps avoid common bugs.
You should not be using the redux core package by itself today, except for learning purposes. The createStore method from the core redux package will not be removed, but we encourage all users to migrate to using Redux Toolkit for all Redux code.
So, instead of the function createStore, it is recommended to use the slightly more "advanced" function configureStore, and we will also use it when we have achieved the basic functionality of Redux.
Side note: createStore is defined as "deprecated", which usually means that the feature will be removed in some newer version of the library. The explanation above and this discussion reveal that createStore will not be removed, and it has been given the status deprecated, perhaps with slightly incorrect reasons. So the function is not obsolete, but today there is a more preferable, new way to do almost the same thing.
Redux-notes
We aim to modify our note application to use Redux for state management. However, let's first cover a few key concepts through a simplified note application.
The first version of our application, written in the file main.jsx, looks as follows:
import ReactDOM from 'react-dom/client'
import { createStore } from 'redux'

const noteReducer = (state = [], action) => {
  switch (action.type) {
    case 'NEW_NOTE':
      state.push(action.payload)
      return state
    default:
      return state
  }
}

const store = createStore(noteReducer)

store.dispatch({
  type: 'NEW_NOTE',
  payload: {
    content: 'the app state is in redux store',
    important: true,
    id: 1
  }
})

store.dispatch({
  type: 'NEW_NOTE',
  payload: {
    content: 'state changes are made with actions',
    important: false,
    id: 2
  }
})

const App = () => {
  return (
    <div>
      <ul>
        {store.getState().map(note => (
          <li key={note.id}>
            {note.content} <strong>{note.important ? 'important' : ''}</strong>
          </li>
        ))}
      </ul>
    </div>
  )
}

const root = ReactDOM.createRoot(document.getElementById('root'))

const renderApp = () => {
  root.render(<App />)
}

renderApp()
store.subscribe(renderApp)
So far the application does not have the functionality for adding new notes, although it is possible to do so by dispatching NEW_NOTE actions.
Now the actions have a type and a field payload, which contains the note to be added:
{
  type: 'NEW_NOTE',
  payload: {
    content: 'state changes are made with actions',
    important: false,
    id: 2
  }
}
The choice of the field name is not random. The general convention is that actions have exactly two fields, type telling the type and payload containing the data included with the Action.
Pure functions, immutable
The initial version of the reducer is very simple:
const noteReducer = (state = [], action) => {
  switch (action.type) {
    case 'NEW_NOTE':
      state.push(action.payload)
      return state
    default:
      return state
  }
}
The state is now an Array. NEW_NOTE-type actions cause a new note to be added to the state with the push method.
The application seems to be working, but the reducer we have declared is bad. It breaks the basic assumption that reducers must be pure functions.
Pure functions are such, that they do not cause any side effects and they must always return the same response when called with the same parameters.
We added a new note to the state with the method state.push(action.payload) which changes the state of the state-object. This is not allowed. The problem is easily solved by using the concat method, which creates a new array, which contains all the elements of the old array and the new element:
const noteReducer = (state = [], action) => {
  switch (action.type) {
    case 'NEW_NOTE':
      return state.concat(action.payload)    default:
      return state
  }
}
A reducer state must be composed of immutable objects. If there is a change in the state, the old object is not changed, but it is replaced with a new, changed, object. This is exactly what we did with the new reducer: the old array is replaced with the new one.
Let's expand our reducer so that it can handle the change of a note's importance:
{
  type: 'TOGGLE_IMPORTANCE',
  payload: {
    id: 2
  }
}
Since we do not have any code which uses this functionality yet, we are expanding the reducer in the 'test-driven' way.
Configuring the test environment
We have to first configure the Vitest testing library for the project. Let's install it as a development dependency for the application:
npm install --save-dev vitestLet us expand package.json with a script for running the tests:
{
  // ...
  "scripts": {
    "dev": "vite",
    "build": "vite build",
    "lint": "eslint .",
    "preview": "vite preview",
    "test": "vitest"  },
  // ...
}
To make testing easier, let's move the reducer's code to its own module, to the file src/reducers/noteReducer.js:
const noteReducer = (state = [], action) => {
  switch (action.type) {
    case 'NEW_NOTE':
      return state.concat(action.payload)
    default:
      return state
  }
}

export default noteReducer
The file main.jsx changes as follows:
import ReactDOM from 'react-dom/client'
import { createStore } from 'redux'
import noteReducer from './reducers/noteReducer'
const store = createStore(noteReducer)

// ...
We'll also add the library deep-freeze, which can be used to ensure that the reducer has been correctly defined as an immutable function. Let's install the library as a development dependency:
npm install --save-dev deep-freezeWe are now ready to write tests.
Tests for noteReducer
Let's start by creating a test for handling the action NEW_NOTE. The test, which we define in file src/reducers/noteReducer.test.js, has the following content:
import deepFreeze from 'deep-freeze'
import { describe, expect, test } from 'vitest'
import noteReducer from './noteReducer'

describe('noteReducer', () => {
  test('returns new state with action NEW_NOTE', () => {
    const state = []
    const action = {
      type: 'NEW_NOTE',
      payload: {
        content: 'the app state is in redux store',
        important: true,
        id: 1
      }
    }

    deepFreeze(state)
    const newState = noteReducer(state, action)

    expect(newState).toHaveLength(1)
    expect(newState).toContainEqual(action.payload)
  })
})
Run the test with npm test. The test ensures that the new state returned by the reducer is an array containing a single element, which is the same object as the one in the action’s payload field.
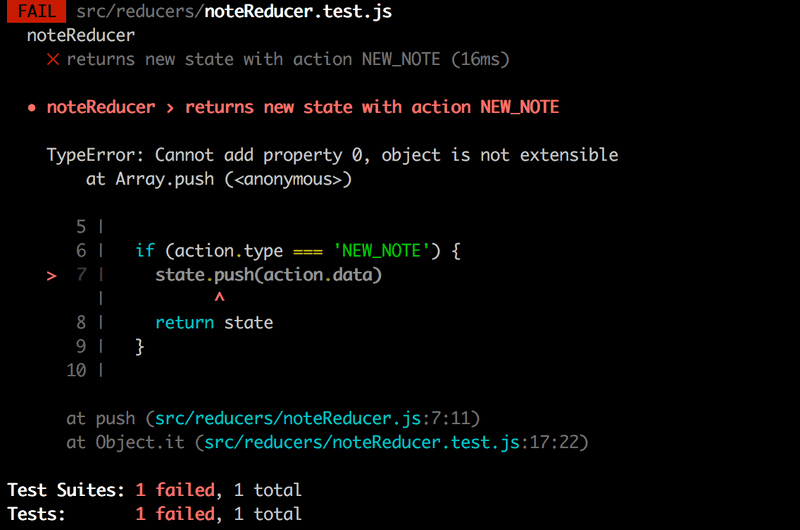
The deepFreeze(state) command ensures that the reducer does not change the state of the store given to it as a parameter. If the reducer used the push command to manipulate the state, the test would fail:
Now we'll create a test for the TOGGLE_IMPORTANCE action:
test('returns new state with action TOGGLE_IMPORTANCE', () => {
  const state = [
    {
      content: 'the app state is in redux store',
      important: true,
      id: 1
    },
    {
      content: 'state changes are made with actions',
      important: false,
      id: 2
    }
  ]

  const action = {
    type: 'TOGGLE_IMPORTANCE',
    payload: {
      id: 2
    }
  }

  deepFreeze(state)
  const newState = noteReducer(state, action)

  expect(newState).toHaveLength(2)

  expect(newState).toContainEqual(state[0])

  expect(newState).toContainEqual({
    content: 'state changes are made with actions',
    important: true,
    id: 2
  })
})
So the following action
{
  type: 'TOGGLE_IMPORTANCE',
  payload: {
    id: 2
  }
}
has to change the importance of the note with the id 2.
The reducer is expanded as follows
const noteReducer = (state = [], action) => {
  switch(action.type) {
    case 'NEW_NOTE':
      return state.concat(action.payload)
    case 'TOGGLE_IMPORTANCE': {      const id = action.payload.id      const noteToChange = state.find(n => n.id === id)      const changedNote = {        ...noteToChange,        important: !noteToChange.important      }      return state.map(note => (note.id !== id ? note : changedNote))    }    default:
      return state
  }
}
We create a copy of the note whose importance has changed with the syntax familiar from part 2, and replace the state with a new state containing all the notes which have not changed and the copy of the changed note changedNote.
Let's recap what goes on in the code. First, we search for a specific note object, the importance of which we want to change:
const noteToChange = state.find(n => n.id === id)then we create a new object, which is a copy of the original note, only the value of the important field has been changed to the opposite of what it was:
const changedNote = {
  ...noteToChange,
  important: !noteToChange.important
}
A new state is then returned. We create it by taking all of the notes from the old state except for the desired note, which we replace with its slightly altered copy:
state.map(note => (note.id !== id ? note : changedNote))Array spread syntax
Because we now have quite good tests for the reducer, we can refactor the code safely.
Adding a new note creates the state returned from the Array's concat function. Let's take a look at how we can achieve the same by using the JavaScript array spread syntax:
const noteReducer = (state = [], action) => {
  switch(action.type) {
    case 'NEW_NOTE':
      return [...state, action.payload]    case 'TOGGLE_IMPORTANCE': {
      // ...
    }
    default:
    return state
  }
}
The spread -syntax works as follows. If we declare
const numbers = [1, 2, 3]...numbers breaks the array up into individual elements, which can be placed in another array.
[...numbers, 4, 5]and the result is an array [1, 2, 3, 4, 5].
If we would have placed the array to another array without the spread
[numbers, 4, 5]the result would have been [ [1, 2, 3], 4, 5].
When we take elements from an array by destructuring, a similar-looking syntax is used to gather the rest of the elements:
const numbers = [1, 2, 3, 4, 5, 6]

const [first, second, ...rest] = numbers

console.log(first)     // prints 1
console.log(second)   // prints 2
console.log(rest)     // prints [3, 4, 5, 6]
Exercises 6.1.-6.2.
Let's make a simplified version of the unicafe exercise from part 1. Let's handle the state management with Redux.
You can take the code from this repository https://github.com/fullstack-hy2020/unicafe-redux for the base of your project.
Start by removing the git configuration of the cloned repository, and by installing dependencies
cd unicafe-redux   // go to the directory of cloned repository
rm -rf .git
npm install
6.1: Unicafe Revisited, step 1
Before implementing the functionality of the UI, let's implement the functionality required by the store.
We have to save the number of each kind of feedback to the store, so the form of the state in the store is:
{
  good: 5,
  ok: 4,
  bad: 2
}
The project has the following base for a reducer:
const initialState = {
  good: 0,
  ok: 0,
  bad: 0
}

const counterReducer = (state = initialState, action) => {
  console.log(action)
  switch (action.type) {
    case 'GOOD':
      return state
    case 'OK':
      return state
    case 'BAD':
      return state
    case 'RESET':
      return state
    default:
      return state
  }
}

export default counterReducer
and a base for its tests
import deepFreeze from 'deep-freeze'
import { describe, expect, test } from 'vitest'
import counterReducer from './reducer'

describe('unicafe reducer', () => {
  const initialState = {
    good: 0,
    ok: 0,
    bad: 0
  }

  test('should return a proper initial state when called with undefined state', () => {
    const action = {
      type: 'DO_NOTHING'
    }

    const newState = counterReducer(undefined, action)
    expect(newState).toEqual(initialState)
  })

  test('good is incremented', () => {
    const action = {
      type: 'GOOD'
    }
    const state = initialState

    deepFreeze(state)
    const newState = counterReducer(state, action)
    expect(newState).toEqual({
      good: 1,
      ok: 0,
      bad: 0
    })
  })
})
Implement the reducer and its tests.
The provided first test should pass without any changes. Redux expects that the reducer returns the original state when it is called with a first parameter - which represents the previous state - with the value undefined.
Start by expanding the reducer so that both tests pass. After that, add the remaining tests for the different actions of the reducer and implement the corresponding functionality in the reducer.
In the tests, make sure that the reducer is an immutable function with the deep-freeze library. A good model for the reducer is the redux-notes example above.
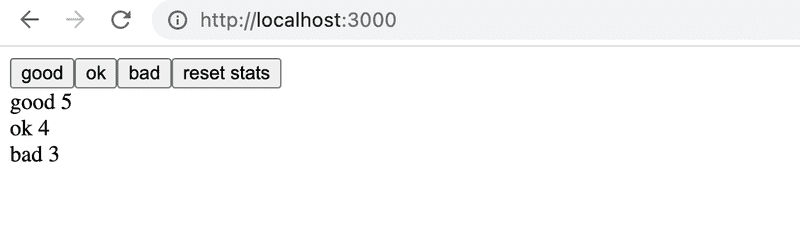
6.2: Unicafe Revisited, step2
Now implement the actual functionality of the application.
Your application can have a modest appearance, nothing else is needed but buttons and the number of reviews for each type:
Uncontrolled form
Let's add the functionality for adding new notes and changing their importance:
// ...

const generateId = () => Number((Math.random() * 1000000).toFixed(0))
const App = () => {
  const addNote = event => {    event.preventDefault()    const content = event.target.note.value    event.target.note.value = ''    store.dispatch({      type: 'NEW_NOTE',      payload: {        content,        important: false,        id: generateId()      }    })  }
  const toggleImportance = id => {    store.dispatch({      type: 'TOGGLE_IMPORTANCE',      payload: { id }    })  }
  return (
    <div>
      <form onSubmit={addNote}>        <input name="note" />         <button type="submit">add</button>      </form>      <ul>
        {store.getState().map(note => (
          <li key={note.id} onClick={() => toggleImportance(note.id)}>            {note.content} <strong>{note.important ? 'important' : ''}</strong>
          </li>
        ))}
      </ul>
    </div>
  )
}

// ...
The implementation of both functionalities is straightforward. It is noteworthy that we have not bound the state of the form fields to the state of the App component like we have previously done. React calls this kind of form uncontrolled.
Uncontrolled forms have certain limitations (for example, dynamic error messages or disabling the submit button based on input are not possible). However they are suitable for our current needs.
You can read more about uncontrolled forms here.
The method for adding new notes is simple, it dispatches the action for adding notes:
addNote = event => {
  event.preventDefault()
  const content = event.target.note.value
  event.target.note.value = ''
  store.dispatch({
    type: 'NEW_NOTE',
    payload: {
      content,
      important: false,
      id: generateId()
    }
  })
}
The content of the new note is obtained directly from the form’s input field, which can be accessed through the event object:
const content = event.target.note.valuePlease note that the input field must have a name in order to access its value:
<form onSubmit={addNote}>
  <input name="note" />  <button type="submit">add</button>
</form>
A note's importance can be changed by clicking its name. The event handler is very simple:
toggleImportance = id => {
  store.dispatch({
    type: 'TOGGLE_IMPORTANCE',
    payload: { id }
  })
}
Action creators
We begin to notice that, even in applications as simple as ours, using Redux can simplify the frontend code. However, we can do a lot better.
React components don't need to know the Redux action types and forms. Let's separate creating actions into separate functions:
const createNote = content => {
  return {
    type: 'NEW_NOTE',
    payload: {
      content,
      important: false,
      id: generateId()
    }
  }
}

const toggleImportanceOf = id => {
  return {
    type: 'TOGGLE_IMPORTANCE',
    payload: { id }
  }
}
Functions that create actions are called action creators.
The App component does not have to know anything about the inner representation of the actions anymore, it just gets the right action by calling the creator function:
const App = () => {
  const addNote = event => {
    event.preventDefault()
    const content = event.target.note.value
    event.target.note.value = ''
    store.dispatch(createNote(content))
  }

  const toggleImportance = id => {
    store.dispatch(toggleImportanceOf(id))  }

  // ...
}
Forwarding Redux Store to various components
Aside from the reducer, our application is in one file. This is of course not sensible, and we should separate App into its module.
Now the question is, how can the App access the store after the move? And more broadly, when a component is composed of many smaller components, there must be a way for all of the components to access the store.
There are multiple ways to share the Redux store with the components. First, we will look into the newest, and possibly the easiest way, which is using the hooks API of the react-redux library.
First, we install react-redux
npm install react-reduxLet's organize the application code more sensibly into several different files. The file main.jsx looks as follows after the changes:
import ReactDOM from 'react-dom/client'
import { createStore } from 'redux'
import { Provider } from 'react-redux'

import App from './App'
import noteReducer from './reducers/noteReducer'

const store = createStore(noteReducer)

ReactDOM.createRoot(document.getElementById('root')).render(
  <Provider store={store}>
    <App />
  </Provider>
)
Note, that the application is now defined as a child of a Provider component provided by the react-redux library. The application's store is given to the Provider as its attribute store:
const store = createStore(noteReducer)

ReactDOM.createRoot(document.getElementById('root')).render(
  <Provider store={store}>    <App />
  </Provider>)
This makes the store accessible to all components in the application, as we will soon see.
Defining the action creators has been moved to the file src/reducers/noteReducer.js where the reducer is defined. That file looks like this:
const noteReducer = (state = [], action) => {
  switch (action.type) {
    case 'NEW_NOTE':
      return [...state, action.payload]
    case 'TOGGLE_IMPORTANCE': {
      const id = action.payload.id
      const noteToChange = state.find(n => n.id === id)
      const changedNote = {
        ...noteToChange,
        important: !noteToChange.important
      }
      return state.map(note => (note.id !== id ? note : changedNote))
    }
    default:
      return state
  }
}

const generateId = () =>
  Number((Math.random() * 1000000).toFixed(0))

export const createNote = (content) => {
  return {
    type: 'NEW_NOTE',
    payload: {
      content,
      important: false,
      id: generateId()
    }
  }
}

export const toggleImportanceOf = (id) => {
  return {
    type: 'TOGGLE_IMPORTANCE',
    payload: { id }
  }
}

export default noteReducer
The module now has multiple export commands. The reducer function is still returned with the export default command, so the reducer can be imported the usual way:
import noteReducer from './reducers/noteReducer'A module can have only one default export, but multiple "normal" exports:
export const createNote = (content) => {
  // ...
}

export const toggleImportanceOf = (id) => {
  // ...
}
Normally (not as defaults) exported functions can be imported with the curly brace syntax:
import { createNote } from '../../reducers/noteReducer'Next, we move the App component into its own file src/App.jsx. The content of the file is as follows:
import { createNote, toggleImportanceOf } from './reducers/noteReducer'
import { useSelector, useDispatch } from 'react-redux'


const App = () => {
  const dispatch = useDispatch()
  const notes = useSelector(state => state)

  const addNote = (event) => {
    event.preventDefault()
    const content = event.target.note.value
    event.target.note.value = ''
    dispatch(createNote(content))
  }

  const toggleImportance = (id) => {
    dispatch(toggleImportanceOf(id))
  }

  return (
    <div>
      <form onSubmit={addNote}>
        <input name="note" />
        <button type="submit">add</button>
      </form>
      <ul>
        {notes.map(note =>
          <li
            key={note.id}
            onClick={() => toggleImportance(note.id)}
          >
            {note.content} <strong>{note.important ? 'important' : ''}</strong>
          </li>
        )}
      </ul>
    </div>
  )
}

export default App
There are a few things to note in the code. Previously the code dispatched actions by calling the dispatch method of the Redux store:
store.dispatch({
  type: 'TOGGLE_IMPORTANCE',
  payload: { id }
})
Now it does it with the dispatch function from the useDispatch hook.
import { useSelector, useDispatch } from 'react-redux'
const App = () => {
  const dispatch = useDispatch()  // ...

  const toggleImportance = (id) => {
    dispatch(toggleImportanceOf(id))  }

  // ...
}
The useDispatch hook provides any React component access to the dispatch function of the Redux store defined in main.jsx. This allows all components to make changes to the state of the Redux store.
The component can access the notes stored in the store with the useSelector-hook of the react-redux library.
import { useSelector, useDispatch } from 'react-redux'
const App = () => {
  // ...
  const notes = useSelector(state => state)  // ...
}
useSelector receives a function as a parameter. The function either searches for or selects data from the Redux store. Here we need all of the notes, so our selector function returns the whole state:
state => statewhich is a shorthand for:
(state) => {
  return state
}
Usually, selector functions are a bit more interesting and return only selected parts of the contents of the Redux store. We could for example return only notes marked as important:
const importantNotes = useSelector(state => state.filter(note => note.important)) The current version of the application can be found on GitHub, branch part6-0.
More components
Let's separate the form responsible for creating a new note into its own component in the file src/components/NoteForm.jsx:
import { useDispatch } from 'react-redux'
import { createNote } from '../reducers/noteReducer'

const NoteForm = () => {
  const dispatch = useDispatch()

  const addNote = (event) => {
    event.preventDefault()
    const content = event.target.note.value
    event.target.note.value = ''
    dispatch(createNote(content))
  }

  return (
    <form onSubmit={addNote}>
      <input name="note" />
      <button type="submit">add</button>
    </form>
  )
}

export default NoteForm
Unlike in the React code we did without Redux, the event handler for changing the state of the app (which now lives in Redux) has been moved away from the App to a child component. The logic for changing the state in Redux is still neatly separated from the whole React part of the application.
We'll also separate the list of notes and displaying a single note into their own components Let's place both in the file src/components/Notes.jsx:
import { useDispatch, useSelector } from 'react-redux'
import { toggleImportanceOf } from '../reducers/noteReducer'

const Note = ({ note, handleClick }) => {
  return (
    <li onClick={handleClick}>
      {note.content}
      <strong> {note.important ? 'important' : ''}</strong>
    </li>
  )
}

const Notes = () => {
  const dispatch = useDispatch()
  const notes = useSelector(state => state)

  return (
    <ul>
      {notes.map(note => (
        <Note
          key={note.id}
          note={note}
          handleClick={() => dispatch(toggleImportanceOf(note.id))}
        />
      ))}
    </ul>
  )
}

export default Notes
The logic for changing the importance of a note is now in the component managing the list of notes.
Only a small amount of code remains in the file App.jsx:
import NoteForm from './components/NoteForm'
import Notes from './components/Notes'

const App = () => {
  return (
    <div>
      <NoteForm />
      <Notes />
    </div>
  )
}

export default AppNote, responsible for rendering a single note, is very simple and is not aware that the event handler it gets as props dispatches an action. These kinds of components are called presentational in React terminology.
Notes, on the other hand, is a container component, as it contains some application logic: it defines what the event handlers of the Note components do and coordinates the configuration of presentational components, that is, the Notes.
The code of the Redux application can be found on GitHub, on the branch part6-1.
Exercises 6.3.-6.8.
Let's make a new version of the anecdote voting application from part 1. Take the project from this repository https://github.com/fullstack-hy2020/redux-anecdotes as the base of your solution.
If you clone the project into an existing git repository, remove the git configuration of the cloned application:
cd redux-anecdotes  // go to the cloned repository
rm -rf .git
The application can be started as usual, but you have to install the dependencies first:
npm install
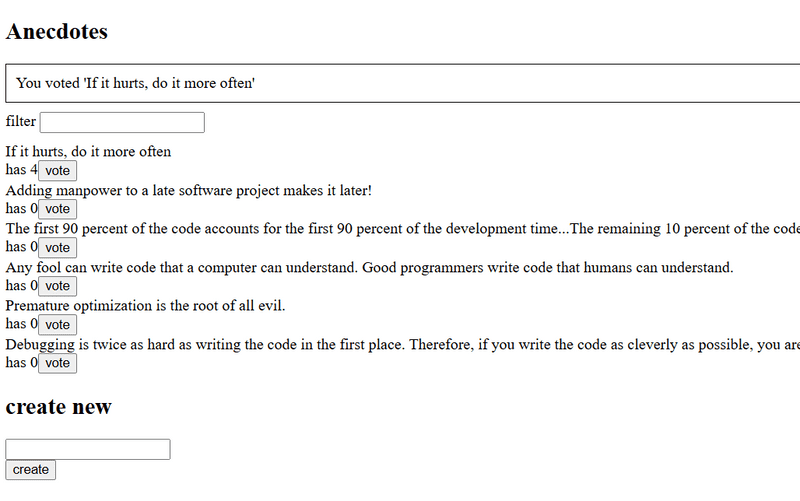
npm run devAfter completing these exercises, your application should look like this:
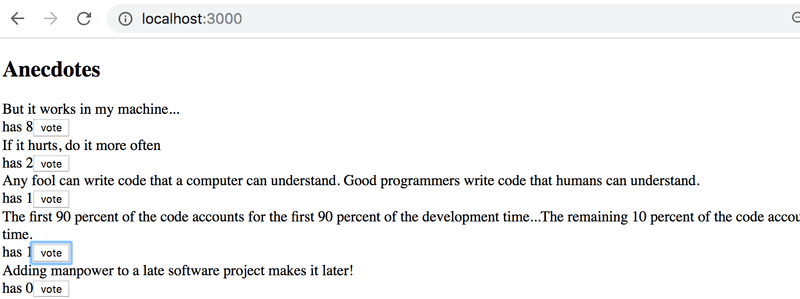
6.3: Anecdotes, step 1
Implement the functionality for voting anecdotes. The number of votes must be saved to a Redux store.
6.4: Anecdotes, step 2
Implement the functionality for adding new anecdotes.
You can keep the form uncontrolled like we did earlier.
6.5: Anecdotes, step 3
Make sure that the anecdotes are ordered by the number of votes.
6.6: Anecdotes, step 4
If you haven't done so already, separate the creation of action-objects to action creator-functions and place them in the src/reducers/anecdoteReducer.js file, so do what we have been doing since the chapter action creators.
6.7: Anecdotes, step 5
Separate the creation of new anecdotes into a component called AnecdoteForm. Move all logic for creating a new anecdote into this new component.
6.8: Anecdotes, step 6
Separate the rendering of the anecdote list into a component called AnecdoteList. Move all logic related to voting for an anecdote to this new component.
Now the App component should look like this:
import AnecdoteForm from './components/AnecdoteForm'
import AnecdoteList from './components/AnecdoteList'

const App = () => {
  return (
    <div>
      <h2>Anecdotes</h2>
      <AnecdoteList />
      <AnecdoteForm />
    </div>
  )
}

export default App
Let's continue our work with the simplified Redux version of our notes application.
To ease our development, let's change our reducer so that the store gets initialized with a state that contains a couple of notes:
const initialState = [  {    content: 'reducer defines how redux store works',    important: true,    id: 1,  },  {    content: 'state of store can contain any data',    important: false,    id: 2,  },]
const noteReducer = (state = initialState, action) => {  // ...
}

// ...

export default noteReducer
Store with complex state
Let's implement filtering for the notes that are displayed to the user. The user interface for the filters will be implemented with radio buttons:
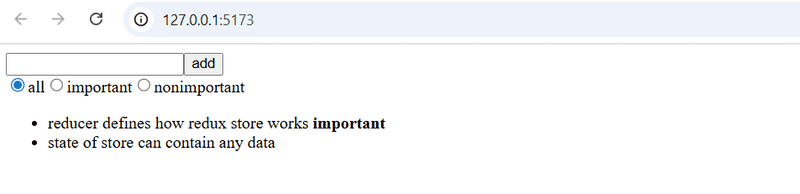
Let's start with a very simple and straightforward implementation:
import NoteForm from './components/NoteForm'
import Notes from './components/Notes'

const App = () => {
  const filterSelected = (value) => {    console.log(value)  }
  return (
    <div>
      <NoteForm />
      <div>        <input          type="radio"          name="filter"          onChange={() => filterSelected('ALL')}        />        all        <input          type="radio"          name="filter"          onChange={() => filterSelected('IMPORTANT')}        />        important        <input          type="radio"          name="filter"          onChange={() => filterSelected('NONIMPORTANT')}        />        nonimportant      </div>      <Notes />
    </div>
  )
}
Since the name attribute of all the radio buttons is the same, they form a button group where only one option can be selected.
The buttons have a change handler that currently only prints the string associated with the clicked button to the console.
In the following section, we will implement filtering by storing both the notes as well as the value of the filter in the redux store. When we are finished, we would like the state of the store to look like this:
{
  notes: [
    { content: 'reducer defines how redux store works', important: true, id: 1},
    { content: 'state of store can contain any data', important: false, id: 2}
  ],
  filter: 'IMPORTANT'
}
Only the array of notes was stored in the state of the previous implementation of our application. In the new implementation, the state object has two properties, notes that contains the array of notes and filter that contains a string indicating which notes should be displayed to the user.
Combined reducers
We could modify our current reducer to deal with the new shape of the state. However, a better solution in this situation is to define a new separate reducer for the state of the filter. Let's also create a new action creator function and place the code in the module src/reducers/filterReducer.js:
const filterReducer = (state = 'ALL', action) => {
  switch (action.type) {
    case 'SET_FILTER':
      return action.payload
    default:
      return state
  }
}

export const filterChange = filter => {
  return {
    type: 'SET_FILTER',
    payload: filter
  }
}

export default filterReducer
The actions for changing the state of the filter look like this:
{
  type: 'SET_FILTER',
  payload: 'IMPORTANT'
}
We can create the actual reducer for our application by combining the two existing reducers with the combineReducers function.
Let's define the combined reducer in the main.jsx file. The updated content of the file is as follows:
import ReactDOM from 'react-dom/client'
import { Provider } from 'react-redux'
import { createStore, combineReducers } from 'redux'
import App from './App'
import filterReducer from './reducers/filterReducer'
import noteReducer from './reducers/noteReducer'
const reducer = combineReducers({
notes: noteReducer,
filter: filterReducer
})
const store = createStore(reducer)
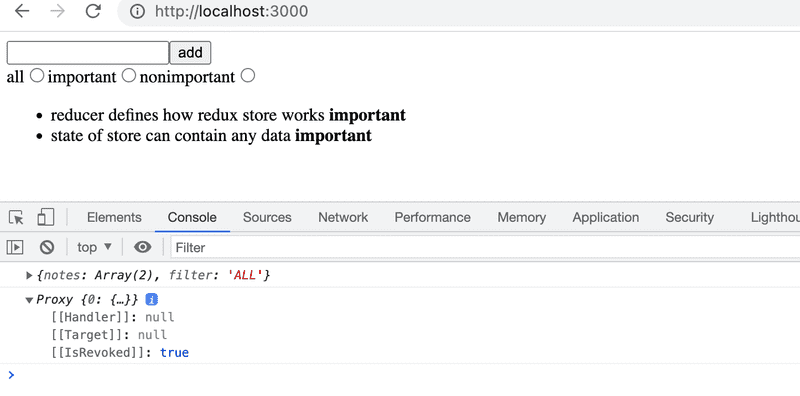
console.log(store.getState())
ReactDOM.createRoot(document.getElementById('root')).render(
<Provider store={store}>
<div />
</Provider>
)Since our application breaks completely at this point, we render an empty div element instead of the App component.
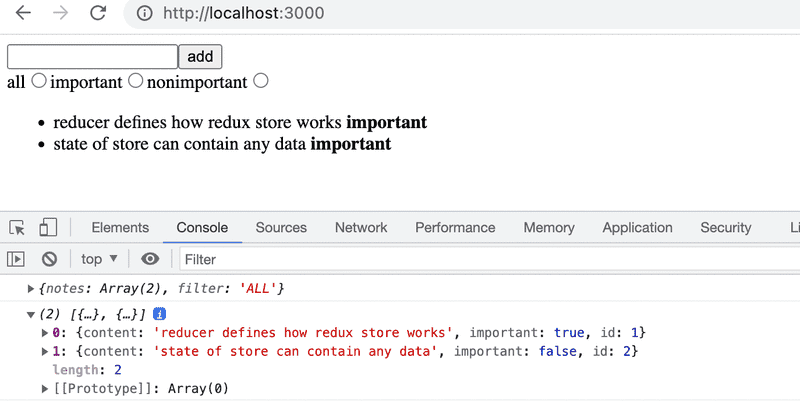
Thanks to the console.log command, the state of the store is printed to the console:
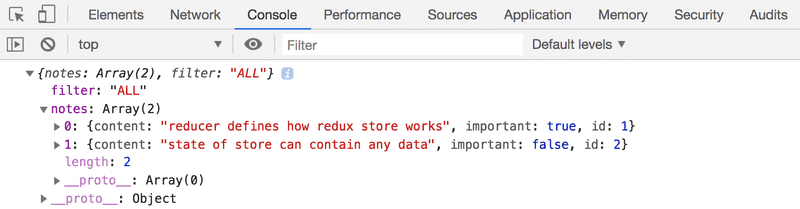
As we can see from the output, the store has the exact shape we wanted it to!
Let's take a closer look at how the combined reducer is created:
const reducer = combineReducers({
  notes: noteReducer,
  filter: filterReducer,
})
The state of the store defined by the reducer above is an object with two properties: notes and filter. The value of the notes property is defined by the noteReducer, which does not have to deal with the other properties of the state. Likewise, the filter property is managed by the filterReducer.
Before we make more changes to the code, let's take a look at how different actions change the state of the store defined by the combined reducer. Let's temporarily add the following lines to the file main.jsx:
// ...

const store = createStore(reducer)

console.log(store.getState())

import { createNote } from './reducers/noteReducer'import { filterChange } from './reducers/filterReducer'
store.subscribe(() => console.log(store.getState()))store.dispatch(filterChange('IMPORTANT'))store.dispatch(createNote('combineReducers forms one reducer from many simple reducers'))
ReactDOM.createRoot(document.getElementById('root')).render(
  <Provider store={store}>
    <div />
  </Provider>
)
By simulating the creation of a note and changing the state of the filter in this fashion, the state of the store gets logged to the console after every change that is made to the store:
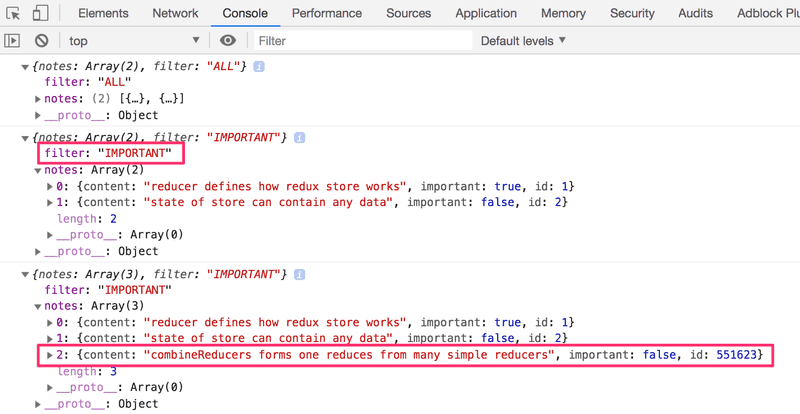
At this point, it is good to become aware of a tiny but important detail. If we add a console log statement to the beginning of both reducers:
const filterReducer = (state = 'ALL', action) => {
  console.log('ACTION: ', action)  // ...
}
Based on the console output one might get the impression that every action gets duplicated:
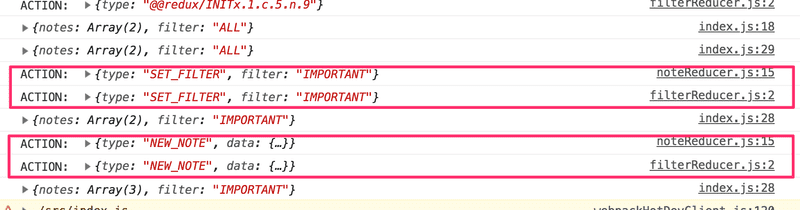
Is there a bug in our code? No. The combined reducer works in such a way that every action gets handled in every part of the combined reducer, or in other words, every reducer "listens" to all of the dispatched actions and does something with them if it has been instructed to do so. Typically only one reducer is interested in any given action, but there are situations where multiple reducers change their respective parts of the state based on the same action.
Finishing the filters
Let's finish the application so that it uses the combined reducer. Let's remove the extra test code from the file main.jsx and restore App as the rendered component. The updated content of the file is as follows:
import ReactDOM from 'react-dom/client'
import { Provider } from 'react-redux'
import { createStore, combineReducers } from 'redux'

import App from './App'
import filterReducer from './reducers/filterReducer'
import noteReducer from './reducers/noteReducer'

const reducer = combineReducers({
  notes: noteReducer,
  filter: filterReducer
})

const store = createStore(reducer)

console.log(store.getState())

ReactDOM.createRoot(document.getElementById('root')).render(
  <Provider store={store}>
    <App />
  </Provider>
)
Next, let's fix a bug that is caused by the code expecting the application store to be an array of notes:
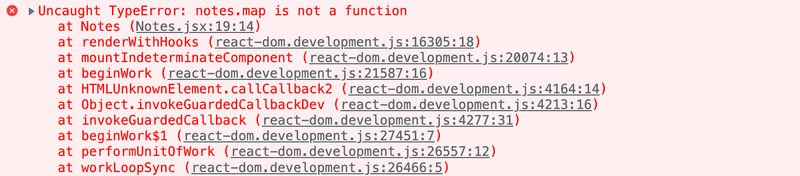
It's an easy fix. Because the notes are in the store's field notes, we only have to make a little change to the selector function:
const Notes = () => {
  const dispatch = useDispatch()
  const notes = useSelector(state => state.notes)
  return(
    <ul>
      {notes.map(note =>
        <Note
          key={note.id}
          note={note}
          handleClick={() =>
            dispatch(toggleImportanceOf(note.id))
          }
        />
      )}
    </ul>
  )
}
Previously the selector function returned the whole state of the store:
const notes = useSelector(state => state)And now it returns only its field notes
const notes = useSelector(state => state.notes)Let's extract the visibility filter into its own src/components/VisibilityFilter.jsx component:
import { useDispatch } from 'react-redux'
import { filterChange } from '../reducers/filterReducer'

const VisibilityFilter = () => {
  const dispatch = useDispatch()

  return (
    <div>
      <input
        type="radio"
        name="filter"
        onChange={() => dispatch(filterChange('ALL'))}
      />
      all
      <input
        type="radio"
        name="filter"
        onChange={() => dispatch(filterChange('IMPORTANT'))}
      />
      important
      <input
        type="radio"
        name="filter"
        onChange={() => dispatch(filterChange('NONIMPORTANT'))}
      />
      nonimportant
    </div>
  )
}

export default VisibilityFilter
With the new component, App can be simplified as follows:
import NoteForm from './components/NoteForm'
import Notes from './components/Notes'
import VisibilityFilter from './components/VisibilityFilter'

const App = () => {
  return (
    <div>
      <NoteForm />
      <VisibilityFilter />
      <Notes />
    </div>
  )
}

export default App
The implementation is rather straightforward. Clicking the different radio buttons changes the state of the store's filter property.
Let's change the Notes component to incorporate the filter:
const Notes = () => {
  const dispatch = useDispatch()
  const notes = useSelector(state => {    if (state.filter === 'ALL') {      return state.notes    }    return state.filter === 'IMPORTANT'      ? state.notes.filter(note => note.important)      : state.notes.filter(note => !note.important)  })
  return (
    <ul>
      {notes.map(note => (
        <Note
          key={note.id}
          note={note}
          handleClick={() => dispatch(toggleImportanceOf(note.id))}
        />
      ))}
    </ul>
  )
}
We only make changes to the selector function, which used to be
useSelector(state => state.notes)Let's simplify the selector by destructuring the fields from the state it receives as a parameter:
const notes = useSelector(({ filter, notes }) => {
  if ( filter === 'ALL' ) {
    return notes
  }
  return filter  === 'IMPORTANT'
    ? notes.filter(note => note.important)
    : notes.filter(note => !note.important)
})
There is a slight cosmetic flaw in our application. Even though the filter is set to ALL by default, the associated radio button is not selected. Naturally, this issue can be fixed, but since this is an unpleasant but ultimately harmless bug we will save the fix for later.
The current version of the application can be found on GitHub, branch part6-2.
Exercise 6.9
6.9 Anecdotes, step 7
Implement filtering for the anecdotes that are displayed to the user.
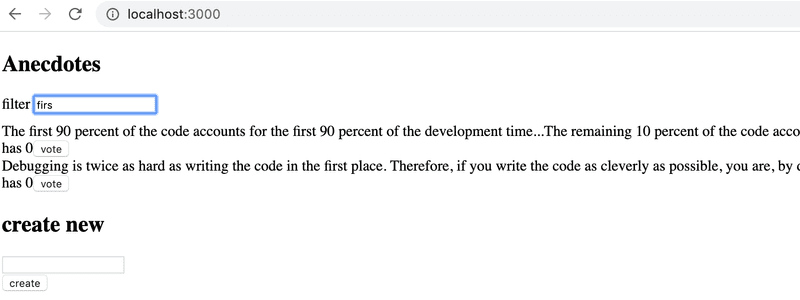
Store the state of the filter in the redux store. It is recommended to create a new reducer, action creators, and a combined reducer for the store using the combineReducers function.
Create a new Filter component for displaying the filter. You can use the following code as a template for the component:
const Filter = () => {
  const handleChange = (event) => {
    // input-field value is in variable event.target.value
  }
  const style = {
    marginBottom: 10
  }

  return (
    <div style={style}>
      filter <input onChange={handleChange} />
    </div>
  )
}

export default Filter
Redux Toolkit and Refactoring the Store Configuration
As we have seen so far, Redux's configuration and state management implementation requires quite a lot of effort. This is manifested for example in the reducer and action creator-related code which has somewhat repetitive boilerplate code. Redux Toolkit is a library that solves these common Redux-related problems. The library for example greatly simplifies the configuration of the Redux store and offers a large variety of tools to ease state management.
Let's start using Redux Toolkit in our application by refactoring the existing code. First, we will need to install the library:
npm install @reduxjs/toolkitNext, open the main.jsx file which currently creates the Redux store. Instead of Redux's createStore function, let's create the store using Redux Toolkit's configureStore function:
import ReactDOM from 'react-dom/client'
import { Provider } from 'react-redux'
import { configureStore } from '@reduxjs/toolkit'
import App from './App'
import filterReducer from './reducers/filterReducer'
import noteReducer from './reducers/noteReducer'

const store = configureStore({  reducer: {    notes: noteReducer,    filter: filterReducer  }})
console.log(store.getState())

ReactDOM.createRoot(document.getElementById('root')).render(
  <Provider store={store}>
    <App />
  </Provider>
)
We already got rid of a few lines of code, now we don't need the combineReducers function to create the store's reducer. We will soon see that the configureStore function has many additional benefits such as the effortless integration of development tools and many commonly used libraries without the need for additional configuration.
Let's further clean up the main.jsx file by moving the code related to the creation of the Redux store into a separate file. Let's create a new file src/store.js:
import { configureStore } from '@reduxjs/toolkit'

import noteReducer from './reducers/noteReducer'
import filterReducer from './reducers/filterReducer'

const store = configureStore({
  reducer: {
    notes: noteReducer,
    filter: filterReducer
  }
})

export default store
After the changes, the content of the main.jsx is the following:
import ReactDOM from 'react-dom/client'
import { Provider } from 'react-redux'

import App from './App'
import store from './store'

ReactDOM.createRoot(document.getElementById('root')).render(
  <Provider store={store}>
    <App />
  </Provider>
)
Redux Toolkit and Refactoring Reducers
Let's move on to refactoring the reducers, which brings forth the benefits of the Redux Toolkit. With Redux Toolkit, we can easily create reducer and related action creators using the createSlice function. We can use the createSlice function to refactor the reducer and action creators in the reducers/noteReducer.js file in the following manner:
import { createSlice } from '@reduxjs/toolkit'
const initialState = [
  {
    content: 'reducer defines how redux store works',
    important: true,
    id: 1,
  },
  {
    content: 'state of store can contain any data',
    important: false,
    id: 2,
  },
]

const generateId = () =>
  Number((Math.random() * 1000000).toFixed(0))

const noteSlice = createSlice({  name: 'notes',  initialState,  reducers: {    createNote(state, action) {      const content = action.payload      state.push({        content,        important: false,        id: generateId(),      })    },    toggleImportanceOf(state, action) {      const id = action.payload      const noteToChange = state.find(n => n.id === id)      const changedNote = {         ...noteToChange,         important: !noteToChange.important       }      return state.map(note =>        note.id !== id ? note : changedNote       )         }  },})
export const { createNote, toggleImportanceOf } = noteSlice.actionsexport default noteSlice.reducer
The createSlice function's name parameter defines the prefix which is used in the action's type values. For example, the createNote action defined later will have the type value of notes/createNote. It is a good practice to give the parameter a value which is unique among the reducers. This way there won't be unexpected collisions between the application's action type values. The initialState parameter defines the reducer's initial state. The reducers parameter takes the reducer itself as an object, of which functions handle state changes caused by certain actions. Note that the action.payload in the function contains the argument provided by calling the action creator:
dispatch(createNote('Redux Toolkit is awesome!'))This dispatch call is equivalent to dispatching the following object:
dispatch({ type: 'notes/createNote', payload: 'Redux Toolkit is awesome!' })If you followed closely, you might have noticed that inside the createNote action, there seems to happen something that violates the reducers' immutability principle mentioned earlier:
createNote(state, action) {
  const content = action.payload

  state.push({
    content,
    important: false,
    id: generateId(),
  })
}
We are mutating state argument's array by calling the push method instead of returning a new instance of the array. What's this all about?
Redux Toolkit utilizes the Immer library with reducers created by createSlice function, which makes it possible to mutate the state argument inside the reducer. Immer uses the mutated state to produce a new, immutable state and thus the state changes remain immutable. Note that state can be changed without "mutating" it, as we have done with the toggleImportanceOf action. In this case, the function directly returns the new state. Nevertheless mutating the state will often come in handy especially when a complex state needs to be updated.
The createSlice function returns an object containing the reducer as well as the action creators defined by the reducers parameter. The reducer can be accessed by the noteSlice.reducer property, whereas the action creators by the noteSlice.actions property. We can produce the file's exports in the following way:
const noteSlice = createSlice({
  // ...
})

export const { createNote, toggleImportanceOf } = noteSlice.actionsexport default noteSlice.reducer
The imports in other files will work just as they did before:
import noteReducer, { createNote, toggleImportanceOf } from './reducers/noteReducer'We need to alter the action type names in the tests due to the conventions of ReduxToolkit:
import deepFreeze from 'deep-freeze'
import { describe, expect, test } from 'vitest'
import noteReducer from './noteReducer'

describe('noteReducer', () => {
  test('returns new state with action notes/createNote', () => {    const state = []
    const action = {
      type: 'notes/createNote',      payload: 'the app state is in redux store'    }

    deepFreeze(state)
    const newState = noteReducer(state, action)

    expect(newState).toHaveLength(1)
    expect(newState.map(note => note.content)).toContainEqual(action.payload)  })
})

test('returns new state with action notes/toggleImportanceOf', () => {  const state = [
    {
      content: 'the app state is in redux store',
      important: true,
      id: 1
    },
    {
      content: 'state changes are made with actions',
      important: false,
      id: 2
    }
  ]

  const action = {
    type: 'notes/toggleImportanceOf',    payload: 2  }

  deepFreeze(state)
  const newState = noteReducer(state, action)

  expect(newState).toHaveLength(2)

  expect(newState).toContainEqual(state[0])

  expect(newState).toContainEqual({
    content: 'state changes are made with actions',
    important: true,
    id: 2
  })
})
You can find the code for our current application in its entirety in the part6-3 branch of this GitHub repository.
Redux Toolkit and console.log
As we have learned, console.log is an extremely powerful tool; it often saves us from trouble.
Let's try to print the state of the Redux Store to the console in the middle of the reducer created with the function createSlice:
const noteSlice = createSlice({
  name: 'notes',
  initialState,
  reducers: {
    // ...
    toggleImportanceOf(state, action) {
      const id = action.payload

      const noteToChange = state.find(n => n.id === id)

      const changedNote = {
        ...noteToChange,
        important: !noteToChange.important
      }

      console.log(state)
      return state.map(note =>
        note.id !== id ? note : changedNote
      )
    }
  },
})
When we now change the importance of a note by clicking its name, the following is printed to the console
The output is interesting but not very useful. This is about the previously mentioned Immer library used by the Redux Toolkit internally to save the state of the Store.
The state can be converted to a human-readable format by using the current function from the immer library. The function can be imported with the following command:
import { current } from '@reduxjs/toolkit'and after this, the state can be printed to the console with the following command:
console.log(current(state))Console output is now human readable
Redux DevTools
Redux DevTools is a Chrome addon that offers useful development tools for Redux. It can be used for example to inspect the Redux store's state and dispatch actions through the browser's console. When the store is created using Redux Toolkit's configureStore function, no additional configuration is needed for Redux DevTools to work.
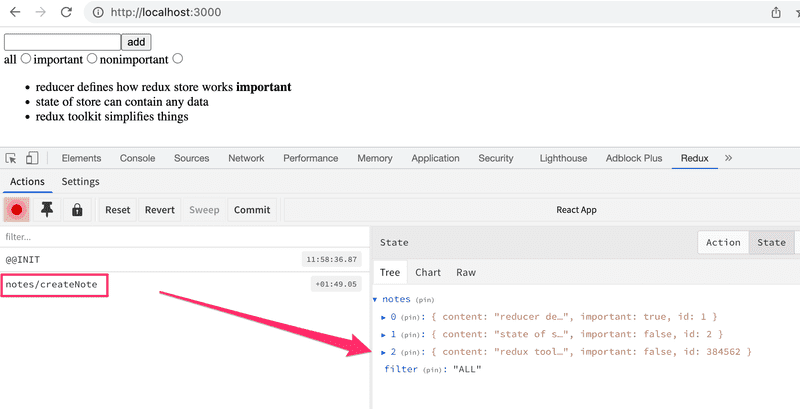
Once the addon is installed, clicking the Redux tab in the browser's developer tools, the Redux DevTools should open:

You can inspect how dispatching a certain action changes the state by clicking the action:
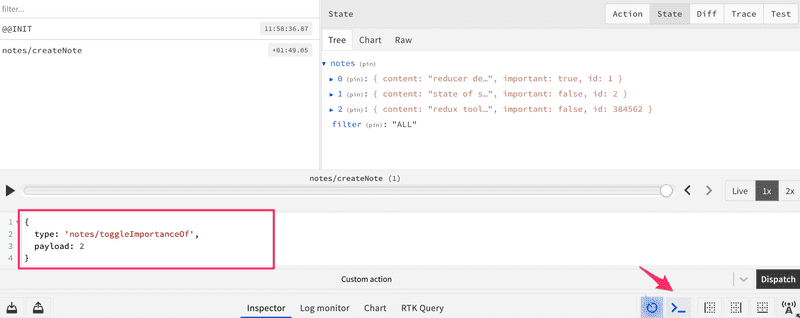
It is also possible to dispatch actions to the store using the development tools:
Exercises 6.10.-6.13.
Let's continue working on the anecdote application using Redux that we started in exercise 6.3.
6.10 Anecdotes, step 8
Install Redux Toolkit for the project. Move the Redux store creation into the file store.js and use Redux Toolkit's configureStore to create the store.
Change the definition of the filter reducer and action creators to use the Redux Toolkit's createSlice function.
Also, start using Redux DevTools to debug the application's state easier.
6.11 Anecdotes, step 9
Change also the definition of the anecdote reducer and action creators to use the Redux Toolkit's createSlice function.
6.12 Anecdotes, step 10
The application has a ready-made body for the Notification component:
const Notification = () => {
  const style = {
    border: 'solid',
    padding: 10,
    borderWidth: 1,
    marginBottom: 10
  }

  return (
    <div style={style}>
      render here notification...
    </div>
  )
}

export default Notification
Extend the component so that it renders the message stored in the Redux store. Create a separate reducer for the new functionality by using the Redux Toolkit's createSlice function.
The application does not have to use the Notification component intelligently at this point in the exercises. It is enough for the application to display the initial value set for the message in the notificationReducer.
6.13 Anecdotes, step 11
Extend the application so that it uses the Notification component to display a message for five seconds when the user votes for an anecdote or creates a new anecdote:
It's recommended to create separate action creators for setting and removing notifications.
Setting up JSON Server
Let's expand the application so that the notes are stored in the backend. We'll use json-server, familiar from part 2.
The initial state of the database is stored in the file db.json, which is placed in the root of the project:
{
  "notes": [
    {
      "content": "the app state is in redux store",
      "important": true,
      "id": 1
    },
    {
      "content": "state changes are made with actions",
      "important": false,
      "id": 2
    }
  ]
}
We'll install json-server for the project:
npm install json-server --save-devand add the following line to the scripts part of the file package.json
"scripts": {
  "server": "json-server -p 3001 db.json",
  // ...
}
Now let's launch json-server with the command npm run server.
Fetch API
In software development, it is often necessary to consider whether a certain functionality should be implemented using an external library or whether it is better to utilize the native solutions provided by the environment. Both approaches have their own advantages and challenges.
In the earlier parts of this course, we used the Axios library to make HTTP requests. Now, let's explore an alternative way to make HTTP requests using the native Fetch API.
It is typical for an external library like Axios to be implemented using other external libraries. For example, if you install Axios in your project with the command npm install axios, the console output will be:
$ npm install axios

added 23 packages, and audited 302 packages in 1s

71 packages are looking for funding
  run `npm fund` for details

found 0 vulnerabilities
So, in addition to the Axios library, the command would install over 20 other npm packages that Axios needs to function.
The Fetch API provides a similar way to make HTTP requests as Axios, but using the Fetch API does not require installing any external libraries. Maintaining the application becomes easier when there are fewer libraries to update, and security is also improved because the potential attack surface of the application is reduced. The security and maintainability of applications is discussed further in part 7 of the course.
In practice, requests are made using the fetch() function. The syntax used differs somewhat from Axios. We will also soon notice that Axios has taken care of some things for us and made our lives easier. However, we will now use the Fetch API, as it is a widely used native solution that every Full Stack developer should be familiar with.
Getting data from the backend
Let's create a method for fetching data from the backend in the file src/services/notes.js:
const baseUrl = 'http://localhost:3001/notes'

const getAll = async () => {
  const response = await fetch(baseUrl)

  if (!response.ok) {
    throw new Error('Failed to fetch notes')
  }

  const data = await response.json()
  return data
}

export default { getAll }
Let's take a closer look at the implementation of the getAll method. The notes are now fetched from the backend by calling the fetch() function, which is given the backend's URL as an argument. The request type is not explicitly defined, so fetch performs its default action, which is a GET request.
Once the response has arrived, the success of the request is checked using the response.ok property, and an error is thrown if necessary:
if (!response.ok) {
  throw new Error('Failed to fetch notes')
}
The response.ok attribute is set to true if the request was successful, meaning the response status code is between 200 and 299. For all other status codes, such as 404 or 500, it is set to false.
Note that fetch does not automatically throw an error even if the response status code is, for example, 404. Error handling must be implemented manually, as we have done here.
If the request is successful, the data contained in the response is converted to JSON format:
const data = await response.json()fetch does not automatically convert any data included in the response to JSON format; the conversion must be done manually. It is also important to note that response.json() is an asynchronous method, so the await keyword is required.
Let's further simplify the code by directly returning the data returned by the response.json() method:
const getAll = async () => {
  const response = await fetch(baseUrl)

  if (!response.ok) {
    throw new Error('Failed to fetch notes')
  }

  return await response.json()}
Initializing the store with data fetched from the server
Let's now modify our application so that the application state is initialized with notes fetched from the server.
In the file noteReducer.js, change the initialization of the notes state so that by default there are no notes:
const noteSlice = createSlice({
  name: 'notes',
  initialState: [],  // ...
})
Let's add an action creator called setNotes, which allows us to directly replace the array of notes. We can create the desired action creator using the createSlice function as follows:
// ...

const noteSlice = createSlice({
  name: 'notes',
  initialState: [],
  reducers: {
    createNote(state, action) {
      const content = action.payload
      state.push({
        content,
        important: false,
        id: generateId()
      })
    },
    toggleImportanceOf(state, action) {
      const id = action.payload
      const noteToChange = state.find(n => n.id === id)
      const changedNote = {
        ...noteToChange,
        important: !noteToChange.important
      }
      return state.map(note => (note.id !== id ? note : changedNote))
    },
    setNotes(state, action) {      return action.payload    }  }
})

export const { createNote, toggleImportanceOf, setNotes } = noteSlice.actionsexport default noteSlice.reducer
Let's implement the initialization of notes in the App component. As is usually the case when fetching data from a server, we will use the useEffect hook:
import { useEffect } from 'react'import { useDispatch } from 'react-redux'
import NoteForm from './components/NoteForm'
import Notes from './components/Notes'
import VisibilityFilter from './components/VisibilityFilter'
import { setNotes } from './reducers/noteReducer'import noteService from './services/notes'
const App = () => {
  const dispatch = useDispatch()
  useEffect(() => {    noteService.getAll().then(notes => dispatch(setNotes(notes)))  }, [dispatch])
  return (
    <div>
      <NoteForm />
      <VisibilityFilter />
      <Notes />
    </div>
  )
}

export default App
The notes are fetched from the server using the getAll() method we defined, and then stored in the Redux store by dispatching the action returned by the setNotes action creator. These operations are performed inside the useEffect hook, meaning they are executed when the App component is rendered for the first time.
Let's take a closer look at a small detail. We have added the dispatch variable to the dependency array of the useEffect hook. If we try to use an empty dependency array, ESLint gives the following warning: React Hook useEffect has a missing dependency: 'dispatch'. What does this mean?
Logically, the code would work exactly the same even if we used an empty dependency array, because dispatch refers to the same function throughout the execution of the program. However, it is considered good programming practice to add all variables and functions used inside the useEffect hook that are defined within the component to the dependency array. This helps to avoid unexpected bugs.
Sending data to the backend
Next, let's implement the functionality for sending a new note to the server. This will also give us an opportunity to practice how to make a POST request using the fetch() method.
Let's extend the code in src/services/notes.js that handles communication with the server as follows:
const baseUrl = 'http://localhost:3001/notes'

const getAll = async () => {
  const response = await fetch(baseUrl)

  if (!response.ok) {
    throw new Error('Failed to fetch notes')
  }

  return await response.json()
}

const createNew = async (content) => {  const response = await fetch(baseUrl, {    method: 'POST',    headers: { 'Content-Type': 'application/json' },    body: JSON.stringify({ content, important: false }),  })    if (!response.ok) {    throw new Error('Failed to create note')  }    return await response.json()}
export default { getAll, createNew }
Let's take a closer look at the implementation of the createNew method. The first parameter of the fetch() function specifies the URL to which the request is made. The second parameter is an object that defines other details of the request, such as the request type, headers, and the data sent with the request. We can further clarify the code by storing the object that defines the request details in a separate options variable:
const createNew = async (content) => {
  const options = {    method: 'POST',    headers: { 'Content-Type': 'application/json' },    body: JSON.stringify({ content, important: false }),  }    const response = await fetch(baseUrl, options)
  if (!response.ok) {
    throw new Error('Failed to create note')
  }

  return await response.json()
}
Let's take a closer look at the options object:
- method defines the type of the request, which in this case is POST
- headers defines the request headers. We add the header 'Content-Type': 'application/json' to let the server know that the data sent with the request is in JSON format, so it can handle the request correctly
- body contains the data sent with the request. You cannot directly assign a JavaScript object to this field; it must first be converted to a JSON string by calling the JSON.stringify() function
As with a GET request, the response status code is checked for errors:
if (!response.ok) {
  throw new Error('Failed to create note')
}
If the request is successful, JSON Server returns the newly created note, for which it has also generated a unique id. However, the data contained in the response still needs to be converted to JSON format using the response.json() method:
return await response.json()Let's then modify our application's NoteForm component so that a new note is sent to the backend. The component's addNote method will change slightly:
import { useDispatch } from 'react-redux'
import { createNote } from '../reducers/noteReducer'
import noteService from '../services/notes'
const NoteForm = (props) => {
  const dispatch = useDispatch()

  const addNote = async (event) => {    event.preventDefault()
    const content = event.target.note.value
    event.target.note.value = ''
    const newNote = await noteService.createNew(content)    dispatch(createNote(newNote))  }

  return (
    <form onSubmit={addNote}>
      <input name="note" />
      <button type="submit">add</button>
    </form>
  )
}

export default NoteForm
When a new note is created in the backend by calling the createNew() method, the return value is an object representing the note, to which the backend has generated a unique id. Therefore, let's modify the action creator createNote defined in notesReducer.js as follows:
const noteSlice = createSlice({
  name: 'notes',
  initialState: [],
  reducers: {
    createNote(state, action) {
      state.push(action.payload)    },
    // ..
  },
})
Changing the importance of notes could be implemented using the same principle, by making an asynchronous method call to the server and then dispatching an appropriate action.
The current state of the code for the application can be found on GitHub in the branch part6-4.
Asynchronous actions and Redux Thunk
Our approach is quite good, but it is not great that the communication with the server happens inside the functions of the components. It would be better if the communication could be abstracted away from the components so that they don't have to do anything else but call the appropriate action creator. As an example, App would initialize the state of the application as follows:
const App = () => {
  const dispatch = useDispatch()

  useEffect(() => {
    dispatch(initializeNotes())
  }, [dispatch])

  // ...
}
and NoteForm would create a new note as follows:
const NoteForm = () => {
  const dispatch = useDispatch()

  const addNote = async (event) => {
    event.preventDefault()
    const content = event.target.note.value
    event.target.note.value = ''
    dispatch(createNote(content))
  }

  // ...
}
In this implementation, both components would dispatch an action without the need to know about the communication with the server that happens behind the scenes. These kinds of async actions can be implemented using the Redux Thunk library. The use of the library doesn't need any additional configuration or even installation when the Redux store is created using the Redux Toolkit's configureStore function.
Thanks to Redux Thunk, it is possible to define action creators that return a function instead of an object. This makes it possible to implement asynchronous action creators that first wait for some asynchronous operation to complete and only then dispatch the actual action.
If an action creator returns a function, Redux automatically passes the Redux store's dispatch and getState methods as arguments to the returned function. This allows us to define an action creator called initializeNotes in the noteReducer.js file, which fetches the initial notes from the server, as follows:
import { createSlice } from '@reduxjs/toolkit'
import noteService from '../services/notes'
const noteSlice = createSlice({
  name: 'notes',
  initialState: [],
  reducers: {
    createNote(state, action) {
      state.push(action.payload)
    },
    toggleImportanceOf(state, action) {
      const id = action.payload
      const noteToChange = state.find((n) => n.id === id)
      const changedNote = {
        ...noteToChange,
        important: !noteToChange.important,
      }
      return state.map((note) => (note.id !== id ? note : changedNote))
    },
    setNotes(state, action) {
      return action.payload
    },
  },
})

const { setNotes } = noteSlice.actions
export const initializeNotes = () => {  return async (dispatch) => {    const notes = await noteService.getAll()    dispatch(setNotes(notes))  }}
export const { createNote, toggleImportanceOf } = noteSlice.actions
export default noteSlice.reducer
In its inner function, that is, in the asynchronous action, the operation first fetches all notes from the server and then dispatches the action to add the notes to the store. It is noteworthy that Redux automatically passes a reference to the dispatch method as an argument to the function, so the action creator initializeNotes does not require any parameters.
The action creator setNotes is no longer exported outside the module, since the initial state of the notes will now be set using the asynchronous action creator initializeNotes we created. However, we still use the setNotes action creator within the module.
The component App can now be defined as follows:
import { useEffect } from 'react'
import { useDispatch } from 'react-redux'

import NoteForm from './components/NoteForm'
import Notes from './components/Notes'
import VisibilityFilter from './components/VisibilityFilter'
import { initializeNotes } from './reducers/noteReducer'
const App = () => {
  const dispatch = useDispatch()

  useEffect(() => {
    dispatch(initializeNotes())  }, [dispatch])

  return (
    <div>
      <NoteForm />
      <VisibilityFilter />
      <Notes />
    </div>
  )
}

export default App
The solution is elegant. The initialization logic for the notes has been completely separated from the React component.
Next, let's create an asynchronous action creator called appendNote:
import { createSlice } from '@reduxjs/toolkit'
import noteService from '../services/notes'

const noteSlice = createSlice({
  name: 'notes',
  initialState: [],
  reducers: {
    createNote(state, action) {
      state.push(action.payload)
    },
    toggleImportanceOf(state, action) {
      const id = action.payload
      const noteToChange = state.find((n) => n.id === id)
      const changedNote = {
        ...noteToChange,
        important: !noteToChange.important,
      }
      return state.map((note) => (note.id !== id ? note : changedNote))
    },
    setNotes(state, action) {
      return action.payload
    },
  },
})

const { createNote, setNotes } = noteSlice.actions
export const initializeNotes = () => {
  return async (dispatch) => {
    const notes = await noteService.getAll()
    dispatch(setNotes(notes))
  }
}

export const appendNote = (content) => {  return async (dispatch) => {    const newNote = await noteService.createNew(content)    dispatch(createNote(newNote))  }}
export const { toggleImportanceOf } = noteSlice.actions
export default noteSlice.reducer
The principle is the same once again. First, an asynchronous operation is performed, and once it is completed, an action that updates the store's state is dispatched. The createNote action creator is no longer exported outside the file; it is used only internally in the implementation of the appendNote function.
The component NoteForm changes as follows:
import { useDispatch } from 'react-redux'
import { appendNote } from '../reducers/noteReducer'
const NoteForm = () => {
  const dispatch = useDispatch()

  const addNote = async (event) => {
    event.preventDefault()
    const content = event.target.note.value
    event.target.note.value = ''
    dispatch(appendNote(content))  }

  return (
    <form onSubmit={addNote}>
      <input name="note" />
      <button type="submit">add</button>
    </form>
  )
}
The current state of the code for the application can be found on GitHub in the branch part6-5.
Redux Toolkit offers a multitude of tools to simplify asynchronous state management. Suitable tools for this use case are for example the createAsyncThunk function and the RTK Query API.