c
Getting data from server
For a while now we have only been working on "frontend", i.e. client-side (browser) functionality. We will begin working on "backend", i.e. server-side functionality in the third part of this course. Nonetheless, we will now take a step in that direction by familiarizing ourselves with how the code executing in the browser communicates with the backend.
Let's use a tool meant to be used during software development called JSON Server to act as our server.
Create a file named db.json in the root directory of the previous notes project with the following content:
{
  "notes": [
    {
      "id": "1",
      "content": "HTML is easy",
      "important": true
    },
    {
      "id": "2",
      "content": "Browser can execute only JavaScript",
      "important": false
    },
    {
      "id": "3",
      "content": "GET and POST are the most important methods of HTTP protocol",
      "important": true
    }
  ]
}
You can start the JSON Server without a separate installation by running the following npx command in the root directory of the application:
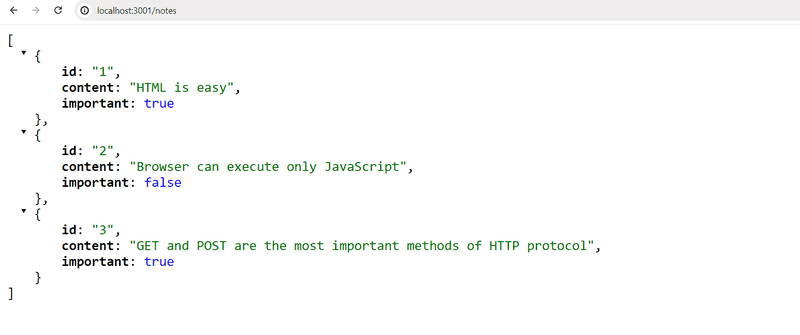
npx json-server --port 3001 db.jsonThe JSON Server starts running on port 3000 by default, but we will now define an alternate port 3001. Let's navigate to the address http://localhost:3001/notes in the browser. We can see that JSON Server serves the notes we previously wrote to the file in JSON format:
If your browser doesn't have a way to format the display of JSON-data, then install an appropriate plugin, e.g. JSONView to make your life easier.
Going forward, the idea will be to save the notes to the server, which in this case means saving them to the json-server. The React code fetches the notes from the server and renders them to the screen. Whenever a new note is added to the application, the React code also sends it to the server to make the new note persist in "memory".
json-server stores all the data in the db.json file, which resides on the server. In the real world, data would be stored in some kind of database. However, json-server is a handy tool that enables the use of server-side functionality in the development phase without the need to program any of it.
We will get familiar with the principles of implementing server-side functionality in more detail in part 3 of this course.
The browser as a runtime environment
Our first task is fetching the already existing notes to our React application from the address http://localhost:3001/notes.
In the part0 example project, we already learned a way to fetch data from a server using JavaScript. The code in the example was fetching the data using XMLHttpRequest, otherwise known as an HTTP request made using an XHR object. This is a technique introduced in 1999, which every browser has supported for a good while now.
The use of XHR is no longer recommended, and browsers already widely support the fetch method, which is based on so-called promises, instead of the event-driven model used by XHR.
As a reminder from part0 (which one should remember to not use without a pressing reason), data was fetched using XHR in the following way:
const xhttp = new XMLHttpRequest()

xhttp.onreadystatechange = function() {
  if (this.readyState == 4 && this.status == 200) {
    const data = JSON.parse(this.responseText)
    // handle the response that is saved in variable data
  }
}

xhttp.open('GET', '/data.json', true)
xhttp.send()
Right at the beginning, we register an event handler to the xhttp object representing the HTTP request, which will be called by the JavaScript runtime whenever the state of the xhttp object changes. If the change in state means that the response to the request has arrived, then the data is handled accordingly.
It is worth noting that the code in the event handler is defined before the request is sent to the server. Despite this, the code within the event handler will be executed at a later point in time. Therefore, the code does not execute synchronously "from top to bottom", but does so asynchronously. JavaScript calls the event handler that was registered for the request at some point.
A synchronous way of making requests that's common in Java programming, for instance, would play out as follows (NB, this is not actually working Java code):
HTTPRequest request = new HTTPRequest();

String url = "https://studies.cs.helsinki.fi/exampleapp/data.json";
List<Note> notes = request.get(url);

notes.forEach(m => {
  System.out.println(m.content);
});
In Java, the code executes line by line and stops to wait for the HTTP request, which means waiting for the command request.get(...) to finish. The data returned by the command, in this case the notes, are then stored in a variable, and we begin manipulating the data in the desired manner.
In contrast, JavaScript engines, or runtime environments follow the asynchronous model. In principle, this requires all IO operations (with some exceptions) to be executed as non-blocking. This means that code execution continues immediately after calling an IO function, without waiting for it to return.
When an asynchronous operation is completed, or, more specifically, at some point after its completion, the JavaScript engine calls the event handlers registered to the operation.
Currently, JavaScript engines are single-threaded, which means that they cannot execute code in parallel. As a result, it is a requirement in practice to use a non-blocking model for executing IO operations. Otherwise, the browser would "freeze" during, for instance, the fetching of data from a server.
One consequence of JavaScript engines being single-threaded is that if code execution takes a long time, the browser becomes unresponsive for the duration of the execution. If the following code is added to the beginning of the App component:
const App = (props) => {
  const [notes, setNotes] = useState(props.notes)
  const [newNote, setNewNote] = useState('')
  const [showAll, setShowAll] = useState(true)

  setTimeout(() => {    console.log('loop..')    let i = 0    while (i < 99999999999) {      i++    }    console.log('end')  }, 5000)
  // ...
}
everything works normally for five seconds. When the function defined as the parameter of setTimeout is executed, the browser page becomes unresponsive for the duration of the long loop. The page freezes completely, meaning you cannot click its buttons or use any other functionality.
For the browser to remain responsive, i.e., to be able to continuously react to user operations with sufficient speed, the code logic needs to be such that no single computation can take too long.
There is a host of additional material on the subject to be found on the internet. One particularly clear presentation of the topic is the keynote by Philip Roberts called What the heck is the event loop anyway?
In today's browsers, it is possible to run parallelized code with the help of so-called web workers. The event loop of an individual browser window is, however, still only handled by a single thread.
npm
Let's get back to the topic of fetching data from the server.
We could use the previously mentioned promise-based function fetch to pull the data from the server. Fetch is a great tool. It is standardized and supported by all modern browsers (excluding IE).
That being said, we will be using the axios library instead for communication between the browser and server. It functions like fetch but is somewhat more pleasant to use. Another good reason to use Axios is that it helps us get familiar with adding external libraries, or npm packages, to React projects.
Nowadays, practically all JavaScript projects are defined using the node package manager, aka npm. The projects created using Vite also follow the npm format. A clear indicator that a project uses npm is the package.json file located at the root of the project:
{
  "name": "part2-notes-frontend",
  "private": true,
  "version": "0.0.0",
  "type": "module",
  "scripts": {
    "dev": "vite",
    "build": "vite build",
    "lint": "eslint .",
    "preview": "vite preview"
  },
  "dependencies": {
    "react": "^18.3.1",
    "react-dom": "^18.3.1"
  },
  "devDependencies": {
    "@eslint/js": "^9.17.0",
    "@types/react": "^18.3.18",
    "@types/react-dom": "^18.3.5",
    "@vitejs/plugin-react": "^4.3.4",
    "eslint": "^9.17.0",
    "eslint-plugin-react": "^7.37.2",
    "eslint-plugin-react-hooks": "^5.0.0",
    "eslint-plugin-react-refresh": "^0.4.16",
    "globals": "^15.14.0",
    "vite": "^6.0.5"
  }
}
At this point, the dependencies part is of most interest to us as it defines what dependencies, or external libraries, the project has.
We now want to use axios. Theoretically, we could define the library directly in the package.json file, but it is better to install it from the command line.
npm install axiosNB npm-commands should always be run in the project root directory, which is where the package.json file can be found.
Axios is now included among the other dependencies:
{
  "name": "part2-notes-frontend",
  "private": true,
  "version": "0.0.0",
  "type": "module",
  "scripts": {
    "dev": "vite",
    "build": "vite build",
    "lint": "eslint .",
    "preview": "vite preview"
  },
  "dependencies": {
    "axios": "^1.7.9",    "react": "^18.3.1",
    "react-dom": "^18.3.1"
  },
  // ...
}
In addition to adding axios to the dependencies, the npm install command also downloaded the library code. As with other dependencies, the code can be found in the node_modules directory located in the root. As one might have noticed, node_modules contains a fair amount of interesting stuff.
Let's make another addition. Install json-server as a development dependency (only used during development) by executing the command:
npm install json-server --save-devand making a small addition to the scripts part of the package.json file:
{
  // ...
  "scripts": {
    "dev": "vite",
    "build": "vite build",
    "lint": "eslint .",
    "preview": "vite preview",
    "server": "json-server -p 3001 db.json"  },
}
We can now conveniently, without parameter definitions, start the json-server from the project root directory with the command:
npm run serverWe will get more familiar with the npm tool in the third part of the course.
NB The previously started json-server must be terminated before starting a new one; otherwise, there will be trouble:
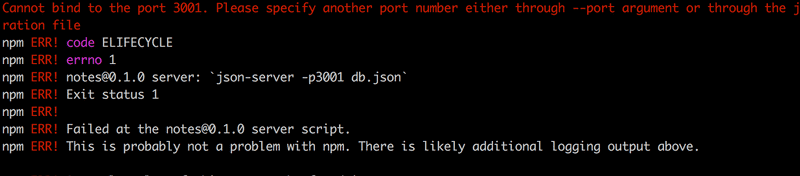
The red print in the error message informs us about the issue:
Cannot bind to port 3001. Please specify another port number either through --port argument or through the json-server.json configuration file
As we can see, the application is not able to bind itself to the port. The reason being that port 3001 is already occupied by the previously started json-server.
We used the command npm install twice, but with slight differences:
npm install axios
npm install json-server --save-dev
There is a fine difference in the parameters. axios is installed as a runtime dependency of the application because the execution of the program requires the existence of the library. On the other hand, json-server was installed as a development dependency (--save-dev), since the program itself doesn't require it. It is used for assistance during software development. There will be more on different dependencies in the next part of the course.
Axios and promises
Now we are ready to use Axios. Going forward, json-server is assumed to be running on port 3001.
NB: To run json-server and your react app simultaneously, you may need to use two terminal windows. One to keep json-server running and the other to run our React application.
The library can be brought into use the same way other libraries, i.e., by using an appropriate import statement.
Add the following to the file main.jsx:
import axios from 'axios'
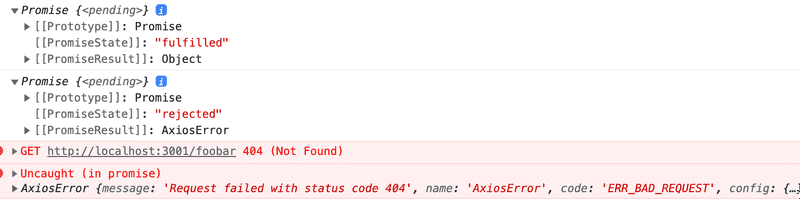
const promise = axios.get('http://localhost:3001/notes')
console.log(promise)
const promise2 = axios.get('http://localhost:3001/foobar')
console.log(promise2)If you open http://localhost:5173/ in the browser, this should be printed to the console
Axios' method get returns a promise.
The documentation on Mozilla's site states the following about promises:
A Promise is an object representing the eventual completion or failure of an asynchronous operation.
In other words, a promise is an object that represents an asynchronous operation. A promise can have three distinct states:
- The promise is pending: It means that the asynchronous operation corresponding to the promise has not yet finished and the final value is not available yet.
- The promise is fulfilled: It means that the operation has been completed and the final value is available, which generally is a successful operation.
- The promise is rejected: It means that an error prevented the final value from being determined, which generally represents a failed operation.
There are many details related to promises, but understanding these three states is sufficient for us for now. If you want, you can read more about promises in Mozilla's documentation.
The first promise in our example is fulfilled, representing a successful axios.get('http://localhost:3001/notes') request. The second one, however, is rejected, and the console tells us the reason. It looks like we were trying to make an HTTP GET request to a non-existent address.
If, and when, we want to access the result of the operation represented by the promise, we must register an event handler to the promise. This is achieved using the method then:
const promise = axios.get('http://localhost:3001/notes')

promise.then(response => {
  console.log(response)
})
The following is printed to the console:
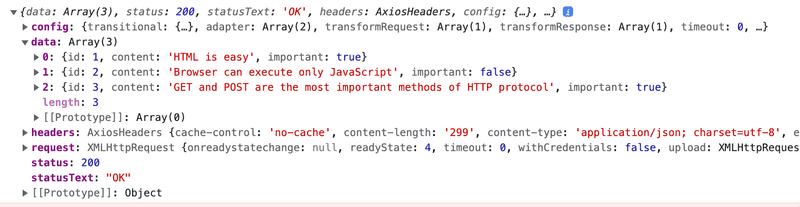
The JavaScript runtime environment calls the callback function registered by the then method providing it with a response object as a parameter. The response object contains all the essential data related to the response of an HTTP GET request, which would include the returned data, status code, and headers.
Storing the promise object in a variable is generally unnecessary, and it's instead common to chain the then method call to the axios method call, so that it follows it directly:
axios.get('http://localhost:3001/notes').then(response => {
  const notes = response.data
  console.log(notes)
})
The callback function now takes the data contained within the response, stores it in a variable, and prints the notes to the console.
A more readable way to format chained method calls is to place each call on its own line:
axios
  .get('http://localhost:3001/notes')
  .then(response => {
    const notes = response.data
    console.log(notes)
  })
The data returned by the server is plain text, basically just one long string. The axios library is still able to parse the data into a JavaScript array, since the server has specified that the data format is application/json; charset=utf-8 (see the previous image) using the content-type header.
We can finally begin using the data fetched from the server.
Let's try and request the notes from our local server and render them, initially as the App component. Please note that this approach has many issues, as we're rendering the entire App component only when we successfully retrieve a response:
import ReactDOM from 'react-dom/client'
import axios from 'axios'
import App from './App'

axios.get('http://localhost:3001/notes').then(response => {
  const notes = response.data
  ReactDOM.createRoot(document.getElementById('root')).render(<App notes={notes} />)
})
This method could be acceptable in some circumstances, but it's somewhat problematic. Let's instead move the fetching of the data into the App component.
What's not immediately obvious, however, is where the command axios.get should be placed within the component.
Effect-hooks
We have already used state hooks that were introduced along with React version 16.8.0, which provide state to React components defined as functions - the so-called functional components. Version 16.8.0 also introduces effect hooks as a new feature. As per the official docs:
Effects let a component connect to and synchronize with external systems. This includes dealing with network, browser DOM, animations, widgets written using a different UI library, and other non-React code.
As such, effect hooks are precisely the right tool to use when fetching data from a server.
Let's remove the fetching of data from main.jsx. Since we're going to be retrieving the notes from the server, there is no longer a need to pass data as props to the App component. So main.jsx can be simplified to:
import ReactDOM from "react-dom/client";
import App from "./App";

ReactDOM.createRoot(document.getElementById("root")).render(<App />);
The App component changes as follows:
import { useState, useEffect } from 'react'import axios from 'axios'import Note from './components/Note'

const App = () => {  const [notes, setNotes] = useState([])  const [newNote, setNewNote] = useState('')
  const [showAll, setShowAll] = useState(true)

  useEffect(() => {    console.log('effect')    axios      .get('http://localhost:3001/notes')      .then(response => {        console.log('promise fulfilled')        setNotes(response.data)      })  }, [])  console.log('render', notes.length, 'notes')
  // ...
}
We have also added a few helpful prints, which clarify the progression of the execution.
This is printed to the console:
render 0 notes
effect
promise fulfilled
render 3 notes
First, the body of the function defining the component is executed and the component is rendered for the first time. At this point render 0 notes is printed, meaning data hasn't been fetched from the server yet.
The following function, or effect in React parlance:
() => {
  console.log('effect')
  axios
    .get('http://localhost:3001/notes')
    .then(response => {
      console.log('promise fulfilled')
      setNotes(response.data)
    })
}
is executed immediately after rendering. The execution of the function results in effect being printed to the console, and the command axios.get initiates the fetching of data from the server as well as registers the following function as an event handler for the operation:
response => {
  console.log('promise fulfilled')
  setNotes(response.data)
})
When data arrives from the server, the JavaScript runtime calls the function registered as the event handler, which prints promise fulfilled to the console and stores the notes received from the server into the state using the function setNotes(response.data).
As always, a call to a state-updating function triggers the re-rendering of the component. As a result, render 3 notes is printed to the console, and the notes fetched from the server are rendered to the screen.
Finally, let's take a look at the definition of the effect hook as a whole:
useEffect(() => {
  console.log('effect')
  axios
    .get('http://localhost:3001/notes').then(response => {
      console.log('promise fulfilled')
      setNotes(response.data)
    })
}, [])
Let's rewrite the code a bit differently.
const hook = () => {
  console.log('effect')
  axios
    .get('http://localhost:3001/notes')
    .then(response => {
      console.log('promise fulfilled')
      setNotes(response.data)
    })
}

useEffect(hook, [])
Now we can see more clearly that the function useEffect takes two parameters. The first is a function, the effect itself. According to the documentation:
By default, effects run after every completed render, but you can choose to fire it only when certain values have changed.
So by default, the effect is always run after the component has been rendered. In our case, however, we only want to execute the effect along with the first render.
The second parameter of useEffect is used to specify how often the effect is run. If the second parameter is an empty array [], then the effect is only run along with the first render of the component.
There are many possible use cases for an effect hook other than fetching data from the server. However, this use is sufficient for us, for now.
Think back to the sequence of events we just discussed. Which parts of the code are run? In what order? How often? Understanding the order of events is critical!
Note that we could have also written the code for the effect function this way:
useEffect(() => {
  console.log('effect')

  const eventHandler = response => {
    console.log('promise fulfilled')
    setNotes(response.data)
  }

  const promise = axios.get('http://localhost:3001/notes')
  promise.then(eventHandler)
}, [])
A reference to an event handler function is assigned to the variable eventHandler. The promise returned by the get method of Axios is stored in the variable promise. The registration of the callback happens by giving the eventHandler variable, referring to the event-handler function, as an argument to the then method of the promise. It isn't usually necessary to assign functions and promises to variables, and a more compact way of representing things, as seen below, is sufficient.
useEffect(() => {
  console.log('effect')
  axios
    .get('http://localhost:3001/notes')
    .then(response => {
      console.log('promise fulfilled')
      setNotes(response.data)
    })
}, [])
We still have a problem with our application. When adding new notes, they are not stored on the server.
The code for the application, as described so far, can be found in full on github, on branch part2-4.
The development runtime environment
The configuration for the whole application has steadily grown more complex. Let's review what happens and where. The following image describes the makeup of the application
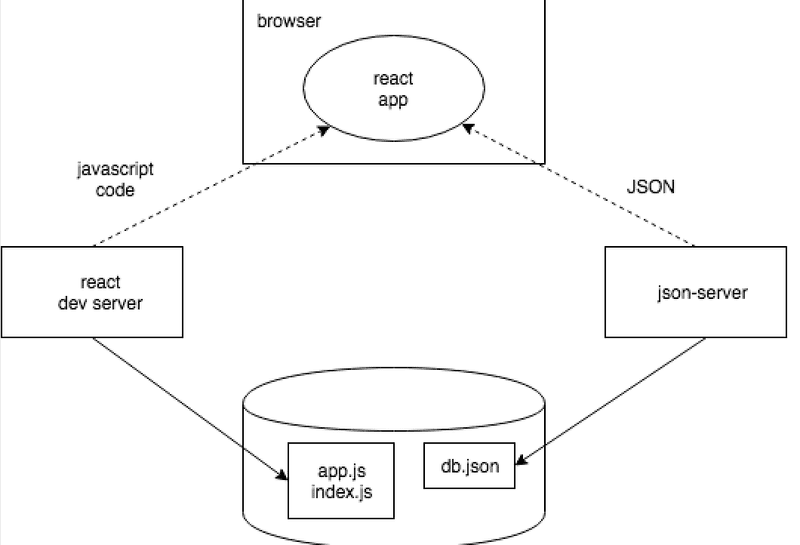
The JavaScript code making up our React application is run in the browser. The browser gets the JavaScript from the React dev server, which is the application that runs after running the command npm run dev. The dev-server transforms the JavaScript into a format understood by the browser. Among other things, it stitches together JavaScript from different files into one file. We'll discuss the dev-server in more detail in part 7 of the course.
The React application running in the browser fetches the JSON formatted data from json-server running on port 3001 on the machine. The server we query the data from - json-server - gets its data from the file db.json.
At this point in development, all the parts of the application happen to reside on the software developer's machine, otherwise known as localhost. The situation changes when the application is deployed to the internet. We will do this in part 3.