d
Altering data in server
When creating notes in our application, we would naturally want to store them in some backend server. The json-server package claims to be a so-called REST or RESTful API in its documentation:
Get a full fake REST API with zero coding in less than 30 seconds (seriously)
The json-server does not exactly match the description provided by the textbook definition of a REST API, but neither do most other APIs claiming to be RESTful.
We will take a closer look at REST in the next part of the course. But it's important to familiarize ourselves at this point with some of the conventions used by json-server and REST APIs in general. In particular, we will be taking a look at the conventional use of routes, aka URLs and HTTP request types, in REST.
REST
In REST terminology, we refer to individual data objects, such as the notes in our application, as resources. Every resource has a unique address associated with it - its URL. According to a general convention used by json-server, we would be able to locate an individual note at the resource URL notes/3, where 3 is the id of the resource. The notes URL, on the other hand, would point to a resource collection containing all the notes.
Resources are fetched from the server with HTTP GET requests. For instance, an HTTP GET request to the URL notes/3 will return the note that has the id number 3. An HTTP GET request to the notes URL would return a list of all notes.
Creating a new resource for storing a note is done by making an HTTP POST request to the notes URL according to the REST convention that the json-server adheres to. The data for the new note resource is sent in the body of the request.
json-server requires all data to be sent in JSON format. What this means in practice is that the data must be a correctly formatted string and that the request must contain the Content-Type request header with the value application/json.
Sending Data to the Server
Let's make the following changes to the event handler responsible for creating a new note:
const addNote = event => {
  event.preventDefault()
  const noteObject = {
    content: newNote,
    important: Math.random() < 0.5,
  }

  axios    .post('http://localhost:3001/notes', noteObject)    .then(response => {      console.log(response)    })}
We create a new object for the note but omit the id property since it's better to let the server generate ids for our resources.
The object is sent to the server using the axios post method. The registered event handler logs the response that is sent back from the server to the console.
When we try to create a new note, the following output pops up in the console:

The newly created note resource is stored in the value of the data property of the response object.
Quite often it is useful to inspect HTTP requests in the Network tab of Chrome developer tools, which was used heavily at the beginning of part 0.
We can use the inspector to check that the headers sent in the POST request are what we expected them to be:
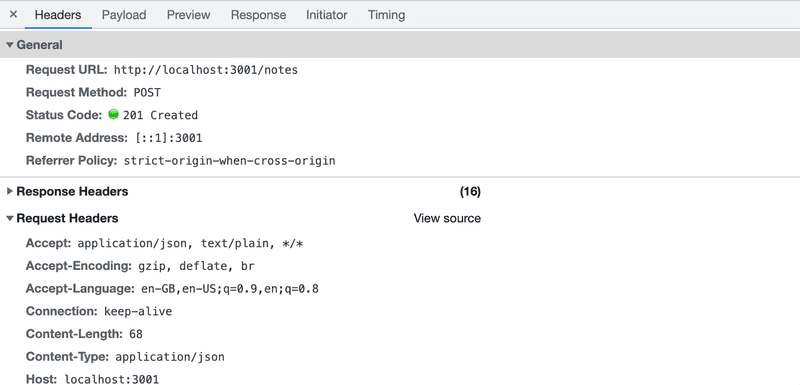
Since the data we sent in the POST request was a JavaScript object, axios automatically knew to set the appropriate application/json value for the Content-Type header.
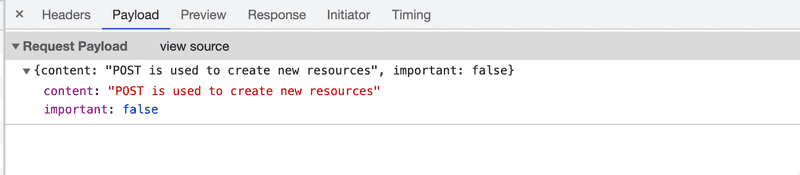
The tab payload can be used to check the request data:
Also the tab response is useful, it shows what was the data the server responded with:

The new note is not rendered to the screen yet. This is because we did not update the state of the App component when we created it. Let's fix this:
const addNote = event => {
  event.preventDefault()
  const noteObject = {
    content: newNote,
    important: Math.random() > 0.5,
  }

  axios
    .post('http://localhost:3001/notes', noteObject)
    .then(response => {
      setNotes(notes.concat(response.data))      setNewNote('')    })
}
The new note returned by the backend server is added to the list of notes in our application's state in the customary way of using the setNotes function and then resetting the note creation form. An important detail to remember is that the concat method does not change the component's original state, but instead creates a new copy of the list.
Once the data returned by the server starts to have an effect on the behavior of our web applications, we are immediately faced with a whole new set of challenges arising from, for instance, the asynchronicity of communication. This necessitates new debugging strategies, console logging and other means of debugging become increasingly more important. We must also develop a sufficient understanding of the principles of both the JavaScript runtime and React components. Guessing won't be enough.
It's beneficial to inspect the state of the backend server, e.g. through the browser:
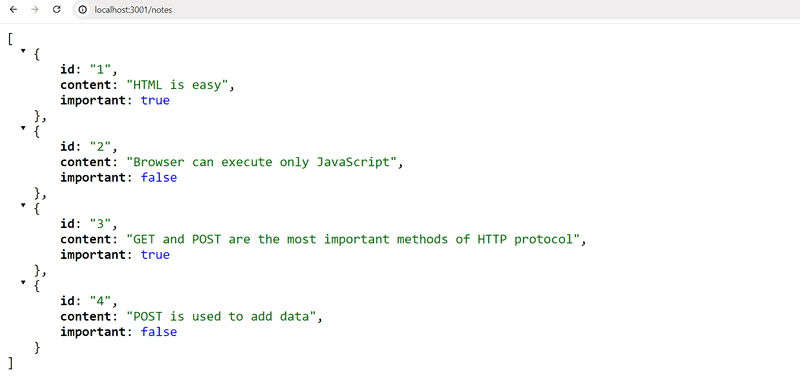
This makes it possible to verify that all the data we intended to send was actually received by the server.
In the next part of the course, we will learn to implement our own logic in the backend. We will then take a closer look at tools like Postman that helps us to debug our server applications. However, inspecting the state of the json-server through the browser is sufficient for our current needs.
The code for the current state of our application can be found in the part2-5 branch on GitHub.
Changing the Importance of Notes
Let's add a button to every note that can be used for toggling its importance.
We make the following changes to the Note component:
const Note = ({ note, toggleImportance }) => {
  const label = note.important
    ? 'make not important' : 'make important'

  return (
    <li>
      {note.content}
      <button onClick={toggleImportance}>{label}</button>
    </li>
  )
}
We add a button to the component and assign its event handler as the toggleImportance function passed in the component's props.
The App component defines an initial version of the toggleImportanceOf event handler function and passes it to every Note component:
const App = () => {
  const [notes, setNotes] = useState([])
  const [newNote, setNewNote] = useState('')
  const [showAll, setShowAll] = useState(true)

  // ...

  const toggleImportanceOf = (id) => {    console.log('importance of ' + id + ' needs to be toggled')  }
  // ...

  return (
    <div>
      <h1>Notes</h1>
      <div>
        <button onClick={() => setShowAll(!showAll)}>
          show {showAll ? 'important' : 'all' }
        </button>
      </div>
      <ul>
        {notesToShow.map(note =>
          <Note
            key={note.id}
            note={note}
            toggleImportance={() => toggleImportanceOf(note.id)}          />
        )}
      </ul>
      // ...
    </div>
  )
}
Notice how every note receives its own unique event handler function since the id of every note is unique.
E.g., if note.id is 3, the event handler function returned by toggleImportance(note.id) will be:
() => { console.log('importance of 3 needs to be toggled') }A short reminder here. The string printed by the event handler is defined in a Java-like manner by adding the strings:
console.log('importance of ' + id + ' needs to be toggled')The template string syntax added in ES6 can be used to write similar strings in a much nicer way:
console.log(`importance of ${id} needs to be toggled`)We can now use the "dollar-bracket"-syntax to add parts to the string that will evaluate JavaScript expressions, e.g. the value of a variable. Note that we use backticks in template strings instead of quotation marks used in regular JavaScript strings.
Individual notes stored in the json-server backend can be modified in two different ways by making HTTP requests to the note's unique URL. We can either replace the entire note with an HTTP PUT request or only change some of the note's properties with an HTTP PATCH request.
The final form of the event handler function is the following:
const toggleImportanceOf = id => {
  const url = `http://localhost:3001/notes/${id}`
  const note = notes.find(n => n.id === id)
  const changedNote = { ...note, important: !note.important }

  axios.put(url, changedNote).then(response => {
    setNotes(notes.map(note => note.id === id ? response.data : note))
  })
}
Almost every line of code in the function body contains important details. The first line defines the unique URL for each note resource based on its id.
The array find method is used to find the note we want to modify, and we then assign it to the note variable.
After this, we create a new object that is an exact copy of the old note, apart from the important property that has the value flipped (from true to false or from false to true).
The code for creating the new object that uses the object spread syntax may seem a bit strange at first:
const changedNote = { ...note, important: !note.important }In practice, { ...note } creates a new object with copies of all the properties from the note object. When we add properties inside the curly braces after the spread object, e.g. { ...note, important: true }, then the value of the important property of the new object will be true. In our example, the important property gets the negation of its previous value in the original object.
There are a few things to point out. Why did we make a copy of the note object we wanted to modify when the following code also appears to work?
const note = notes.find(n => n.id === id)
note.important = !note.important

axios.put(url, note).then(response => {
  // ...
This is not recommended because the variable note is a reference to an item in the notes array in the component's state, and as we recall we must never mutate state directly in React.
It's also worth noting that the new object changedNote is only a so-called shallow copy, meaning that the values of the new object are the same as the values of the old object. If the values of the old object were objects themselves, then the copied values in the new object would reference the same objects that were in the old object.
The new note is then sent with a PUT request to the backend where it will replace the old object.
The callback function sets the component's notes state to a new array that contains all the items from the previous notes array, except for the old note which is replaced by the updated version of it returned by the server:
axios.put(url, changedNote).then(response => {
  setNotes(notes.map(note => note.id === id ? response.data : note))
})
This is accomplished with the map method:
notes.map(note => note.id === id ? response.data : note)The map method creates a new array by mapping every item from the old array into an item in the new array. In our example, the new array is created conditionally so that if note.id === id is true; the note object returned by the server is added to the array. If the condition is false, then we simply copy the item from the old array into the new array instead.
This map trick may seem a bit strange at first, but it's worth spending some time wrapping your head around it. We will be using this method many times throughout the course.
Extracting Communication with the Backend into a Separate Module
The App component has become somewhat bloated after adding the code for communicating with the backend server. In the spirit of the single responsibility principle, we deem it wise to extract this communication into its own module.
Let's create a src/services directory and add a file there called notes.js:
import axios from 'axios'
const baseUrl = 'http://localhost:3001/notes'

const getAll = () => {
  return axios.get(baseUrl)
}

const create = newObject => {
  return axios.post(baseUrl, newObject)
}

const update = (id, newObject) => {
  return axios.put(`${baseUrl}/${id}`, newObject)
}

export default {
  getAll: getAll,
  create: create,
  update: update
}
The module returns an object that has three functions (getAll, create, and update) as its properties that deal with notes. The functions directly return the promises returned by the axios methods.
The App component uses import to get access to the module:
import noteService from './services/notes'
const App = () => {
The functions of the module can be used directly with the imported variable noteService as follows:
const App = () => {
  // ...

  useEffect(() => {
    noteService      .getAll()      .then(response => {        setNotes(response.data)      })  }, [])

  const toggleImportanceOf = id => {
    const note = notes.find(n => n.id === id)
    const changedNote = { ...note, important: !note.important }

    noteService      .update(id, changedNote)      .then(response => {        setNotes(notes.map(note => note.id === id ? response.data : note))      })  }

  const addNote = (event) => {
    event.preventDefault()
    const noteObject = {
      content: newNote,
      important: Math.random() > 0.5
    }

    noteService      .create(noteObject)      .then(response => {        setNotes(notes.concat(response.data))        setNewNote('')      })  }

  // ...
}

export default App
We could take our implementation a step further. When the App component uses the functions, it receives an object that contains the entire response for the HTTP request:
noteService
  .getAll()
  .then(response => {
    setNotes(response.data)
  })
The App component only uses the response.data property of the response object.
The module would be much nicer to use if, instead of the entire HTTP response, we would only get the response data. Using the module would then look like this:
noteService
  .getAll()
  .then(initialNotes => {
    setNotes(initialNotes)
  })
We can achieve this by changing the code in the module as follows (the current code contains some copy-paste, but we will tolerate that for now):
import axios from 'axios'
const baseUrl = 'http://localhost:3001/notes'

const getAll = () => {
  const request = axios.get(baseUrl)
  return request.then(response => response.data)
}

const create = newObject => {
  const request = axios.post(baseUrl, newObject)
  return request.then(response => response.data)
}

const update = (id, newObject) => {
  const request = axios.put(`${baseUrl}/${id}`, newObject)
  return request.then(response => response.data)
}

export default {
  getAll: getAll,
  create: create,
  update: update
}
We no longer return the promise returned by axios directly. Instead, we assign the promise to the request variable and call its then method:
const getAll = () => {
  const request = axios.get(baseUrl)
  return request.then(response => response.data)
}
The last row in our function is simply a more compact expression of the same code as shown below:
const getAll = () => {
  const request = axios.get(baseUrl)
  return request.then(response => {    return response.data  })}
The modified getAll function still returns a promise, as the then method of a promise also returns a promise.
After defining the parameter of the then method to directly return response.data, we have gotten the getAll function to work like we wanted it to. When the HTTP request is successful, the promise returns the data sent back in the response from the backend.
We have to update the App component to work with the changes made to our module. We have to fix the callback functions given as parameters to the noteService object's methods so that they use the directly returned response data:
const App = () => {
  // ...

  useEffect(() => {
    noteService
      .getAll()
      .then(initialNotes => {        setNotes(initialNotes)      })
  }, [])

  const toggleImportanceOf = id => {
    const note = notes.find(n => n.id === id)
    const changedNote = { ...note, important: !note.important }

    noteService
      .update(id, changedNote)
      .then(returnedNote => {        setNotes(notes.map(note => note.id === id ? returnedNote : note))      })
  }

  const addNote = (event) => {
    event.preventDefault()
    const noteObject = {
      content: newNote,
      important: Math.random() > 0.5
    }

    noteService
      .create(noteObject)
      .then(returnedNote => {        setNotes(notes.concat(returnedNote))        setNewNote('')
      })
  }

  // ...
}
This is all quite complicated and attempting to explain it may just make it harder to understand. The internet is full of material discussing the topic, such as this one.
The "Async and performance" book from the You do not know JS book series explains the topic well, but the explanation is many pages long.
Promises are central to modern JavaScript development and it is highly recommended to invest a reasonable amount of time into understanding them.
Cleaner Syntax for Defining Object Literals
The module defining note-related services currently exports an object with the properties getAll, create, and update that are assigned to functions for handling notes.
The module definition was:
import axios from 'axios'
const baseUrl = 'http://localhost:3001/notes'

const getAll = () => {
  const request = axios.get(baseUrl)
  return request.then(response => response.data)
}

const create = newObject => {
  const request = axios.post(baseUrl, newObject)
  return request.then(response => response.data)
}

const update = (id, newObject) => {
  const request = axios.put(`${baseUrl}/${id}`, newObject)
  return request.then(response => response.data)
}

export default {
  getAll: getAll,
  create: create,
  update: update
}
The module exports the following, rather peculiar looking, object:
{
  getAll: getAll,
  create: create,
  update: update
}
The labels to the left of the colon in the object definition are the keys of the object, whereas the ones to the right of it are variables that are defined inside the module.
Since the names of the keys and the assigned variables are the same, we can write the object definition with a more compact syntax:
{
  getAll,
  create,
  update
}
As a result, the module definition gets simplified into the following form:
import axios from 'axios'
const baseUrl = 'http://localhost:3001/notes'

const getAll = () => {
  const request = axios.get(baseUrl)
  return request.then(response => response.data)
}

const create = newObject => {
  const request = axios.post(baseUrl, newObject)
  return request.then(response => response.data)
}

const update = (id, newObject) => {
  const request = axios.put(`${baseUrl}/${id}`, newObject)
  return request.then(response => response.data)
}

export default { getAll, create, update }
In defining the object using this shorter notation, we make use of a new feature that was introduced to JavaScript through ES6, enabling a slightly more compact way of defining objects using variables.
To demonstrate this feature, let's consider a situation where we have the following values assigned to variables:
const name = 'Leevi'
const age = 0
In older versions of JavaScript we had to define an object like this:
const person = {
  name: name,
  age: age
}
However, since both the property fields and the variable names in the object are the same, it's enough to simply write the following in ES6 JavaScript:
const person = { name, age }The result is identical for both expressions. They both create an object with a name property with the value Leevi and an age property with the value 0.
Promises and Errors
If our application allowed users to delete notes, we could end up in a situation where a user tries to change the importance of a note that has already been deleted from the system.
Let's simulate this situation by making the getAll function of the note service return a "hardcoded" note that does not actually exist on the backend server:
const getAll = () => {
  const request = axios.get(baseUrl)
  const nonExisting = {
    id: 10000,
    content: 'This note is not saved to server',
    important: true,
  }
  return request.then(response => response.data.concat(nonExisting))
}
When we try to change the importance of the hardcoded note, we see the following error message in the console. The error says that the backend server responded to our HTTP PUT request with a status code 404 not found.

The application should be able to handle these types of error situations gracefully. Users won't be able to tell that an error has occurred unless they happen to have their console open. The only way the error can be seen in the application is that clicking the button does not affect the note's importance.
We had previously mentioned that a promise can be in one of three different states. When an axios HTTP request fails, the associated promise is rejected. Our current code does not handle this rejection in any way.
The rejection of a promise is handled by providing the then method with a second callback function, which is called in the situation where the promise is rejected.
The more common way of adding a handler for rejected promises is to use the catch method.
In practice, the error handler for rejected promises is defined like this:
axios
  .get('http://example.com/probably_will_fail')
  .then(response => {
    console.log('success!')
  })
  .catch(error => {
    console.log('fail')
  })
If the request fails, the event handler registered with the catch method gets called.
The catch method is often utilized by placing it deeper within the promise chain.
When multiple .then methods are chained together, we are in fact creating a promise chain:
axios
  .get('http://...')
  .then(response => response.data)
  .then(data => {
    // ...
  })
The catch method can be used to define a handler function at the end of a promise chain, which is called once any promise in the chain throws an error and the promise becomes rejected.
axios
  .get('http://...')
  .then(response => response.data)
  .then(data => {
    // ...
  })
  .catch(error => {
    console.log('fail')
  })
Let's take advantage of this feature. We will place our application's error handler in the App component:
const toggleImportanceOf = id => {
  const note = notes.find(n => n.id === id)
  const changedNote = { ...note, important: !note.important }

  noteService
    .update(id, changedNote).then(returnedNote => {
      setNotes(notes.map(note => note.id === id ? returnedNote : note))
    })
    .catch(error => {      alert(        `the note '${note.content}' was already deleted from server`      )      setNotes(notes.filter(n => n.id !== id))    })}
The error message is displayed to the user with the trusty old alert dialog popup, and the deleted note gets filtered out from the state.
Removing an already deleted note from the application's state is done with the array filter method, which returns a new array comprising only the items from the list for which the function that was passed as a parameter returns true for:
notes.filter(n => n.id !== id)It's probably not a good idea to use alert in more serious React applications. We will soon learn a more advanced way of displaying messages and notifications to users. There are situations, however, where a simple, battle-tested method like alert can function as a starting point. A more advanced method could always be added in later, given that there's time and energy for it.
The code for the current state of our application can be found in the part2-6 branch on GitHub.
Full stack developer's oath
It is again time for the exercises. The complexity of our app is now increasing since besides just taking care of the React components in the frontend, we also have a backend that is persisting the application data.
To cope with the increasing complexity we should extend the web developer's oath to a Full stack developer's oath, which reminds us to make sure that the communication between frontend and backend happens as expected.
So here is the updated oath:
Full stack development is extremely hard, that is why I will use all the possible means to make it easier
- I will have my browser developer console open all the time
- I will use the network tab of the browser dev tools to ensure that frontend and backend are communicating as I expect
- I will constantly keep an eye on the state of the server to make sure that the data sent there by the frontend is saved there as I expect
- I will progress with small steps
- I will write lots of console.log statements to make sure I understand how the code behaves and to help pinpoint problems
- If my code does not work, I will not write more code. Instead, I start deleting the code until it works or just return to a state when everything was still working
- When I ask for help in the course Discord channel or elsewhere I formulate my questions properly, see here how to ask for help
Exercises 2.12.-2.15.
2.12: The Phonebook step 7
Let's return to our phonebook application.
Currently, the numbers that are added to the phonebook are not saved to a backend server. Fix this situation.
2.13: The Phonebook step 8
Extract the code that handles the communication with the backend into its own module by following the example shown earlier in this part of the course material.
2.14: The Phonebook step 9
Make it possible for users to delete entries from the phonebook. The deletion can be done through a dedicated button for each person in the phonebook list. You can confirm the action from the user by using the window.confirm method:
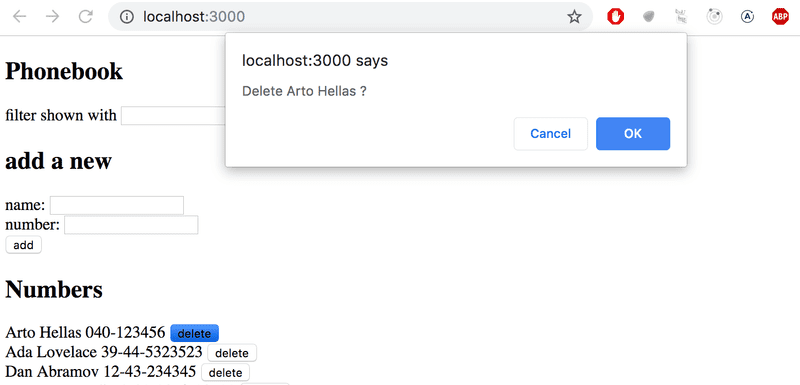
The associated resource for a person in the backend can be deleted by making an HTTP DELETE request to the resource's URL. If we are deleting e.g. a person who has the id 2, we would have to make an HTTP DELETE request to the URL localhost:3001/persons/2. No data is sent with the request.
You can make an HTTP DELETE request with the axios library in the same way that we make all of the other requests.
NB: You can't use the name delete for a variable because it's a reserved word in JavaScript. E.g. the following is not possible:
// use some other name for variable!
const delete = (id) => {
  // ...
}
2.15*: The Phonebook step 10
Why is there an asterisk in the exercise? See here for the explanation.
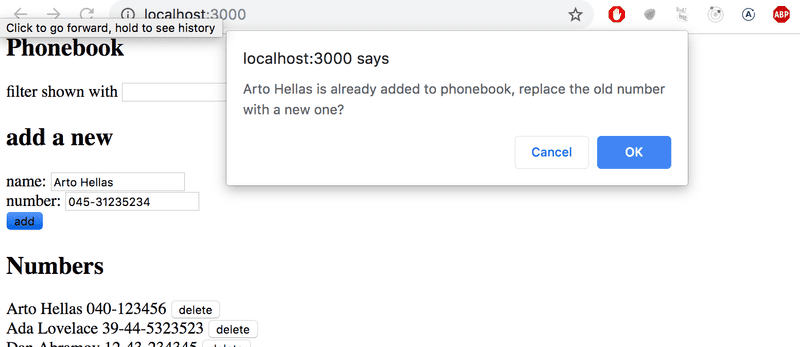
Change the functionality so that if a number is added to an already existing user, the new number will replace the old number. It's recommended to use the HTTP PUT method for updating the phone number.
If the person's information is already in the phonebook, the application can ask the user to confirm the action: