d
React with types
Before we start delving into how you can use TypeScript with React, we should first have a look at what we want to achieve. When everything works as it should, TypeScript will help us catch the following errors:
- Trying to pass an extra/unwanted prop to a component
- Forgetting to pass a required prop to a component
- Passing a prop with the wrong type to a component
If we make any of these errors, TypeScript can help us catch them in our editor right away. If we didn't use TypeScript, we would have to catch these errors later during testing. We might be forced to do some tedious debugging to find the cause of the errors.
That's enough reasoning for now. Let's start getting our hands dirty!
Vite with TypeScript
We can use Vite to create a TypeScript app specifying a template react-ts in the initialization script. So to create a TypeScript app, run the following command:
npm create vite@latest my-app-name -- --template react-tsAfter running the command, you should have a complete basic React app that uses TypeScript. You can start the app by running npm run dev in the application's root.
If you take a look at the files and folders, you'll notice that the app is not that different from one using pure JavaScript. The only differences are that the .jsx files are now .tsx files, they contain some type annotations, and the root directory contains a tsconfig.app.json file.
Now, let's take a look at the tsconfig.app.json file that has been created for us:
{
  "compilerOptions": {
    "target": "ES2020",
    "useDefineForClassFields": true,
    "lib": ["ES2020", "DOM", "DOM.Iterable"],
    "module": "ESNext",
    "skipLibCheck": true,

    /* Bundler mode */
    "moduleResolution": "bundler",
    "allowImportingTsExtensions": true,
    "resolveJsonModule": true,
    "isolatedModules": true,
    "noEmit": true,
    "jsx": "react-jsx",

    /* Linting */
    "strict": true,
    "noUnusedLocals": true,
    "noUnusedParameters": true,
    "noFallthroughCasesInSwitch": true
  },
  "include": ["src"],
  "references": [{ "path": "./tsconfig.node.json" }]
}
Notice compilerOptions now has the key lib that includes "type definitions for things found in browser environments (like document)". Everything else should be more or less fine.
In our previous project, we used ESlint to help us enforce a coding style, and we'll do the same with this app. We do not need to install any dependencies, since Vite has taken care of that already.
When we look at the main.tsx file that Vite has generated, it looks familiar but there is a small but remarkable difference, there is a exclamation mark after the statement document.getElementById('root'):
import React from 'react'
import ReactDOM from 'react-dom/client'
import App from './App.tsx'
import './index.css'

ReactDOM.createRoot(document.getElementById('root')!).render(
  <React.StrictMode>
    <App />
  </React.StrictMode>,
)
The reason for this is that the statement might return value null but the ReactDOM.createRoot does not accept null as parameter. With the ! operator, it is possible to assert to the TypeScript compiler that the value is not null.
Earlier in this part we warned about the dangers of type assertions, but in our case the assertion is ok since we are sure that the file index.html indeed has this particular id and the function is always returning a HTMLElement.
React components with TypeScript
Let us consider the following JavaScript React example:
import ReactDOM from 'react-dom/client'
import PropTypes from "prop-types";

const Welcome = props => {
  return <h1>Hello, {props.name}</h1>;
};

Welcome.propTypes = {
  name: PropTypes.string
};

ReactDOM.createRoot(document.getElementById('root')).render(
  <Welcome name="Sarah" />
)
In this example, we have a component called Welcome to which we pass a name as a prop. It then renders the name to the screen. We know that the name should be a string, and we use the prop-types package introduced in part 5 to receive hints about the desired types of a component's props and warnings about invalid prop types.
With TypeScript, we don't need the prop-types package anymore. We can define the types with the help of TypeScript, just like we define types for a regular function as React components are nothing but mere functions. We will use an interface for the parameter types (i.e. props) and JSX.Element as the return type for any React component:
import ReactDOM from 'react-dom/client'

interface WelcomeProps {
  name: string;
}

const Welcome = (props: WelcomeProps): JSX.Element => {
  return <h1>Hello, {props.name}</h1>;
};

ReactDOM.createRoot(document.getElementById('root')!).render(
  <Welcome name="Sarah" />
)
We defined a new type, WelcomeProps, and passed it to the function's parameter types.
const Welcome = (props: WelcomeProps): JSX.Element => {You could write the same thing using a more verbose syntax:
const Welcome = ({ name }: { name: string }): JSX.Element => (
  <h1>Hello, {name}</h1>
);
Now our editor knows that the name prop is a string.
There is actually no need to define the return type of a React component since the TypeScript compiler infers the type automatically, so we can just write:
interface WelcomeProps {
  name: string;
}

const Welcome = (props: WelcomeProps) => {  return <h1>Hello, {props.name}</h1>;
};

ReactDOM.createRoot(document.getElementById('root')!).render(
  <Welcome name="Sarah" />
)Deeper type usage
In the previous exercise, we had three parts of a course, and all parts had the same attributes name and exerciseCount. But what if we need additional attributes for a specific part? How would this look, codewise? Let's consider the following example:
const courseParts = [
  {
    name: "Fundamentals",
    exerciseCount: 10,
    description: "This is an awesome course part"
  },
  {
    name: "Using props to pass data",
    exerciseCount: 7,
    groupProjectCount: 3
  },
  {
    name: "Basics of type Narrowing",
    exerciseCount: 7,
    description: "How to go from unknown to string"
  },
  {
    name: "Deeper type usage",
    exerciseCount: 14,
    description: "Confusing description",
    backgroundMaterial: "https://type-level-typescript.com/template-literal-types"
  },
];
In the above example, we have added some additional attributes to each course part. Each part has the name and exerciseCount attributes, but the first, the third and fourth also have an attribute called description. The second and fourth parts also have some distinct additional attributes.
Let's imagine that our application just keeps on growing, and we need to pass the different course parts around in our code. On top of that, there are also additional attributes and course parts added to the mix. How can we know that our code is capable of handling all the different types of data correctly, and we are not for example forgetting to render a new course part on some page? This is where TypeScript comes in handy!
Let's start by defining types for our different course parts. We notice that the first and third have the same set of attributes. The second and fourth are a bit different so we have three different kinds of course part elements.
So let us define a type for each of the different kind of course parts:
interface CoursePartBasic {
  name: string;
  exerciseCount: number;
  description: string;
  kind: "basic"
}

interface CoursePartGroup {
  name: string;
  exerciseCount: number;
  groupProjectCount: number;
  kind: "group"
}

interface CoursePartBackground {
  name: string;
  exerciseCount: number;
  description: string;
  backgroundMaterial: string;
  kind: "background"
}
Besides the attributes that are found in the various course parts, we have now introduced an additional attribute called kind that has a literal type, it is a "hard coded" string, distinct for each course part. We shall soon see where the attribute kind is used!
Next, we will create a type union of all these types. We can then use it to define a type for our array, which should accept any of these course part types:
type CoursePart = CoursePartBasic | CoursePartGroup | CoursePartBackground;Now we can set the type for our courseParts variable:
const App = () => {
  const courseName = "Half Stack application development";
  const courseParts: CoursePart[] = [
    {
      name: "Fundamentals",
      exerciseCount: 10,
      description: "This is an awesome course part",
      kind: "basic"    },
    {
      name: "Using props to pass data",
      exerciseCount: 7,
      groupProjectCount: 3,
      kind: "group"    },
    {
      name: "Basics of type Narrowing",
      exerciseCount: 7,
      description: "How to go from unknown to string",
      kind: "basic"    },
    {
      name: "Deeper type usage",
      exerciseCount: 14,
      description: "Confusing description",
      backgroundMaterial: "https://type-level-typescript.com/template-literal-types",
      kind: "background"    },
  ]

  // ...
}
Note that we have now added the attribute kind with a proper value to each element of the array.
Our editor will automatically warn us if we use the wrong type for an attribute, use an extra attribute, or forget to set an expected attribute. If we e.g. try to add the following to the array
{
  name: "TypeScript in frontend",
  exerciseCount: 10,
  kind: "basic",
},
We will immediately see an error in the editor:
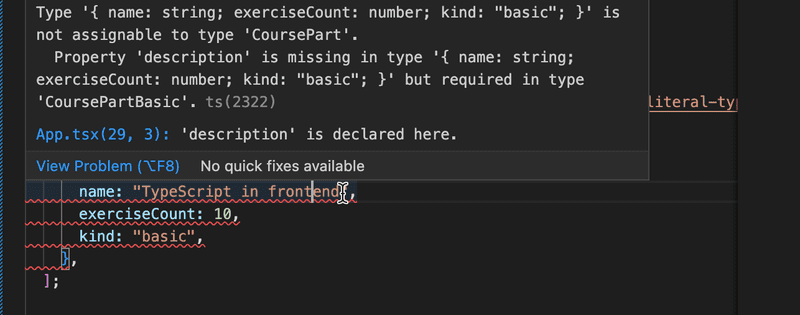
Since our new entry has the attribute kind with value "basic", TypeScript knows that the entry does not only have the type CoursePart but it is actually meant to be a CoursePartBasic. So here the attribute kind "narrows" the type of the entry from a more general to a more specific type that has a certain set of attributes. We shall soon see this style of type narrowing in action in the code!
But we're not satisfied yet! There is still a lot of duplication in our types, and we want to avoid that. We start by identifying the attributes all course parts have in common, and defining a base type that contains them. Then we will extend that base type to create our kind-specific types:
interface CoursePartBase {
  name: string;
  exerciseCount: number;
}

interface CoursePartBasic extends CoursePartBase {
  description: string;
  kind: "basic"
}

interface CoursePartGroup extends CoursePartBase {
  groupProjectCount: number;
  kind: "group"
}

interface CoursePartBackground extends CoursePartBase {
  description: string;
  backgroundMaterial: string;
  kind: "background"
}

type CoursePart = CoursePartBasic | CoursePartGroup | CoursePartBackground;
More type narrowing
How should we now use these types in our components?
If we try to access the objects in the array courseParts: CoursePart[] we notice that it is possible to only access the attributes that are common to all the types in the union:

And indeed, the TypeScript documentation says this:
TypeScript will only allow an operation (or attribute access) if it is valid for every member of the union.
The documentation also mentions the following:
The solution is to narrow the union with code... Narrowing occurs when TypeScript can deduce a more specific type for a value based on the structure of the code.
So once again the type narrowing is the rescue!
One handy way to narrow these kinds of types in TypeScript is to use switch case expressions. Once TypeScript has inferred that a variable is of union type and that each type in the union contains a certain literal attribute (in our case kind), we can use that as a type identifier. We can then build a switch case around that attribute and TypeScript will know which attributes are available within each case block:
In the above example, TypeScript knows that a part has the type CoursePart and it can then infer that part is of either type CoursePartBasic, CoursePartGroup or CoursePartBackground based on the value of the attribute kind.
The specific technique of type narrowing where a union type is narrowed based on literal attribute value is called discriminated union.
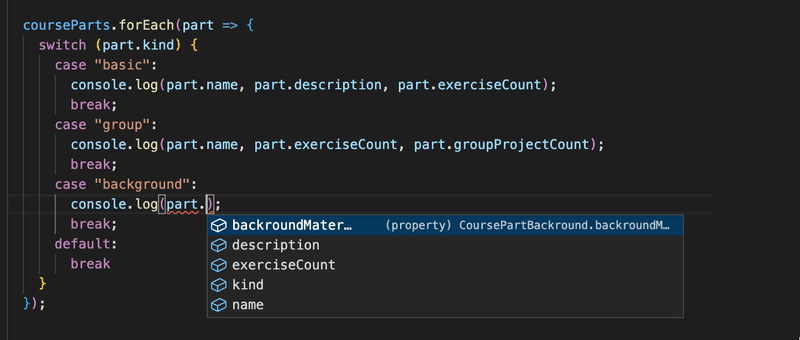
Note that the narrowing can naturally be also done with if clause. We could eg. do the following:
  courseParts.forEach(part => {
    if (part.kind === 'background') {
      console.log('see the following:', part.backgroundMaterial)
    }

    // can not refer to part.backgroundMaterial here!
  });
What about adding new types? If we were to add a new course part, wouldn't it be nice to know if we had already implemented handling that type in our code? In the example above, a new type would go to the default block and nothing would get printed for a new type. Sometimes this is wholly acceptable. For instance, if you wanted to handle only specific (but not all) cases of a type union, having a default is fine. Nonetheless, it is recommended to handle all variations separately in most cases.
With TypeScript, we can use a method called exhaustive type checking. Its basic principle is that if we encounter an unexpected value, we call a function that accepts a value with the type never and also has the return type never.
A straightforward version of the function could look like this:
/**
 * Helper function for exhaustive type checking
 */
const assertNever = (value: never): never => {
  throw new Error(
    `Unhandled discriminated union member: ${JSON.stringify(value)}`
  );
};
If we now were to replace the contents of our default block to:
default:
  return assertNever(part);
and remove the case that handles the type CoursePartBackground, we would see the following error:
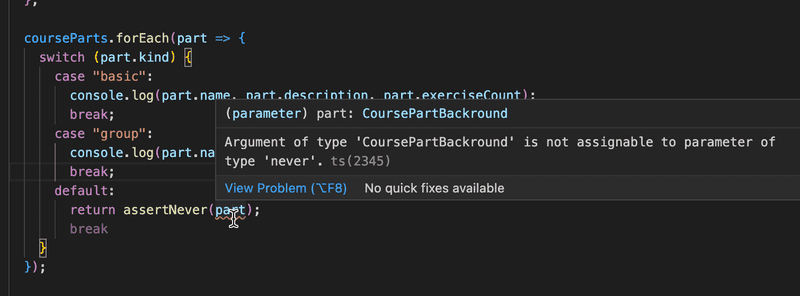
The error message says that
'CoursePartBackground' is not assignable to parameter of type 'never'.which tells us that we are using a variable somewhere where it should never be used. This tells us that something needs to be fixed.
Exercise 9.16
9.16
Let us now continue extending the app created in exercise 9.15. First, add the type information and replace the variable courseParts with the one from the example below.
interface CoursePartBase {
  name: string;
  exerciseCount: number;
}

interface CoursePartBasic extends CoursePartBase {
  description: string;
  kind: "basic"
}

interface CoursePartGroup extends CoursePartBase {
  groupProjectCount: number;
  kind: "group"
}

interface CoursePartBackground extends CoursePartBase {
  description: string;
  backgroundMaterial: string;
  kind: "background"
}

type CoursePart = CoursePartBasic | CoursePartGroup | CoursePartBackground;

const courseParts: CoursePart[] = [
  {
    name: "Fundamentals",
    exerciseCount: 10,
    description: "This is an awesome course part",
    kind: "basic"
  },
  {
    name: "Using props to pass data",
    exerciseCount: 7,
    groupProjectCount: 3,
    kind: "group"
  },
  {
    name: "Basics of type Narrowing",
    exerciseCount: 7,
    description: "How to go from unknown to string",
    kind: "basic"
  },
  {
    name: "Deeper type usage",
    exerciseCount: 14,
    description: "Confusing description",
    backgroundMaterial: "https://type-level-typescript.com/template-literal-types",
    kind: "background"
  },
  {
    name: "TypeScript in frontend",
    exerciseCount: 10,
    description: "a hard part",
    kind: "basic",
  },
];
Now we know that both interfaces CoursePartBasic and CoursePartBackground share not only the base attributes but also an attribute called description, which is a string in both interfaces.
Your first task is to declare a new interface that includes the description attribute and extends the CoursePartBase interface. Then modify the code so that you can remove the description attribute from both CoursePartBasic and CoursePartBackground without getting any errors.
Then create a component Part that renders all attributes of each type of course part. Use a switch case-based exhaustive type checking! Use the new component in component Content.
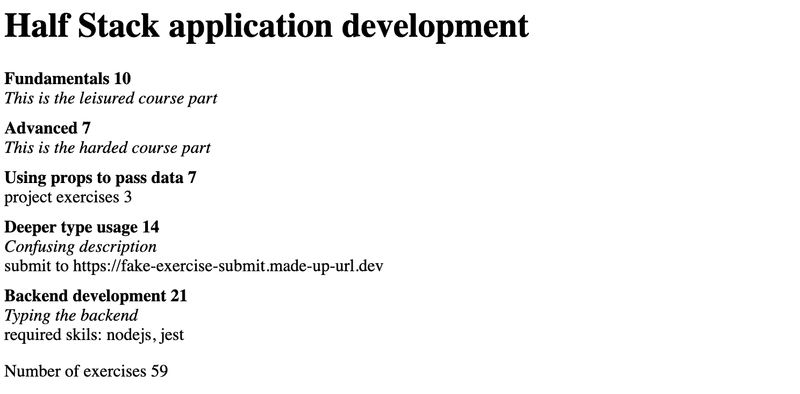
Lastly, add another course part interface with the following attributes: name, exerciseCount, description and requirements, the latter being a string array. The objects of this type look like the following:
{
  name: "Backend development",
  exerciseCount: 21,
  description: "Typing the backend",
  requirements: ["nodejs", "jest"],
  kind: "special"
}
Then add that interface to the type union CoursePart and add the corresponding data to the courseParts variable. Now, if you have not modified your Content component correctly, you should get an error, because you have not yet added support for the fourth course part type. Do the necessary changes to Content, so that all attributes for the new course part also get rendered and that the compiler doesn't produce any errors.
The result might look like the following:
React app with state
So far, we have only looked at an application that keeps all the data in a typed variable but does not have any state. Let us once more go back to the note app, and build a typed version of it.
We start with the following code:
import { useState } from 'react';

const App = () => {
  const [newNote, setNewNote] = useState('');
  const [notes, setNotes] = useState([]);

  return null
}
When we hover over the useState calls in the editor, we notice a couple of interesting things.
The type of the first call useState('') looks like the following:
useState<string>(initialState: string | (() => string)):
  [string, React.Dispatch<React.SetStateAction<string>>]
The type is somewhat challenging to decipher. It has the following "form":
functionName(parameters): return_valueSo we notice that TypeScript compiler has inferred that the initial state is either a string or a function that returns a string:
initialState: string | (() => string))The type of the returned array is the following:
[string, React.Dispatch<React.SetStateAction<string>>]So the first element, assigned to newNote is a string and the second element that we assigned setNewNote has a slightly more complex type. We notice that there is a string mentioned there, so we know that it must be the type of a function that sets a valued data. See here if you want to learn more about the types of useState function.
From all this we see that TypeScript has indeed inferred the type of the first useState correctly, a state with type string is created.
When we look at the second useState that has the initial value [] , the type looks quite different
useState<never[]>(initialState: never[] | (() => never[])):
  [never[], React.Dispatch<React.SetStateAction<never[]>>]
TypeScript can just infer that the state has type never[], it is an array but it has no clue what the elements stored to the array are, so we clearly need to help the compiler and provide the type explicitly.
One of the best sources for information about typing React is the React TypeScript Cheatsheet. The Cheatsheet chapter about useState hook instructs us to use a type parameter in situations where the compiler can not infer the type.
Let us now define a type for notes:
interface Note {
  id: string,
  content: string
}
The solution is now simple:
const [notes, setNotes] = useState<Note[]>([]);And indeed, the type is set correctly:
useState<Note[]>(initialState: Note[] | (() => Note[])):
  [Note[], React.Dispatch<React.SetStateAction<Note[]>>]
So in technical terms useState is a generic function, where the type has to be specified as a type parameter in those cases when the compiler can not infer the type.
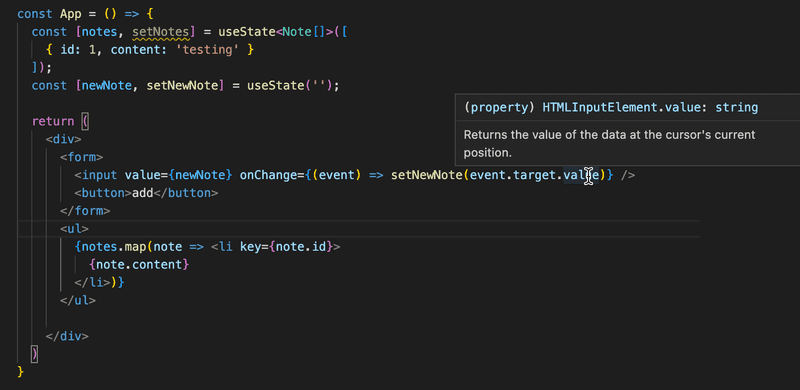
Rendering the notes is now easy. Let us just add some data to the state so that we can see that the code works:
interface Note {
  id: string,
  content: string
}

import { useState } from "react";

const App = () => {
  const [notes, setNotes] = useState<Note[]>([
    { id: '1', content: 'testing' }  ]);
  const [newNote, setNewNote] = useState('');

  return (
    <div>      <ul>        {notes.map(note =>          <li key={note.id}>{note.content}</li>        )}      </ul>    </div>  )
}
The next task is to add a form that makes it possible to create new notes:
const App = () => {
  const [notes, setNotes] = useState<Note[]>([
    { id: 1, content: 'testing' }
  ]);
  const [newNote, setNewNote] = useState('');

  return (
    <div>
      <form>        <input          value={newNote}          onChange={(event) => setNewNote(event.target.value)}         />        <button type='submit'>add</button>      </form>      <ul>
        {notes.map(note =>
          <li key={note.id}>{note.content}</li>
        )}
      </ul>
    </div>
  )
}
It just works, there are no complaints about types! When we hover over the event.target.value, we see that it is indeed a string, just what is expected for the parameter of setNewNote:
So we still need the event handler for adding the new note. Let us try the following:
const App = () => {
  // ...

  const noteCreation = (event) => {    event.preventDefault()    // ...  };
  return (
    <div>
      <form onSubmit={noteCreation}>        <input
          value={newNote}
          onChange={(event) => setNewNote(event.target.value)}
        />
        <button type='submit'>add</button>
      </form>
      // ...
    </div>
  )
}
It does not quite work, there is an Eslint error complaining about implicit any:
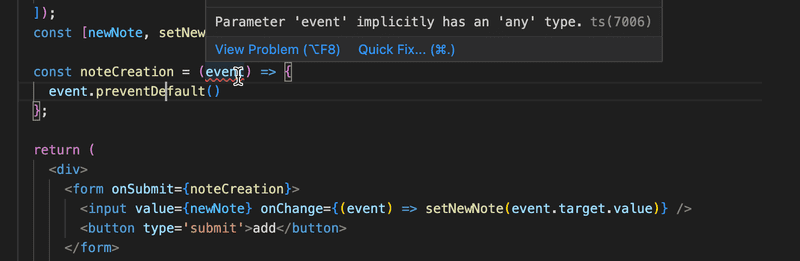
TypeScript compiler now has no clue what the type of the parameter is, this is why the type is the infamous implicit any that we want to avoid at all costs. The React TypeScript cheatsheet comes to the rescue again, the chapter about forms and events reveals that the right type of event handler is React.SyntheticEvent.
The code becomes
interface Note {
  id: string,
  content: string
}

const App = () => {
  const [notes, setNotes] = useState<Note[]>([]);
  const [newNote, setNewNote] = useState('');

  const noteCreation = (event: React.SyntheticEvent) => {    event.preventDefault()    const noteToAdd = {      content: newNote,      id: String(notes.length + 1)    }    setNotes(notes.concat(noteToAdd));    setNewNote('')  };
  return (
    <div>
      <form onSubmit={noteCreation}>
        <input value={newNote} onChange={(event) => setNewNote(event.target.value)} />
        <button type='submit'>add</button>
      </form>
      <ul>
        {notes.map(note =>
          <li key={note.id}>{note.content}</li>
        )}
      </ul>
    </div>
  )
}
And that's it, our app is ready and perfectly typed!
Communicating with the server
Let us modify the app so that the notes are saved in a JSON server backend in url http://localhost:3001/notes
As usual, we shall use Axios and the useEffect hook to fetch the initial state from the server.
Let us try the following:
const App = () => {
  // ...
  useEffect(() => {
    axios.get('http://localhost:3001/notes').then(response => {
      console.log(response.data);
    })
  }, [])
  // ...
}
When we hover over the response.data we see that it has the type any

To set the data to the state with function setNotes we must type it properly.
With a little help from the internet, we find a clever trick:
  useEffect(() => {
    axios.get<Note[]>('http://localhost:3001/notes').then(response => {      console.log(response.data);
    })
  }, [])
When we hover over the response.data we see that it has the correct type:
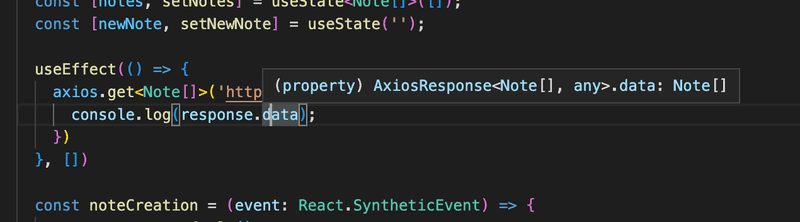
We can now set the data in the state notes to get the code working:
  useEffect(() => {
    axios.get<Note[]>('http://localhost:3001/notes').then(response => {
      setNotes(response.data)    })
  }, [])
So just like with useState, we gave a type parameter to axios.get to instruct it on how the typing should be done. Just like useState, axios.get is also a generic function. Unlike some generic functions, the type parameter of axios.get has a default value of any so, if the function is used without defining the type parameter, the type of the response data will be any.
The code works, compiler and Eslint are happy and remain quiet. However, giving a type parameter to axios.get is a potentially dangerous thing to do. The response body can contain data in an arbitrary form, and when giving a type parameter we are essentially just telling the TypeScript compiler to trust us that the data has type Note[].
So our code is essentially as safe as it would be if a type assertion would be used (not good):
  useEffect(() => {
    axios.get('http://localhost:3001/notes').then(response => {
      // response.body is of type any
      setNotes(response.data as Note[])    })
  }, [])
Since the TypeScript types do not even exist in runtime, our code does not give us any safety against situations where the request body contains data in the wrong form.
Giving a type parameter to axios.get might be ok if we are absolutely sure that the backend behaves correctly and always returns the data in the correct form. If we want to build a robust system we should prepare for surprises and parse the response data (similar to what we did in the previous section for the requests to the backend).
Let us now wrap up our app by implementing the new note addition:
  const noteCreation = (event: React.SyntheticEvent) => {
    event.preventDefault()
    axios.post<Note>('http://localhost:3001/notes', { content: newNote })      .then(response => {        setNotes(notes.concat(response.data))      })
    setNewNote('')
  };
We are again giving axios.post a type parameter. We know that the server response is the added note, so the proper type parameter is Note.
Let us clean up the code a bit. For the type definitions, we create a file types.ts with the following content:
export interface Note {
  id: string,
  content: string
}

export type NewNote = Omit<Note, 'id'>
We have added a new type for a new note, one that does not yet have the id field assigned.
The code that communicates with the backend is also extracted to a module in the file noteService.ts
import axios from 'axios';
import { Note, NewNote } from "./types";

const baseUrl = 'http://localhost:3001/notes'

export const getAllNotes = () => {
  return axios
    .get<Note[]>(baseUrl)
    .then(response => response.data)
}

export const createNote = (object: NewNote) => {
  return axios
    .post<Note>(baseUrl, object)
    .then(response => response.data)
}
The component App is now much cleaner:
import { useState, useEffect } from "react";
import { Note } from "./types";import { getAllNotes, createNote } from './noteService';
const App = () => {
  const [notes, setNotes] = useState<Note[]>([]);
  const [newNote, setNewNote] = useState('');

  useEffect(() => {
    getAllNotes().then(data => {      setNotes(data)    })  }, [])

  const noteCreation = (event: React.SyntheticEvent) => {
    event.preventDefault()
    createNote({ content: newNote }).then(data => {      setNotes(notes.concat(data))    })
    setNewNote('')
  };

  return (
    // ...
  )
}
The app is now nicely typed and ready for further development!
The code of the typed notes can be found here.
A note about defining object types
We have used interfaces to define object types, e.g. diary entries, in the previous section
interface DiaryEntry {
  id: number;
  date: string;
  weather: Weather;
  visibility: Visibility;
  comment?: string;
}
and in the course part of this section
interface CoursePartBase {
  name: string;
  exerciseCount: number;
}
We actually could have achieved the same effect by using a type alias
type DiaryEntry = {
  id: number;
  date: string;
  weather: Weather;
  visibility: Visibility;
  comment?: string;
}
In most cases, you can use either type or interface, whichever syntax you prefer. However, there are a few things to keep in mind. For example, if you define multiple interfaces with the same name, they will result in a merged interface, whereas if you try to define multiple types with the same name, it will result in an error stating that a type with the same name is already declared.
TypeScript documentation recommends using interfaces in most cases.
Exercises 9.17-9.20
Let us now build a frontend for the Ilari's flight diaries that was developed in the previous section. The source code of the backend can be found in this GitHub repository.
Exercise 9.17
Create a TypeScript React app with similar configurations as the apps of this section. Fetch the diaries from the backend and render those to screen. Do all the required typing and ensure that there are no Eslint errors.
Remember to keep the network tab open. It might give you a valuable hint...
You can decide how the diary entries are rendered. If you wish, you may take inspiration from the figure below. Note that the backend API does not return the diary comments, you may modify it to return also those on a GET request.
Exercise 9.18
Make it possible to add new diary entries from the frontend. In this exercise you may skip all validations and assume that the user just enters the data in a correct form.
Exercise 9.19
Notify the user if the the creation of a diary entry fails in the backend, show also the reason for the failure.
See eg. this to see how you can narrow the Axios error so that you can get hold of the error message.
Your solution may look like this:

Exercise 9.20
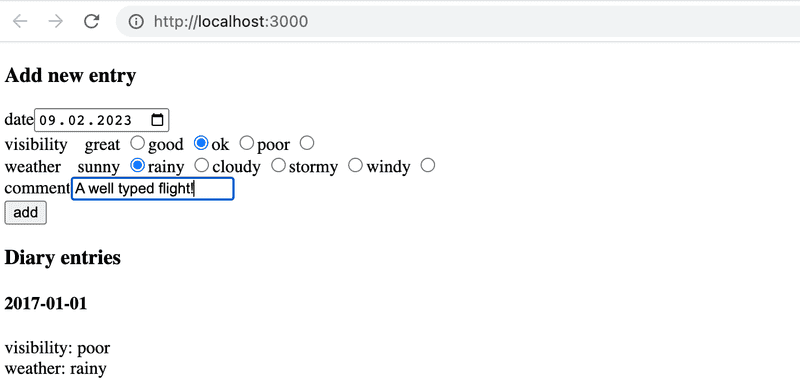
Addition of a diary entry is now very error prone since user can type anything to the input fields. The situation must be improved.
Modify the input form so that the date is set with a HTML date input element, and the weather and visibility are set with HTML radio buttons. We have already used radio buttons in part 6, that material may or may not be useful...
Your app should all the time stay well typed and there should not be any Eslint errors and no Eslint rules should be ignored.
Your solution could look like this: