e
Grande finale: Patientor
Working with an existing codebase
When diving into an existing codebase for the first time, it is good to get an overall view of the conventions and structure of the project. You can start your research by reading the README.md in the root of the repository. Usually, the README contains a brief description of the application and the requirements for using it, as well as how to start it for development. If the README is not available or someone has "saved time" and left it as a stub, you can take a peek at the package.json. It is always a good idea to start the application and click around to verify you have a functional development environment.
You can also browse the folder structure to get some insight into the application's functionality and/or the architecture used. These are not always clear, and the developers might have chosen a way to organize code that is not familiar to you. The sample project used in the rest of this part is organized, feature-wise. You can see what pages the application has, and some general components, e.g. modals and state. Keep in mind that the features may have different scopes. For example, modals are visible UI-level components whereas the state is comparable to business logic and keeps the data organized under the hood for the rest of the app to use.
TypeScript provides types for what kind of data structures, functions, components, and state to expect. You can try looking for types.ts or something similar to get started. VSCode is a big help and simply highlighting variables and parameters can provide quite a lot of insight. All this naturally depends on how types are used in the project.
If the project has unit, integration or end-to-end tests, reading those is most likely beneficial. Test cases are your most important tool when refactoring or adding new features to the application. You want to make sure not to break any existing features when hammering around the code. TypeScript can also give you guidance with argument and return types when changing the code.
Remember that reading code is a skill in itself, so don't worry if you don't understand the code on your first readthrough. The code may have a lot of corner cases, and pieces of logic may have been added here and there throughout its development cycle. It is hard to imagine what kind of problems the previous developer has wrestled with. Think of it all like growth rings in trees. Understanding everything requires digging deep into the code and business domain requirements. The more code you read, the better you will be at understanding it. You will most likely read far more code than you are going to produce throughout your life.
Patientor frontend
It's time to get our hands dirty finalizing the frontend for the backend we built in exercises 9.8.-9.13. We will actually also need to add some new features to the backend for finishing the app.
Before diving into the code, let us start both the frontend and the backend.
If all goes well, you should see a patient listing page. It fetches a list of patients from our backend, and renders it to the screen as a simple table. There is also a button for creating new patients on the backend. As we are using mock data instead of a database, the data will not persist - closing the backend will delete all the data we have added. UI design has not been a strong point of the creators, so let's disregard the UI for now.
After verifying that everything works, we can start studying the code. All the interesting stuff resides in the src folder. For your convenience, there is already a types.ts file for basic types used in the app, which you will have to extend or refactor in the exercises.
In principle, we could use the same types for both the backend and the frontend, but usually, the frontend has different data structures and use cases for the data, which causes the types to be different. For example, the frontend has a state and may want to keep data in objects or maps whereas the backend uses an array. The frontend might also not need all the fields of a data object saved in the backend, and it may need to add some new fields to use for rendering.
The folder structure looks as follows:
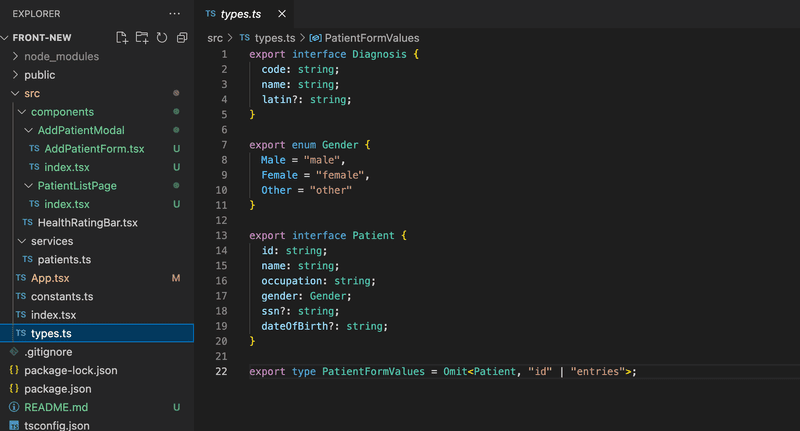
Besides the component App and a directory for services, there are currently three main components: AddPatientModal and PatientListPage which are both defined in a directory and a component HealthRatingBar defined in a file. If a component has some subcomponents not used elsewhere in the app, it might be a good idea to define the component and its subcomponents in a directory. For example, now the AddPatientModal is defined in the file components/AddPatientModal/index.tsx and its subcomponent AddPatientForm in its own file under the same directory.
There is nothing too surprising in the code. The state and communication with the backend are implemented with useState hook and Axios, similar to the notes app in the previous section. Material UI is used to style the app and the navigation structure is implemented with React Router, both familiar to us from part 7 of the course.
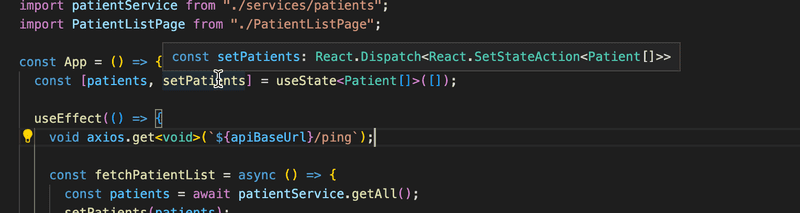
From the typing point of view, there are a couple of interesting things. Component App passes the function setPatients as a prop to the component PatientListPage:
const App = () => {
  const [patients, setPatients] = useState<Patient[]>([]);
  // ...

  return (
    <div className="App">
      <Router>
        <Container>
          <Routes>
            // ...
            <Route path="/" element={
              <PatientListPage
                patients={patients}
                setPatients={setPatients}              />}
            />
          </Routes>
        </Container>
      </Router>
    </div>
  );
};
To keep the TypeScript compiler happy, the props are typed as follows:
interface Props {
  patients : Patient[]
  setPatients: React.Dispatch<React.SetStateAction<Patient[]>>
}

const PatientListPage = ({ patients, setPatients } : Props ) => {
  // ...
}
So the function setPatients has type React.Dispatch<React.SetStateAction<Patient[]>>. We can see the type in the editor when we hover over the function:
The React TypeScript cheatsheet has a pretty nice list of typical prop types, where we can seek help if finding the proper typing for props is not obvious.
PatientListPage passes four props to the component AddPatientModal. Two of these props are functions. Let us have a look at how these are typed:
const PatientListPage = ({ patients, setPatients } : Props ) => {

  const [modalOpen, setModalOpen] = useState<boolean>(false);
  const [error, setError] = useState<string>();

  // ...

  const closeModal = (): void => {    setModalOpen(false);
    setError(undefined);
  };

  const submitNewPatient = async (values: PatientFormValues) => {    // ...
  };
  // ...

  return (
    <div className="App">
      // ...
      <AddPatientModal
        modalOpen={modalOpen}
        onSubmit={submitNewPatient}        error={error}
        onClose={closeModal}      />
    </div>
  );
};
Types look like the following:
interface Props {
  modalOpen: boolean;
  onClose: () => void;
  onSubmit: (values: PatientFormValues) => void;
  error?: string;
}

const AddPatientModal = ({ modalOpen, onClose, onSubmit, error }: Props) => {
  // ...
}
onClose is just a function that takes no parameters and does not return anything, so the type is:
() => voidThe type of onSubmit is a bit more interesting, it has one parameter that has the type PatientFormValues. The return value of the function is <void>. So again the function type is written with the arrow syntax:
(values: PatientFormValues) => <void>The return value of a async function is a promise with the value that the function returns. Our function does not return anything so the proper return type is just <void>.
Exercises 9.21-9.22
We will soon add a new type for our app, Entry, which represents a lightweight patient journal entry. It consists of a journal text, i.e. a description, a creation date, information regarding the specialist who created it and possible diagnosis codes. Diagnosis codes map to the ICD-10 codes returned from the /api/diagnoses endpoint. Our naive implementation will be that a patient has an array of entries.
Before going into this, we need some preparatory work.
9.21: Patientor, step1
Create an endpoint /api/patients/:id to the backend that returns all of the patient information for one patient, including the array of patient entries that is still empty for all the patients. For the time being, expand the backend types as follows:
// eslint-disable-next-line @typescript-eslint/no-empty-object-type
export interface Entry {
}
export interface Patient {
id: string;
name: string;
ssn: string;
occupation: string;
gender: Gender;
dateOfBirth: string;
entries: Entry[]}
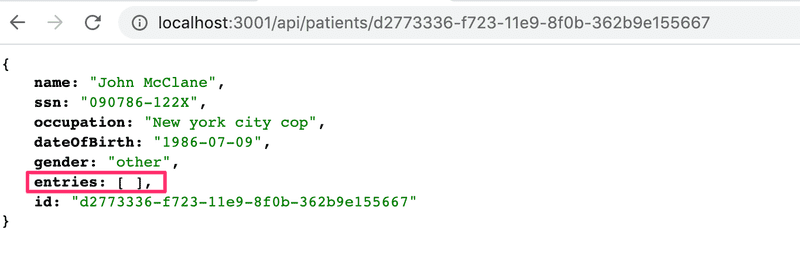
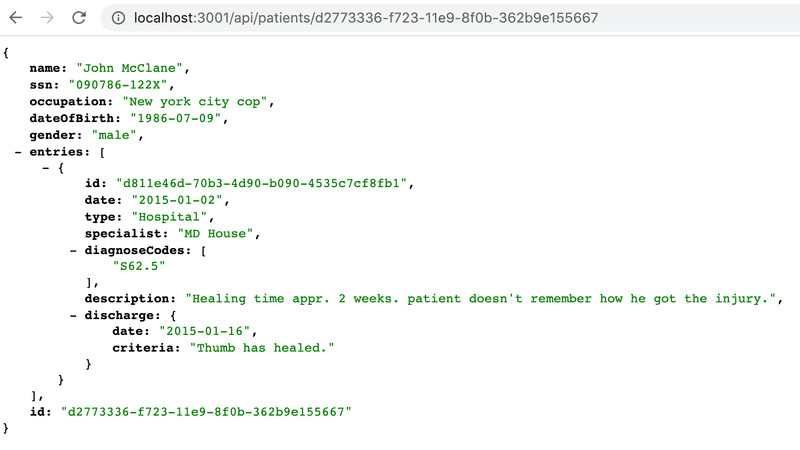
export type NonSensitivePatient = Omit<Patient, 'ssn' | 'entries'>;The response should look as follows:
9.22: Patientor, step2
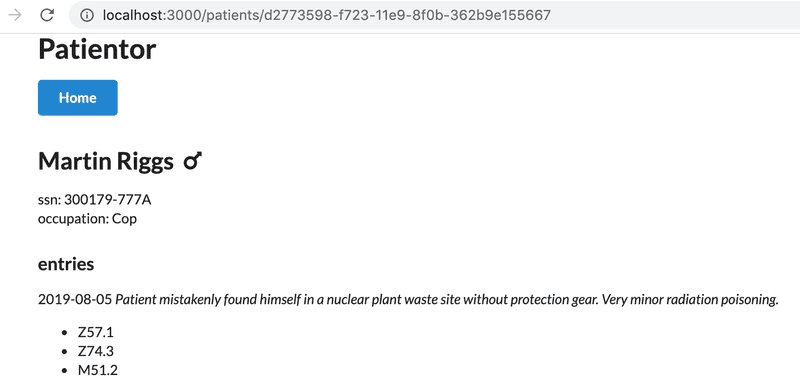
Create a page for showing a patient's full information in the frontend.
The user should be able to access a patient's information by clicking the patient's name.
Fetch the data from the endpoint created in the previous exercise.
You may use MaterialUI for the new components but that is up to you since our main focus now is TypeScript.
You might want to have a look at part 7 if you don't yet have a grasp on how the React Router works.
The result could look like this:
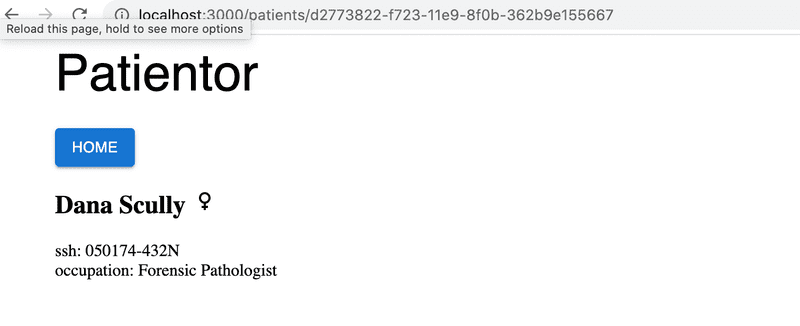
The example uses Material UI Icons to represent genders.
Full entries
In exercise 9.10 we implemented an endpoint for fetching information about various diagnoses, but we are still not using that endpoint at all. Since we now have a page for viewing a patient's information, it would be nice to expand our data a bit. Let's add an Entry field to our patient data so that a patient's data contains their medical entries, including possible diagnoses.
Let's ditch our old patient seed data from the backend and start using this expanded format.
Let us now create a proper Entry type based on the data we have.
If we take a closer look at the data, we can see that the entries are quite different from one another. For example, let's take a look at the first two entries:
{
  id: 'd811e46d-70b3-4d90-b090-4535c7cf8fb1',
  date: '2015-01-02',
  type: 'Hospital',
  specialist: 'MD House',
  diagnosisCodes: ['S62.5'],
  description:
    "Healing time appr. 2 weeks. patient doesn't remember how he got the injury.",
  discharge: {
    date: '2015-01-16',
    criteria: 'Thumb has healed.',
  }
}
...
{
  id: 'fcd59fa6-c4b4-4fec-ac4d-df4fe1f85f62',
  date: '2019-08-05',
  type: 'OccupationalHealthcare',
  specialist: 'MD House',
  employerName: 'HyPD',
  diagnosisCodes: ['Z57.1', 'Z74.3', 'M51.2'],
  description:
    'Patient mistakenly found himself in a nuclear plant waste site without protection gear. Very minor radiation poisoning. ',
  sickLeave: {
    startDate: '2019-08-05',
    endDate: '2019-08-28'
  }
}
Immediately, we can see that while the first few fields are the same, the first entry has a discharge field and the second entry has employerName and sickLeave fields. All the entries seem to have some fields in common, but some fields are entry-specific.
When looking at the type, we can see that there are three kinds of entries:
- OccupationalHealthcare
- Hospital
- HealthCheck
This indicates we need three separate types. Since they all have some fields in common, we might just want to create a base entry interface that we can extend with the different fields in each type.
When looking at the data, it seems that the fields id, description, date and specialist are something that can be found in each entry. On top of that, it seems that diagnosisCodes is only found in one OccupationalHealthcare and one Hospital type entry. Since it is not always used, even in those types of entries, it is safe to assume that the field is optional. We could consider adding it to the HealthCheck type as well since it might just not be used in these specific entries.
So our BaseEntry from which each type could be extended would be the following:
interface BaseEntry {
  id: string;
  description: string;
  date: string;
  specialist: string;
  diagnosisCodes?: string[];
}
If we want to finetune it a bit further, since we already have a Diagnosis type defined in the backend, we might just want to refer to the code field of the Diagnosis type directly in case its type ever changes. We can do that like so:
interface BaseEntry {
  id: string;
  description: string;
  date: string;
  specialist: string;
  diagnosisCodes?: Diagnosis['code'][];
}
As was mentioned earlier in this part, we could define an array with the syntax Array<Type> instead of defining it Type[]. In this particular case writing Diagnosis['code'][] starts to look a bit strange so we will decide to use the alternative syntax (that is also recommended by the ESlint rule array-simple):
interface BaseEntry {
  id: string;
  description: string;
  date: string;
  specialist: string;
  diagnosisCodes?: Array<Diagnosis['code']>;}
Now that we have the BaseEntry defined, we can start creating the extended entry types we will actually be using. Let's start by creating the HealthCheckEntry type.
Entries of type HealthCheck contain the field HealthCheckRating, which is an integer from 0 to 3, zero meaning Healthy and three meaning CriticalRisk. This is a perfect case for an enum definition. With these specifications, we could write a HealthCheckEntry type definition like so:
export enum HealthCheckRating {
  "Healthy" = 0,
  "LowRisk" = 1,
  "HighRisk" = 2,
  "CriticalRisk" = 3
}

interface HealthCheckEntry extends BaseEntry {
  type: "HealthCheck";
  healthCheckRating: HealthCheckRating;
}
Now we only need to create the OccupationalHealthcareEntry and HospitalEntry types so we can combine them in a union and export them as an Entry type like this:
export type Entry =
  | HospitalEntry
  | OccupationalHealthcareEntry
  | HealthCheckEntry;
Omit with unions
An important point concerning unions is that, when you use them with Omit to exclude a property, it works in a possibly unexpected way. Suppose that we want to remove the id from each Entry. We could think of using
Omit<Entry, 'id'>but it wouldn't work as we might expect. In fact, the resulting type would only contain the common properties, but not the ones they don't share. A possible workaround is to define a special Omit-like function to deal with such situations:
// Define special omit for unions
type UnionOmit<T, K extends string | number | symbol> = T extends unknown ? Omit<T, K> : never;
// Define Entry without the 'id' property
type EntryWithoutId = UnionOmit<Entry, 'id'>;
Exercises 9.23-9.30
Now we are ready to put the finishing touches to the app!
9.23: Patientor, step 3
Define the types OccupationalHealthcareEntry and HospitalEntry so that those conform with the new example data. Ensure that your backend returns the entries properly when you go to an individual patient's route:
Use types properly in the backend! For now, there is no need to do a proper validation for all the fields of the entries in the backend, it is enough e.g. to check that the field type has a correct value.
9.24: Patientor, step 4
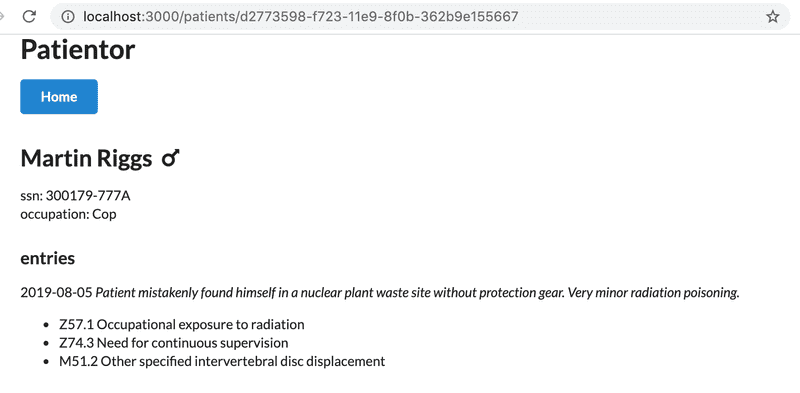
Extend a patient's page in the frontend to list the date, description and diagnoseCodes of the patient's entries.
You can use the same type definition for an Entry in the frontend. For these exercises, it is enough to just copy/paste the definitions from the backend to the frontend.
Your solution could look like this:
9.25: Patientor, step 5
Fetch and add diagnoses to the application state from the /api/diagnoses endpoint. Use the new diagnosis data to show the descriptions for patient's diagnosis codes:
9.26: Patientor, step 6
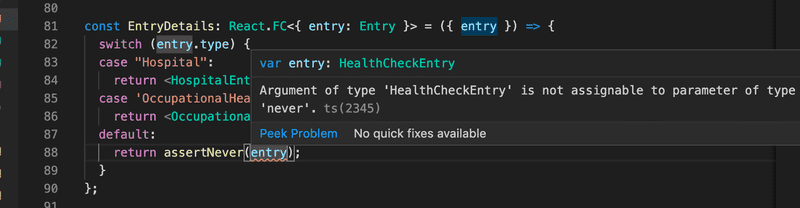
Extend the entry listing on the patient's page to include the Entry's details, with a new component that shows the rest of the information of the patient's entries, distinguishing different types from each other.
You could use eg. Icons or some other Material UI component to get appropriate visuals for your listing.
You should use a switch case-based rendering and exhaustive type checking so that no cases can be forgotten.
Like this:
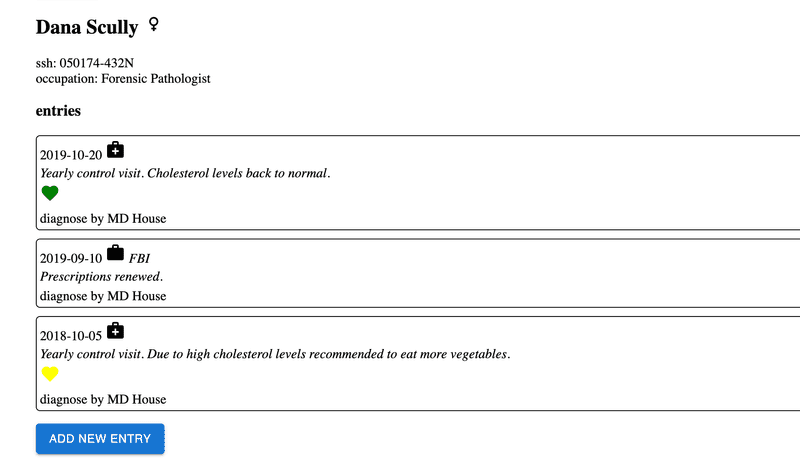
The resulting entries in the listing could look something like this:
9.27: Patientor, step 7
We have established that patients can have different kinds of entries. We don't yet have any way of adding entries to patients in our app, so, at the moment, it is pretty useless as an electronic medical record.
Your next task is to add endpoint /api/patients/:id/entries to your backend, through which you can POST an entry for a patient.
Remember that we have different kinds of entries in our app, so our backend should support all those types and check that at least all required fields are given for each type.
In this exercise, you quite likely need to remember this trick.
You may assume that the diagnostic codes are sent in the correct form and use eg. the following kind of parser to extract those from the request body:
const parseDiagnosisCodes = (object: unknown): Array<Diagnosis['code']> =>  {
  if (!object || typeof object !== 'object' || !('diagnosisCodes' in object)) {
    // we will just trust the data to be in correct form
    return [] as Array<Diagnosis['code']>;
  }

  return object.diagnosisCodes as Array<Diagnosis['code']>;
};
9.28: Patientor, step 8
Now that our backend supports adding entries, we want to add the corresponding functionality to the frontend. In this exercise, you should add a form for adding an entry to a patient. An intuitive place for accessing the form would be on a patient's page.
In this exercise, it is enough to support one entry type. All the fields in the form can be just plain text inputs, so it is up to the user to enter valid values.
Upon a successful submission the new entry should be added to the correct patient and the patient's entries on the patient page should be updated to contain the new entry.
Your form might look something like this:
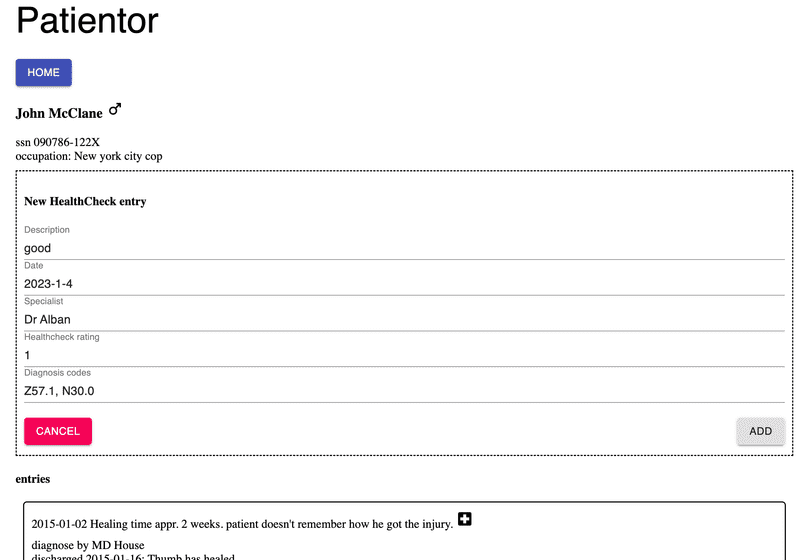
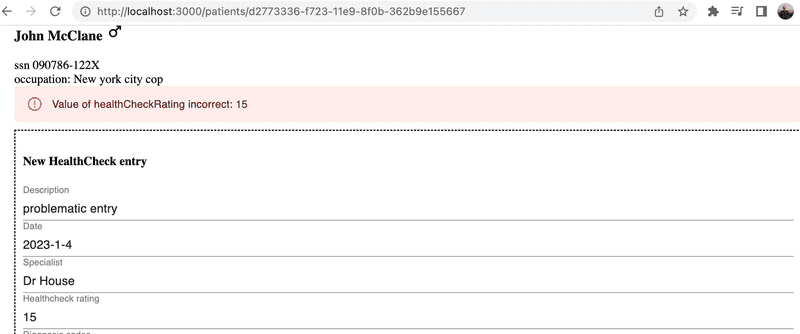
If a user enters invalid values to the form and backend rejects the addition, show a proper error message to the user
9.29: Patientor, step 9
Extend your solution so that it supports all the entry types
9.30: Patientor, step 10
Improve the entry creation forms so that it makes it hard to enter incorrect dates, diagnosis codes and health rating.
Your improved form might look something like this:
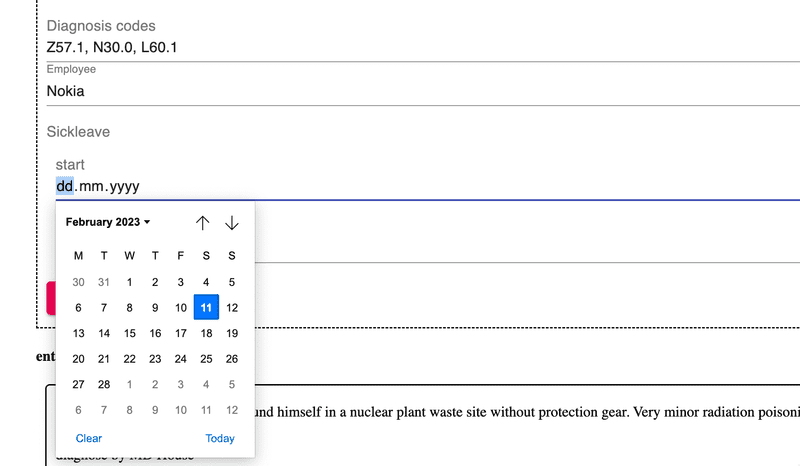
Diagnosis codes are now set with Material UI multiple select and dates with Input elements with type date.
Submitting exercises and getting the credits
Exercises of this part are submitted via the submissions system just like in the previous parts, but unlike previous parts, the submission goes to a different "course instance". Remember that you have to finish at least 24 exercises to pass this part!
Once you have completed the exercises and want to get the credits, let us know through the exercise submission system that you have completed the course:
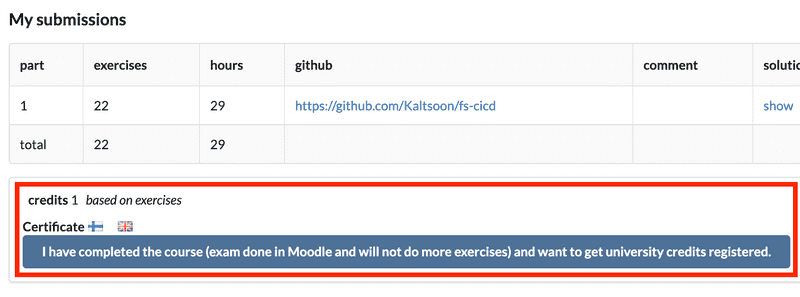
Note that you need a registration to the corresponding course part to get the credits registered, see here for more information.
You can download the certificate for completing this part by clicking one of the flag icons. The flag icon corresponds to the certificate's language.