a
Login in frontend
In the last two parts, we have mainly concentrated on the backend. The frontend that we developed in part 2 does not yet support the user management we implemented to the backend in part 4.
At the moment the frontend shows existing notes and lets users change the state of a note from important to not important and vice versa. New notes cannot be added anymore because of the changes made to the backend in part 4: the backend now expects that a token verifying a user's identity is sent with the new note.
We'll now implement a part of the required user management functionality in the frontend. Let's begin with the user login. Throughout this part, we will assume that new users will not be added from the frontend.
Adding a Login Form
A login form has now been added to the top of the page:
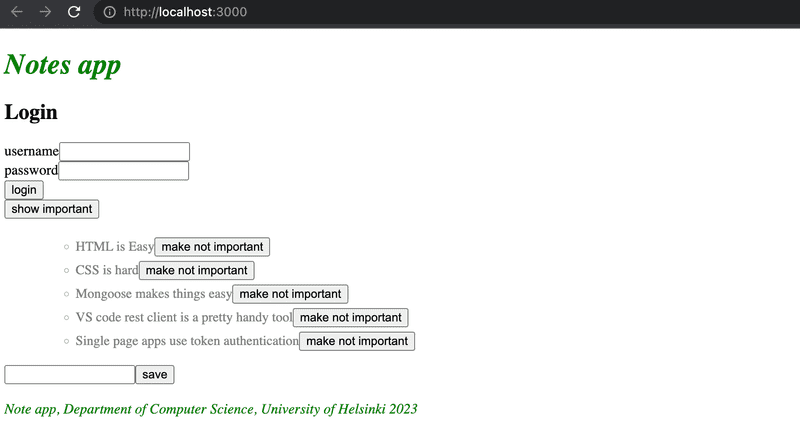
The code of the App component now looks as follows:
const App = () => {
  const [notes, setNotes] = useState([])
  const [newNote, setNewNote] = useState('')
  const [showAll, setShowAll] = useState(true)
  const [errorMessage, setErrorMessage] = useState(null)
  const [username, setUsername] = useState('')   const [password, setPassword] = useState('')
  useEffect(() => {
    noteService
      .getAll().then(initialNotes => {
        setNotes(initialNotes)
      })
  }, [])

  // ...

  const handleLogin = (event) => {    event.preventDefault()    console.log('logging in with', username, password)  }
  return (
    <div>
      <h1>Notes</h1>
      <Notification message={errorMessage} />

      <h2>Login</h2>      <form onSubmit={handleLogin}>        <div>          <label>            username            <input              type="text"              value={username}              onChange={({ target }) => setUsername(target.value)}            />          </label>        </div>        <div>          <label>            password            <input              type="password"              value={password}              onChange={({ target }) => setPassword(target.value)}            />          </label>        </div>        <button type="submit">login</button>      </form>
      // ...
    </div>
  )
}

export default App
The current application code can be found on GitHub, in the branch part5-1. If you clone the repo, don't forget to run npm install before attempting to run the frontend.
The frontend will not display any notes if it's not connected to the backend. You can start the backend with npm run dev in its folder from Part 4. This will run the backend on port 3001. While that is active, in a separate terminal window you can start the frontend with npm run dev, and now you can see the notes that are saved in your MongoDB database from Part 4.
Keep this in mind from now on.
The login form is handled the same way we handled forms in part 2. The app state has fields for username and password to store the data from the form. The form fields have event handlers, which synchronize changes in the field to the state of the App component. The event handlers are simple: An object is given to them as a parameter, and they destructure the field target from the object and save its value to the state.
({ target }) => setUsername(target.value)The method handleLogin, which is responsible for handling the data in the form, is yet to be implemented.
Adding Logic to the Login Form
Logging in is done by sending an HTTP POST request to the server address api/login. Let's separate the code responsible for this request into its own module, to file services/login.js.
We'll use async/await syntax instead of promises for the HTTP request:
import axios from 'axios'
const baseUrl = '/api/login'

const login = async credentials => {
  const response = await axios.post(baseUrl, credentials)
  return response.data
}

export default { login }
The method for handling the login can be implemented as follows:
import loginService from './services/login'
const App = () => {
  // ...
  const [username, setUsername] = useState('')
  const [password, setPassword] = useState('')
  const [user, setUser] = useState(null)
  // ...

  const handleLogin = async event => {    event.preventDefault()

    try {      const user = await loginService.login({ username, password })      setUser(user)      setUsername('')      setPassword('')    } catch {      setErrorMessage('wrong credentials')      setTimeout(() => {        setErrorMessage(null)      }, 5000)    }  }

  // ...
}
If the login is successful, the form fields are emptied and the server response (including a token and the user details) is saved to the user field of the application's state.
If the login fails or running the function loginService.login results in an error, the user is notified.
Conditional Rendering of the Login Form
The user is not notified about a successful login in any way. Let's modify the application to show the login form only if the user is not logged-in, so when user === null. The form for adding new notes is shown only if the user is logged-in, so when user state contains the user's details.
Let's add two helper functions to the App component for generating the forms:
const App = () => {
  // ...

  const loginForm = () => (
    <form onSubmit={handleLogin}>
      <div>
        <label>
          username
          <input
            type="text"
            value={username}
            onChange={({ target }) => setUsername(target.value)}
          />
        </label>
      </div>
      <div>
        <label>
          password
          <input
            type="password"
            value={password}
            onChange={({ target }) => setPassword(target.value)}
          />
        </label>
      </div>
      <button type="submit">login</button>
    </form>
  )

  const noteForm = () => (
    <form onSubmit={addNote}>
      <input value={newNote} onChange={handleNoteChange} />
      <button type="submit">save</button>
    </form>
  )

  return (
    // ...
  )
}
and conditionally render them:
const App = () => {
  // ...

  const loginForm = () => (
    // ...
  )

  const noteForm = () => (
    // ...
  )

  return (
    <div>
      <h1>Notes</h1>
      <Notification message={errorMessage} />

      {!user && loginForm()}      {user && noteForm()}
      <div>
        <button onClick={() => setShowAll(!showAll)}>
          show {showAll ? 'important' : 'all'}
        </button>
      </div>
      <ul>
        {notesToShow.map(note => (
          <Note
            key={note.id}
            note={note}
            toggleImportance={() => toggleImportanceOf(note.id)}
          />
        ))}
      </ul>

      <Footer />
    </div>
  )
}
A slightly odd looking, but commonly used React trick is used to render the forms conditionally:
{!user && loginForm()}If the first statement evaluates to false or is falsy, the second statement (generating the form) is not executed at all.
Let's do one more modification. If the user is logged in, their name is shown on the screen:
return (
  <div>
    <h1>Notes</h1>
    <Notification message={errorMessage} />

    {!user && loginForm()}
    {user && (      <div>        <p>{user.name} logged in</p>        {noteForm()}      </div>    )}
    <div>
      <button onClick={() => setShowAll(!showAll)}>
    // ...
The solution isn't perfect, but we'll leave it like this for now.
Our main component App is at the moment way too large. The changes we did now are a clear sign that the forms should be refactored into their own components. However, we will leave that for an optional exercise.
The current application code can be found on GitHub, in the branch part5-2.
Note on Using the Label Element
We used the label element for the input fields in the login form. The input field for the username is placed inside the corresponding label element:
<div>
  <label>
    username
    <input
      type="text"
      value={username}
      onChange={({ target }) => setUsername(target.value)}
    />
  </label>
</div>
// ...
Why did we implement the form this way? Visually, the same result could be achieved with simpler code, without a separate label element:
<div>
  username
  <input
    type="text"
    value={username}
    onChange={({ target }) => setUsername(target.value)}
  />
</div>
// ...
The label element is used in forms to describe and name input fields. It provides a description for the input field, helping the user understand what information should be entered into each field. This description is programmatically linked to the corresponding input field, improving the form's accessibility.
This way, screen readers can read the field's name to the user when the input field is selected, and clicking on the label's text automatically focuses on the correct input field. Using the label element with input fields is always recommended, even if the same visual result could be achieved without it.
There are several ways to link a specific label to an input element. The easiest method is to place the input element inside the corresponding label element, as demonstrated in this material. This automatically associates the label with the correct input field, requiring no additional configuration.
Creating new notes
The token returned with a successful login is saved to the application's state - the user's field token:
const handleLogin = async (event) => {
  event.preventDefault()
  try {
    const user = await loginService.login({
      username, password,
    })

    setUser(user)    setUsername('')
    setPassword('')
  } catch (exception) {
    // ...
  }
}
Let's fix creating new notes so it works with the backend. This means adding the token of the logged-in user to the Authorization header of the HTTP request.
The noteService module changes like so:
import axios from 'axios'
const baseUrl = '/api/notes'

let token = null
const setToken = newToken => {  token = `Bearer ${newToken}`}
const getAll = () => {
  const request = axios.get(baseUrl)
  return request.then(response => response.data)
}

const create = async newObject => {
  const config = {    headers: { Authorization: token }  }
  const response = await axios.post(baseUrl, newObject, config)  return response.data
}

const update = (id, newObject) => {
  const request = axios.put(`${ baseUrl }/${id}`, newObject)
  return request.then(response => response.data)
}

export default { getAll, create, update, setToken }
The noteService module contains a private variable called token. Its value can be changed with the setToken function, which is exported by the module. create, now with async/await syntax, sets the token to the Authorization header. The header is given to axios as the third parameter of the post method.
The event handler responsible for login must be changed to call the method noteService.setToken(user.token) with a successful login:
const handleLogin = async (event) => {
  event.preventDefault()

  try {
    const user = await loginService.login({ username, password })
    noteService.setToken(user.token)    setUser(user)
    setUsername('')
    setPassword('')
  } catch {
    // ...
  }
}
And now adding new notes works again!
Saving the token to the browser's local storage
Our application has a small flaw: if the browser is refreshed (eg. pressing F5), the user's login information disappears.
This problem is easily solved by saving the login details to local storage. Local Storage is a key-value database in the browser.
It is very easy to use. A value corresponding to a certain key is saved to the database with the method setItem. For example:
window.localStorage.setItem('name', 'juha tauriainen')saves the string given as the second parameter as the value of the key name.
The value of a key can be found with the method getItem:
window.localStorage.getItem('name')while removeItem removes a key.
Values in the local storage are persisted even when the page is re-rendered. The storage is origin-specific so each web application has its own storage.
Let's extend our application so that it saves the details of a logged-in user to the local storage.
Values saved to the storage are DOMstrings, so we cannot save a JavaScript object as it is. The object has to be parsed to JSON first, with the method JSON.stringify. Correspondingly, when a JSON object is read from the local storage, it has to be parsed back to JavaScript with JSON.parse.
Changes to the login method are as follows:
  const handleLogin = async (event) => {
    event.preventDefault()
    try {
      const user = await loginService.login({ username, password })

      window.localStorage.setItem(        'loggedNoteappUser', JSON.stringify(user)      )       noteService.setToken(user.token)
      setUser(user)
      setUsername('')
      setPassword('')
    } catch (exception) {
      // ...
    }
  }
The details of a logged-in user are now saved to the local storage, and they can be viewed on the console (by typing window.localStorage in it):
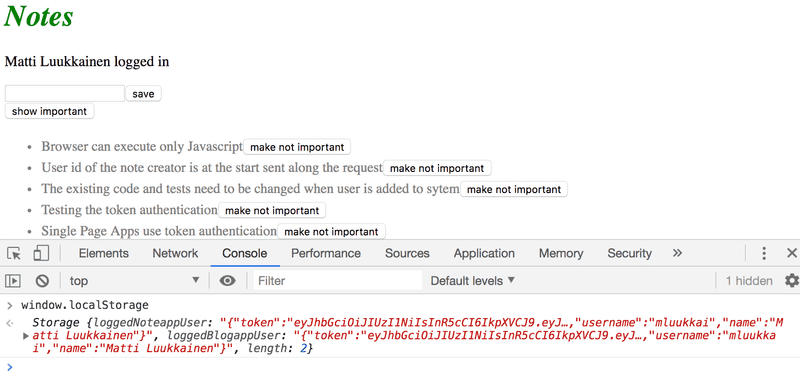
You can also inspect the local storage using the developer tools. On Chrome, go to the Application tab and select Local Storage (more details here). On Firefox go to the Storage tab and select Local Storage (details here).
We still have to modify our application so that when we enter the page, the application checks if user details of a logged-in user can already be found on the local storage. If they are there, the details are saved to the state of the application and to noteService.
The right way to do this is with an effect hook: a mechanism we first encountered in part 2, and used to fetch notes from the server.
We can have multiple effect hooks, so let's create a second one to handle the first loading of the page:
const App = () => {
  const [notes, setNotes] = useState([])
  const [newNote, setNewNote] = useState('')
  const [showAll, setShowAll] = useState(true)
  const [errorMessage, setErrorMessage] = useState(null)
  const [username, setUsername] = useState('')
  const [password, setPassword] = useState('')
  const [user, setUser] = useState(null)

  useEffect(() => {
    noteService.getAll().then(initialNotes => {
      setNotes(initialNotes)
    })
  }, [])

  useEffect(() => {    const loggedUserJSON = window.localStorage.getItem('loggedNoteappUser')    if (loggedUserJSON) {      const user = JSON.parse(loggedUserJSON)      setUser(user)      noteService.setToken(user.token)    }  }, [])
  // ...
}
The empty array as the parameter of the effect ensures that the effect is executed only when the component is rendered for the first time.
Now a user stays logged in to the application forever. We should probably add a logout functionality, which removes the login details from the local storage. We will however leave it as an exercise.
It's possible to log out a user using the console, and that is enough for now. You can log out with the command:
window.localStorage.removeItem('loggedNoteappUser')or with the command which empties localstorage completely:
window.localStorage.clear()The current application code can be found on GitHub, in the branch part5-3.
Exercises 5.1.-5.4.
We will now create a frontend for the blog list backend we created in the last part. You can use this application from GitHub as the base of your solution. You need to connect your backend with a proxy as shown in part 3.
It is enough to submit your finished solution. You can commit after each exercise, but that is not necessary.
The first few exercises revise everything we have learned about React so far. They can be challenging, especially if your backend is incomplete. It might be best to use the backend that we marked as the answer for part 4.
While doing the exercises, remember all of the debugging methods we have talked about, especially keeping an eye on the console.
Warning: If you notice you are mixing in the async/await and then commands, it's 99.9% certain you are doing something wrong. Use either or, never both.
5.1: Blog List Frontend, step 1
Clone the application from GitHub with the command:
git clone https://github.com/fullstack-hy2020/bloglist-frontendRemove the git configuration of the cloned application
cd bloglist-frontend   // go to cloned repository
rm -rf .git
The application is started the usual way, but you have to install its dependencies first:
npm install
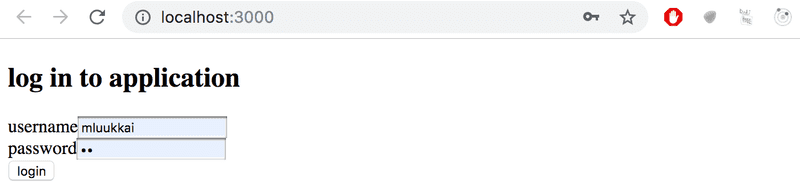
npm run devImplement login functionality to the frontend. The token returned with a successful login is saved to the application's state user.
If a user is not logged in, only the login form is visible.
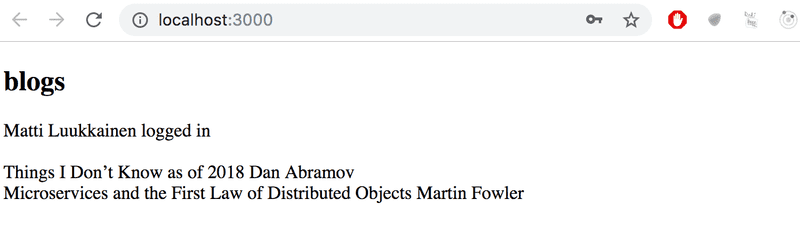
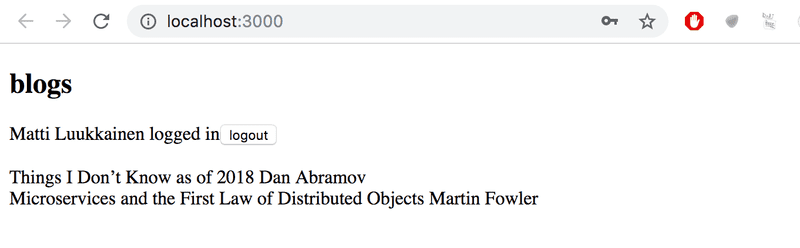
If the user is logged-in, the name of the user and a list of blogs is shown.
User details of the logged-in user do not have to be saved to the local storage yet.
NB You can implement the conditional rendering of the login form like this for example:
  if (user === null) {
    return (
      <div>
        <h2>Log in to application</h2>
        <form>
          //...
        </form>
      </div>
    )
  }

  return (
    <div>
      <h2>blogs</h2>
      {blogs.map(blog =>
        <Blog key={blog.id} blog={blog} />
      )}
    </div>
  )
}
5.2: Blog List Frontend, step 2
Make the login 'permanent' by using the local storage. Also, implement a way to log out.
Ensure the browser does not remember the details of the user after logging out.
5.3: Blog List Frontend, step 3
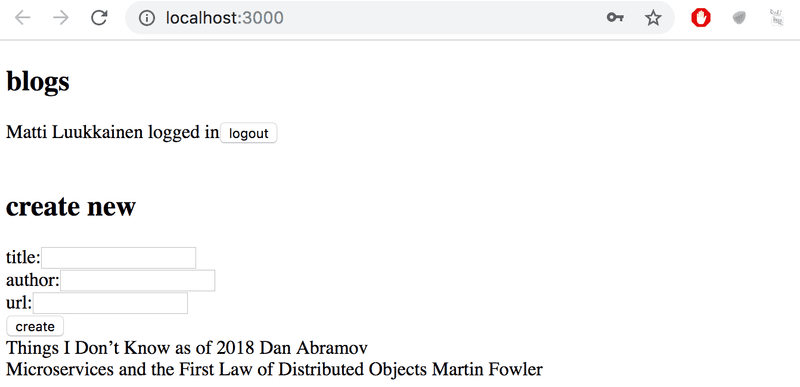
Expand your application to allow a logged-in user to add new blogs:
5.4: Blog List Frontend, step 4
Implement notifications that inform the user about successful and unsuccessful operations at the top of the page. For example, when a new blog is added, the following notification can be shown:

Failed login can show the following notification:
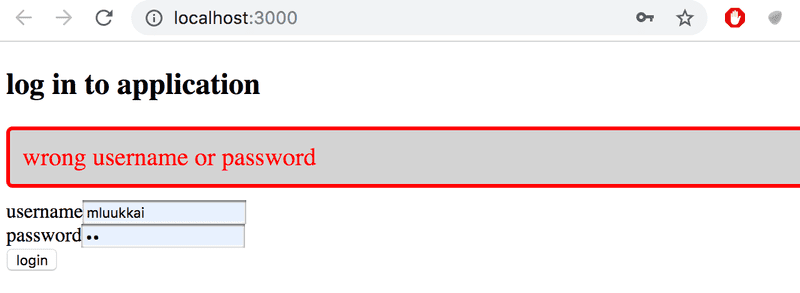
The notifications must be visible for a few seconds. It is not compulsory to add colors.
A note on using local storage
At the end of the last part, we mentioned that the challenge of token-based authentication is how to cope with the situation when the API access of the token holder to the API needs to be revoked.
There are two solutions to the problem. The first one is to limit the validity period of a token. This forces the user to re-login to the app once the token has expired. The other approach is to save the validity information of each token to the backend database. This solution is often called a server-side session.
No matter how the validity of tokens is checked and ensured, saving a token in the local storage might contain a security risk if the application has a security vulnerability that allows Cross Site Scripting (XSS) attacks. An XSS attack is possible if the application would allow a user to inject arbitrary JavaScript code (e.g. using a form) that the app would then execute. When using React sensibly it should not be possible since React sanitizes all text that it renders, meaning that it is not executing the rendered content as JavaScript.
If one wants to play safe, the best option is to not store a token in local storage. This might be an option in situations where leaking a token might have tragic consequences.
It has been suggested that the identity of a signed-in user should be saved as httpOnly cookies, so that JavaScript code could not have any access to the token. The drawback of this solution is that it would make implementing SPA applications a bit more complex. One would need at least to implement a separate page for logging in.
However, it is good to notice that even the use of httpOnly cookies does not guarantee anything. It has even been suggested that httpOnly cookies are not any safer than the use of local storage.
So no matter the used solution the most important thing is to minimize the risk of XSS attacks altogether.