d
Token authentication
Users must be able to log into our application, and when a user is logged in, their user information must automatically be attached to any new notes they create.
We will now implement support for token-based authentication to the backend.
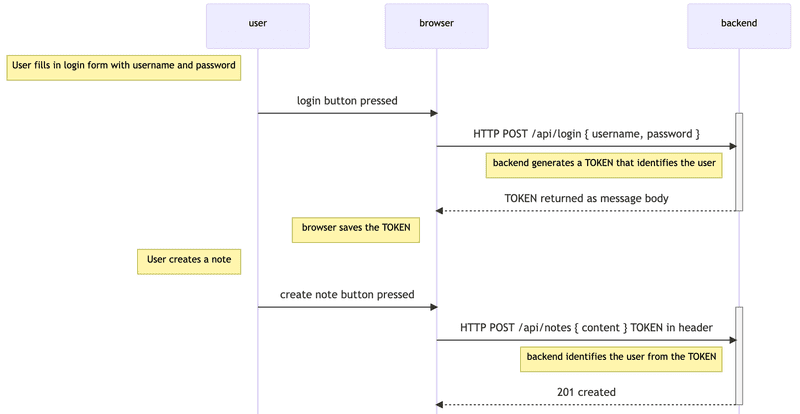
The principles of token-based authentication are depicted in the following sequence diagram:
-
User starts by logging in using a login form implemented with React
- We will add the login form to the frontend in part 5
- This causes the React code to send the username and the password to the server address /api/login as an HTTP POST request.
-
If the username and the password are correct, the server generates a token that somehow identifies the logged-in user.
- The token is signed digitally, making it impossible to falsify (with cryptographic means)
- The backend responds with a status code indicating the operation was successful and returns the token with the response.
- The browser saves the token, for example to the state of a React application.
- When the user creates a new note (or does some other operation requiring identification), the React code sends the token to the server with the request.
- The server uses the token to identify the user
Let's first implement the functionality for logging in. Install the jsonwebtoken library, which allows us to generate JSON web tokens.
npm install jsonwebtokenThe code for login functionality goes to the file controllers/login.js.
const jwt = require('jsonwebtoken')
const bcrypt = require('bcrypt')
const loginRouter = require('express').Router()
const User = require('../models/user')

loginRouter.post('/', async (request, response) => {
  const { username, password } = request.body

  const user = await User.findOne({ username })
  const passwordCorrect = user === null
    ? false
    : await bcrypt.compare(password, user.passwordHash)

  if (!(user && passwordCorrect)) {
    return response.status(401).json({
      error: 'invalid username or password'
    })
  }

  const userForToken = {
    username: user.username,
    id: user._id,
  }

  const token = jwt.sign(userForToken, process.env.SECRET)

  response
    .status(200)
    .send({ token, username: user.username, name: user.name })
})

module.exports = loginRouter
The code starts by searching for the user from the database by the username attached to the request.
const user = await User.findOne({ username })Next, it checks the password, also attached to the request.
const passwordCorrect = user === null
  ? false
  : await bcrypt.compare(password, user.passwordHash)
Because the passwords themselves are not saved to the database, but hashes calculated from the passwords, the bcrypt.compare method is used to check if the password is correct:
await bcrypt.compare(password, user.passwordHash)If the user is not found, or the password is incorrect, the request is responded with the status code 401 unauthorized. The reason for the failure is explained in the response body.
if (!(user && passwordCorrect)) {
  return response.status(401).json({
    error: 'invalid username or password'
  })
}
If the password is correct, a token is created with the method jwt.sign. The token contains the username and the user id in a digitally signed form.
const userForToken = {
  username: user.username,
  id: user._id,
}

const token = jwt.sign(userForToken, process.env.SECRET)
The token has been digitally signed using a string from the environment variable SECRET as the secret. The digital signature ensures that only parties who know the secret can generate a valid token. The value for the environment variable must be set in the .env file.
A successful request is responded to with the status code 200 OK. The generated token and the username of the user are sent back in the response body.
response
  .status(200)
  .send({ token, username: user.username, name: user.name })
Now the code for login just has to be added to the application by adding the new router to app.js.
const loginRouter = require('./controllers/login')
//...
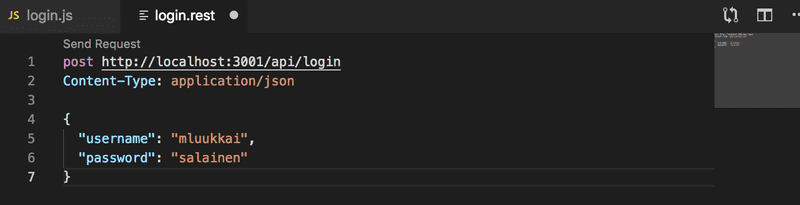
app.use('/api/login', loginRouter)Let's try logging in using VS Code REST-client:
It does not work. The following is printed to the console:
(node:32911) UnhandledPromiseRejectionWarning: Error: secretOrPrivateKey must have a value
    at Object.module.exports [as sign] (/Users/mluukkai/opetus/_2019fullstack-koodit/osa3/notes-backend/node_modules/jsonwebtoken/sign.js:101:20)
    at loginRouter.post (/Users/mluukkai/opetus/_2019fullstack-koodit/osa3/notes-backend/controllers/login.js:26:21)
(node:32911) UnhandledPromiseRejectionWarning: Unhandled promise rejection. This error originated either by throwing inside of an async function without a catch block, or by rejecting a promise which was not handled with .catch(). (rejection id: 2)
The command jwt.sign(userForToken, process.env.SECRET) fails. We forgot to set a value to the environment variable SECRET. It can be any string. When we set the value in file .env (and restart the server), the login works.
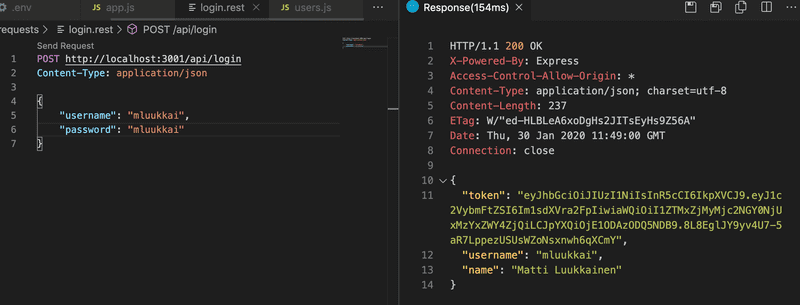
A successful login returns the user details and the token:
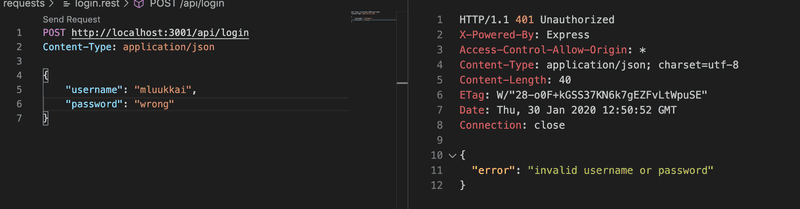
A wrong username or password returns an error message and the proper status code:
Limiting creating new notes to logged-in users
Let's change creating new notes so that it is only possible if the post request has a valid token attached. The note is then saved to the notes list of the user identified by the token.
There are several ways of sending the token from the browser to the server. We will use the Authorization header. The header also tells which authentication scheme is used. This can be necessary if the server offers multiple ways to authenticate. Identifying the scheme tells the server how the attached credentials should be interpreted.
The Bearer scheme is suitable for our needs.
In practice, this means that if the token is, for example, the string eyJhbGciOiJIUzI1NiIsInR5c2VybmFtZSI6Im1sdXVra2FpIiwiaW, the Authorization header will have the value:
Bearer eyJhbGciOiJIUzI1NiIsInR5c2VybmFtZSI6Im1sdXVra2FpIiwiaWCreating new notes will change like so (controllers/notes.js):
const jwt = require('jsonwebtoken')
// ...
const getTokenFrom = request => {  const authorization = request.get('authorization')  if (authorization && authorization.startsWith('Bearer ')) {    return authorization.replace('Bearer ', '')  }  return null}
notesRouter.post('/', async (request, response) => {
  const body = request.body
  const decodedToken = jwt.verify(getTokenFrom(request), process.env.SECRET)  if (!decodedToken.id) {    return response.status(401).json({ error: 'token invalid' })  }  const user = await User.findById(decodedToken.id)
  if (!user) {
    return response.status(400).json({ error: 'UserId missing or not valid' })
  }

  const note = new Note({
    content: body.content,
    important: body.important || false,
    user: user._id
  })

  const savedNote = await note.save()
  user.notes = user.notes.concat(savedNote._id)
  await user.save()

  response.status(201).json(savedNote)
})
The helper function getTokenFrom isolates the token from the authorization header. The validity of the token is checked with jwt.verify. The method also decodes the token, or returns the Object which the token was based on.
const decodedToken = jwt.verify(token, process.env.SECRET)If the token is missing or it is invalid, the exception JsonWebTokenError is raised. We need to extend the error handling middleware to take care of this particular case:
const errorHandler = (error, request, response, next) => {
  if (error.name === 'CastError') {
    return response.status(400).send({ error: 'malformatted id' })
  } else if (error.name === 'ValidationError') {
    return response.status(400).json({ error: error.message })
  } else if (error.name === 'MongoServerError' && error.message.includes('E11000 duplicate key error')) {
    return response.status(400).json({ error: 'expected `username` to be unique' })
  } else if (error.name ===  'JsonWebTokenError') {    return response.status(401).json({ error: 'token invalid' })  }

  next(error)
}
The object decoded from the token contains the username and id fields, which tell the server who made the request.
If the object decoded from the token does not contain the user's identity (decodedToken.id is undefined), error status code 401 unauthorized is returned and the reason for the failure is explained in the response body.
if (!decodedToken.id) {
  return response.status(401).json({
    error: 'token invalid'
  })
}
When the identity of the maker of the request is resolved, the execution continues as before.
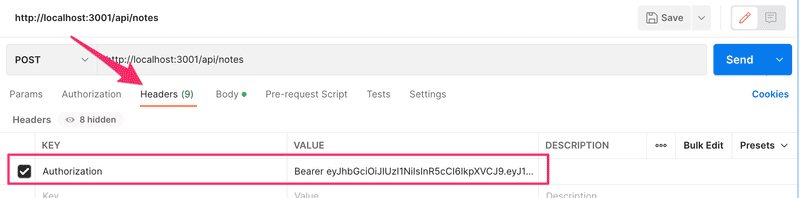
A new note can now be created using Postman if the authorization header is given the correct value, the string Bearer eyJhbGciOiJIUzI1NiIsInR5cCI6IkpXVCJ, where the second value is the token returned by the login operation.
Using Postman this looks as follows:
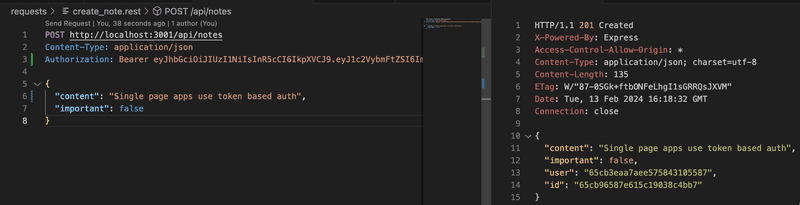
and with Visual Studio Code REST client
Current application code can be found on GitHub, branch part4-9.
If the application has multiple interfaces requiring identification, JWT's validation should be separated into its own middleware. An existing library like express-jwt could also be used.
Problems of Token-based authentication
Token authentication is pretty easy to implement, but it contains one problem. Once the API user, eg. a React app gets a token, the API has a blind trust to the token holder. What if the access rights of the token holder should be revoked?
There are two solutions to the problem. The easier one is to limit the validity period of a token:
loginRouter.post('/', async (request, response) => {
  const { username, password } = request.body

  const user = await User.findOne({ username })
  const passwordCorrect = user === null
    ? false
    : await bcrypt.compare(password, user.passwordHash)

  if (!(user && passwordCorrect)) {
    return response.status(401).json({
      error: 'invalid username or password'
    })
  }

  const userForToken = {
    username: user.username,
    id: user._id,
  }

  // token expires in 60*60 seconds, that is, in one hour
  const token = jwt.sign(    userForToken,     process.env.SECRET,    { expiresIn: 60*60 }  )
  response
    .status(200)
    .send({ token, username: user.username, name: user.name })
})
Once the token expires, the client app needs to get a new token. Usually, this happens by forcing the user to re-login to the app.
The error handling middleware should be extended to give a proper error in the case of an expired token:
const errorHandler = (error, request, response, next) => {
  logger.error(error.message)

  if (error.name === 'CastError') {
    return response.status(400).send({ error: 'malformatted id' })
  } else if (error.name === 'ValidationError') {
    return response.status(400).json({ error: error.message })
  } else if (error.name === 'MongoServerError' && error.message.includes('E11000 duplicate key error')) {
    return response.status(400).json({
      error: 'expected `username` to be unique'
    })
  } else if (error.name === 'JsonWebTokenError') {
    return response.status(401).json({
      error: 'invalid token'
    })
  } else if (error.name === 'TokenExpiredError') {    return response.status(401).json({      error: 'token expired'    })  }
  next(error)
}
The shorter the expiration time, the safer the solution is. If the token falls into the wrong hands or user access to the system needs to be revoked, the token is only usable for a limited amount of time. However, a short expiration time is a potential pain point for the user, as it requires them to log in more frequently.
The other solution is to save info about each token to the backend database and to check for each API request if the access rights corresponding to the tokens are still valid. With this scheme, access rights can be revoked at any time. This kind of solution is often called a server-side session.
The negative aspect of server-side sessions is the increased complexity in the backend and also the effect on performance since the token validity needs to be checked for each API request to the database. Database access is considerably slower compared to checking the validity of the token itself. That is why it is quite common to save the session corresponding to a token to a key-value database such as Redis, that is limited in functionality compared to eg. MongoDB or a relational database, but extremely fast in some usage scenarios.
When server-side sessions are used, the token is quite often just a random string, that does not include any information about the user as it is quite often the case when jwt-tokens are used. For each API request, the server fetches the relevant information about the identity of the user from the database. It is also quite usual that instead of using Authorization-header, cookies are used as the mechanism for transferring the token between the client and the server.
End notes
There have been many changes to the code which have caused a typical problem for a fast-paced software project: most of the tests have broken. Because this part of the course is already jammed with new information, we will leave fixing the tests to a non-compulsory exercise.
Usernames, passwords and applications using token authentication must always be used over HTTPS. We could use a Node HTTPS server in our application instead of the HTTP server (it requires more configuration). On the other hand, the production version of our application is in Fly.io, so our application stays secure: Fly.io routes all traffic between a browser and the Fly.io server over HTTPS.
We will implement login to the frontend in the next part.
Exercises 4.15.-4.23.
In the next exercises, the basics of user management will be implemented for the Bloglist application. The safest way is to follow the course material from part 4 chapter User administration to the chapter Token authentication. You can of course also use your creativity.
One more warning: If you notice you are mixing async/await and then calls, it is 99% certain you are doing something wrong. Use either or, never both.
4.15: Blog List Expansion, step 3
Implement a way to create new users by doing an HTTP POST request to address api/users. Users have a username, password and name.
Do not save passwords to the database as clear text, but use the bcrypt library like we did in part 4 chapter Creating users.
NB Some Windows users have had problems with bcrypt. If you run into problems, remove the library with command
npm uninstall bcrypt and install bcryptjs instead.
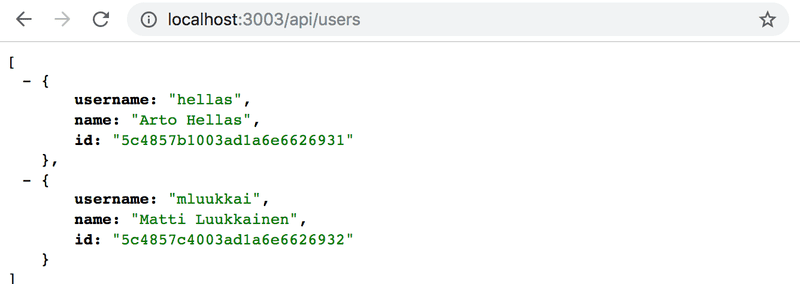
Implement a way to see the details of all users by doing a suitable HTTP request.
The list of users can, for example, look as follows:
4.16*: Blog List Expansion, step 4
Add a feature which adds the following restrictions to creating new users: Both username and password must be given and both must be at least 3 characters long. The username must be unique.
The operation must respond with a suitable status code and some kind of an error message if an invalid user is created.
NB Do not test password restrictions with Mongoose validations. It is not a good idea because the password received by the backend and the password hash saved to the database are not the same thing. The password length should be validated in the controller as we did in part 3 before using Mongoose validation.
Also, implement tests that ensure invalid users are not created and that an invalid add user operation returns a suitable status code and error message.
NB if you decide to define tests on multiple files, you should note that by default each test file is executed in its own process (see Test execution model in the documentation). The consequence of this is that different test files are executed at the same time. Since the tests share the same database, simultaneous execution may cause problems, which can be avoided by executing the tests with the option --test-concurrency=1, i.e. defining them to be executed sequentially.
4.17: Blog List Expansion, step 5
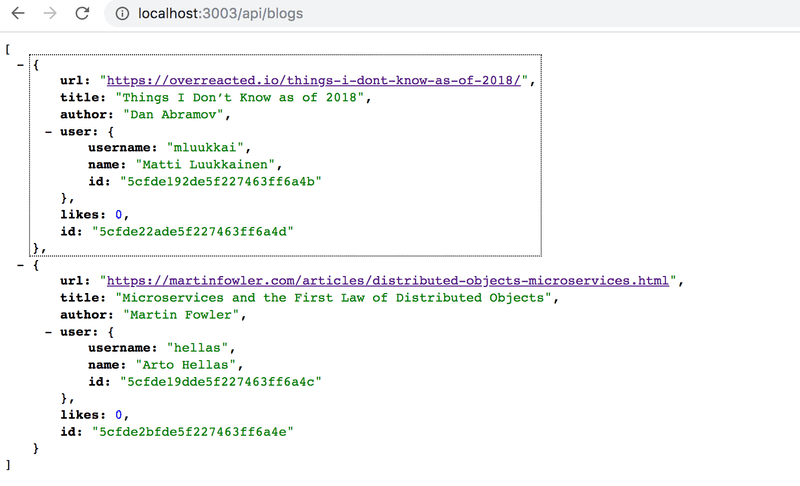
Expand blogs so that each blog contains information on the creator of the blog.
Modify adding new blogs so that when a new blog is created, any user from the database is designated as its creator (for example the one found first). Implement this according to part 4 chapter populate. Which user is designated as the creator does not matter just yet. The functionality is finished in exercise 4.19.
Modify listing all blogs so that the creator's user information is displayed with the blog:
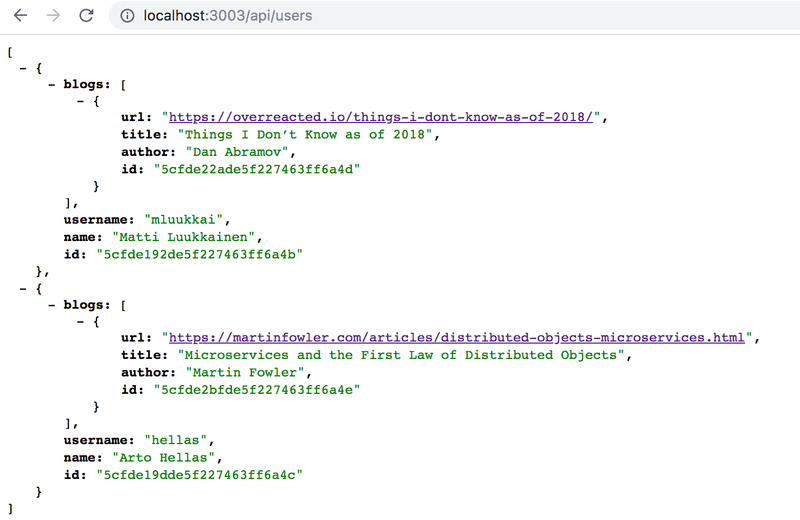
and listing all users also displays the blogs created by each user:
4.18: Blog List Expansion, step 6
Implement token-based authentication according to part 4 chapter Token authentication.
4.19: Blog List Expansion, step 7
Modify adding new blogs so that it is only possible if a valid token is sent with the HTTP POST request. The user identified by the token is designated as the creator of the blog.
4.20*: Blog List Expansion, step 8
This example from part 4 shows taking the token from the header with the getTokenFrom helper function in controllers/blogs.js.
If you used the same solution, refactor taking the token to a middleware. The middleware should take the token from the Authorization header and assign it to the token field of the request object.
In other words, if you register this middleware in the app.js file before all routes
app.use(middleware.tokenExtractor)Routes can access the token with request.token:
blogsRouter.post('/', async (request, response) => {
  // ..
  const decodedToken = jwt.verify(request.token, process.env.SECRET)
  // ..
})
Remember that a normal middleware function is a function with three parameters, that at the end calls the last parameter next to move the control to the next middleware:
const tokenExtractor = (request, response, next) => {
  // code that extracts the token

  next()
}
4.21*: Blog List Expansion, step 9
Change the delete blog operation so that a blog can be deleted only by the user who added it. Therefore, deleting a blog is possible only if the token sent with the request is the same as that of the blog's creator.
If deleting a blog is attempted without a token or by an invalid user, the operation should return a suitable status code.
Note that if you fetch a blog from the database,
const blog = await Blog.findById(...)the field blog.user does not contain a string, but an object. So if you want to compare the ID of the object fetched from the database and a string ID, a normal comparison operation does not work. The ID fetched from the database must be parsed into a string first.
if ( blog.user.toString() === userid.toString() ) ...4.22*: Blog List Expansion, step 10
Both the new blog creation and blog deletion need to find out the identity of the user who is doing the operation. The middleware tokenExtractor that we did in exercise 4.20 helps but still both the handlers of post and delete operations need to find out who the user holding a specific token is.
Now create a new middleware called userExtractor that identifies the user related to the request and attaches it to the request object. After registering the middleware, the post and delete handlers should be able to access the user directly by referencing request.user:
blogsRouter.post('/', userExtractor, async (request, response) => {
  // get user from request object
  const user = request.user
  // ..
})

blogsRouter.delete('/:id', userExtractor, async (request, response) => {
  // get user from request object
  const user = request.user
  // ..
})
Note that in this case, the userExtractor middleware has been registered with individual routes, so it is only executed in certain cases. So instead of using userExtractor with all the routes,
// use the middleware in all routes
app.use(middleware.userExtractor)
app.use('/api/blogs', blogsRouter)
app.use('/api/users', usersRouter)
app.use('/api/login', loginRouter)
we could register it to be only executed with path /api/blogs routes:
// use the middleware only in /api/blogs routes
app.use('/api/blogs', middleware.userExtractor, blogsRouter)app.use('/api/users', usersRouter)
app.use('/api/login', loginRouter)
This is done by chaining multiple middleware functions as parameters to the use function. In the same way, middleware can also be registered only for individual routes:
router.post('/', userExtractor, async (request, response) => {
  // ...
})
Make sure that fetching all blogs with a GET request still works without a token.
4.23*: Blog List Expansion, step 11
After adding token-based authentication the tests for adding a new blog broke down. Fix them. Also, write a new test to ensure adding a blog fails with the proper status code 401 Unauthorized if a token is not provided.
This is most likely useful when doing the fix.
This is the last exercise for this part of the course and it's time to push your code to GitHub and mark all of your finished exercises to the exercise submission system.