c
Testing React apps
There are many different ways of testing React applications. Let's take a look at them next.
The course previously used the Jest library developed by Facebook to test React components. We are now using the new generation of testing tools from Vite developers called Vitest. Apart from the configurations, the libraries provide the same programming interface, so there is virtually no difference in the test code.
Let's start by installing Vitest and the jsdom library simulating a web browser:
npm install --save-dev vitest jsdomIn addition to Vitest, we also need another testing library that will help us render components for testing purposes. The current best option for this is react-testing-library which has seen rapid growth in popularity in recent times. It is also worth extending the expressive power of the tests with the library jest-dom.
Let's install the libraries with the command:
npm install --save-dev @testing-library/react @testing-library/jest-domBefore we can do the first test, we need some configurations.
We add a script to the package.json file to run the tests:
{
  "scripts": {
    // ...
    "test": "vitest run"
  }
  // ...
}
Let's create a file testSetup.js in the project root with the following content
import { afterEach } from 'vitest'
import { cleanup } from '@testing-library/react'
import '@testing-library/jest-dom/vitest'

afterEach(() => {
  cleanup()
})
Now, after each test, the function cleanup is executed to reset jsdom, which is simulating the browser.
Expand the vite.config.js file as follows
export default defineConfig({
  // ...
  test: {
    environment: 'jsdom',
    globals: true,
    setupFiles: './testSetup.js',
  }
})
With globals: true, there is no need to import keywords such as describe, test and expect into the tests.
Let's first write tests for the component that is responsible for rendering a note:
const Note = ({ note, toggleImportance }) => {
  const label = note.important
    ? 'make not important'
    : 'make important'

  return (
    <li className='note'>      {note.content}
      <button onClick={toggleImportance}>{label}</button>
    </li>
  )
}
Notice that the li element has the value note for the CSS attribute className, that could be used to access the component in our tests.
Rendering the component for tests
We will write our test in the src/components/Note.test.jsx file, which is in the same directory as the component itself.
The first test verifies that the component renders the contents of the note:
import { render, screen } from '@testing-library/react'
import Note from './Note'

test('renders content', () => {
  const note = {
    content: 'Component testing is done with react-testing-library',
    important: true
  }

  render(<Note note={note} />)

  const element = screen.getByText('Component testing is done with react-testing-library')
  expect(element).toBeDefined()
})
After the initial configuration, the test renders the component with the render function provided by the react-testing-library:
render(<Note note={note} />)Normally React components are rendered to the DOM. The render method we used renders the components in a format that is suitable for tests without rendering them to the DOM.
We can use the object screen to access the rendered component. We use screen's method getByText to search for an element that has the note content and ensure that it exists:
  const element = screen.getByText('Component testing is done with react-testing-library')
  expect(element).toBeDefined()
The existence of an element is checked using Vitest's expect command. Expect generates an assertion for its argument, the validity of which can be tested using various condition functions. Now we used toBeDefined which tests whether the element argument of expect exists.
Run the test with command npm test:
$ npm test

> notes-frontend@0.0.0 test
> vitest run


 RUN  v3.2.3 /home/vejolkko/repot/fullstack-examples/notes-frontend

 ✓ src/components/Note.test.jsx (1 test) 19ms
   ✓ renders content 18ms

 Test Files  1 passed (1)
      Tests  1 passed (1)
   Start at  14:31:54
   Duration  874ms (transform 51ms, setup 169ms, collect 19ms, tests 19ms, environment 454ms, prepare 87ms)
Eslint complains about the keywords test and expect in the tests. The problem can be solved by adding the following configuration to the eslint.config.js file:
// ...

export default [
  // ...
  {    files: ['**/*.test.{js,jsx}'],    languageOptions: {      globals: {        ...globals.vitest      }    }  }]
This is how ESLint is informed that Vitest keywords are globally available in test files.
Test file location
In React there are (at least) two different conventions for the test file's location. We created our test files according to the current standard by placing them in the same directory as the component being tested.
The other convention is to store the test files "normally" in a separate test directory. Whichever convention we choose, it is almost guaranteed to be wrong according to someone's opinion.
I do not like this way of storing tests and application code in the same directory. However, we will follow this approach for now, as it is the most common practice in small projects.
Searching for content in a component
The react-testing-library package offers many different ways of investigating the content of the component being tested. In reality, the expect in our test is not needed at all:
import { render, screen } from '@testing-library/react'
import Note from './Note'

test('renders content', () => {
  const note = {
    content: 'Component testing is done with react-testing-library',
    important: true
  }

  render(<Note note={note} />)

  const element = screen.getByText('Component testing is done with react-testing-library')

  expect(element).toBeDefined()})
Test fails if getByText does not find the element it is looking for.
The getByText command, by default, searches for an element that contains only the text provided as a parameter and nothing else. Let us assume that a component would render text to an HTML element as follows:
const Note = ({ note, toggleImportance }) => {
  const label = note.important
    ? 'make not important' : 'make important'

  return (
    <li className='note'>
      Your awesome note: {note.content}      <button onClick={toggleImportance}>{label}</button>
    </li>
  )
}

export default Note
The getByText method that the test uses does not find the element:
test('renders content', () => {
  const note = {
    content: 'Does not work anymore :(',
    important: true
  }

  render(<Note note={note} />)

  const element = screen.getByText('Does not work anymore :(')

  expect(element).toBeDefined()
})
If we want to look for an element that contains the text, we could use an extra option:
const element = screen.getByText(
  'Does not work anymore :(', { exact: false }
)
or we could use the findByText method:
const element = await screen.findByText('Does not work anymore :(')It is important to notice that, unlike the other ByText methods, findByText returns a promise!
There are situations where yet another form of the queryByText method is useful. The method returns the element but it does not cause an exception if it is not found.
We could eg. use the method to ensure that something is not rendered to the component:
test('does not render this', () => {
  const note = {
    content: 'This is a reminder',
    important: true
  }

  render(<Note note={note} />)

  const element = screen.queryByText('do not want this thing to be rendered')
  expect(element).toBeNull()
})
Other methods also exist, such as getByTestId, which searches for elements based on id fields specifically created for testing purposes.
We could also use CSS-selectors to find rendered elements by using the method querySelector of the object container that is one of the fields returned by the render:
import { render, screen } from '@testing-library/react'
import Note from './Note'

test('renders content', () => {
  const note = {
    content: 'Component testing is done with react-testing-library',
    important: true
  }

  const { container } = render(<Note note={note} />)
  const div = container.querySelector('.note')  expect(div).toHaveTextContent(    'Component testing is done with react-testing-library'  )})
It is, however, recommended to search for elements primarily using methods other than the container object and CSS selectors. CSS attributes can often be changed without affecting the application's functionality, and users are not aware of them. It is better to search for elements based on properties visible to the user, for example, by using the getByText method. This way, the tests better simulate the actual nature of the component and how a user would find the element on the screen.
Debugging tests
We typically run into many different kinds of problems when writing our tests.
Object screen has method debug that can be used to print the HTML of a component to the terminal. If we change the test as follows:
import { render, screen } from '@testing-library/react'
import Note from './Note'

test('renders content', () => {
  const note = {
    content: 'Component testing is done with react-testing-library',
    important: true
  }

  render(<Note note={note} />)

  screen.debug()
  // ...

})
the HTML gets printed to the console:
console.log
  <body>
    <div>
      <li
        class="note"
      >
        Component testing is done with react-testing-library
        <button>
          make not important
        </button>
      </li>
    </div>
  </body>
It is also possible to use the same method to print a wanted element to console:
import { render, screen } from '@testing-library/react'
import Note from './Note'

test('renders content', () => {
  const note = {
    content: 'Component testing is done with react-testing-library',
    important: true
  }

  render(<Note note={note} />)

  const element = screen.getByText('Component testing is done with react-testing-library')

  screen.debug(element)
  expect(element).toBeDefined()
})
Now the HTML of the wanted element gets printed:
  <li
    class="note"
  >
    Component testing is done with react-testing-library
    <button>
      make not important
    </button>
  </li>
Clicking buttons in tests
In addition to displaying content, the Note component also makes sure that when the button associated with the note is pressed, the toggleImportance event handler function gets called.
Let us install a library user-event that makes simulating user input a bit easier:
npm install --save-dev @testing-library/user-eventTesting this functionality can be accomplished like this:
import { render, screen } from '@testing-library/react'
import userEvent from '@testing-library/user-event'import Note from './Note'

// ...

test('clicking the button calls event handler once', async () => {
  const note = {
    content: 'Component testing is done with react-testing-library',
    important: true
  }

  const mockHandler = vi.fn()
  render(
    <Note note={note} toggleImportance={mockHandler} />  )

  const user = userEvent.setup()  const button = screen.getByText('make not important')  await user.click(button)
  expect(mockHandler.mock.calls).toHaveLength(1)})
There are a few interesting things related to this test. The event handler is a mock function defined with Vitest:
const mockHandler = vi.fn()A session is started to interact with the rendered component:
const user = userEvent.setup()The test finds the button based on the text from the rendered component and clicks the element:
const button = screen.getByText('make not important')
await user.click(button)
Clicking happens with the method click of the userEvent-library.
The expectation of the test uses toHaveLength to verify that the mock function has been called exactly once:
expect(mockHandler.mock.calls).toHaveLength(1)The calls to the mock function are saved to the array mock.calls within the mock function object.
Mock objects and functions are commonly used stub components in testing that are used for replacing dependencies of the components being tested. Mocks make it possible to return hardcoded responses, and to verify the number of times the mock functions are called and with what parameters.
In our example, the mock function is a perfect choice since it can be easily used for verifying that the method gets called exactly once.
Tests for the Togglable component
Let's write a few tests for the Togglable component. The tests are shown below:
import { render, screen } from '@testing-library/react'
import userEvent from '@testing-library/user-event'
import Togglable from './Togglable'

describe('<Togglable />', () => {
  beforeEach(() => {
    render(
      <Togglable buttonLabel="show...">
        <div>togglable content</div>
      </Togglable>
    )
  })

  test('renders its children', () => {
    screen.getByText('togglable content')
  })

  test('at start the children are not displayed', () => {
    const element = screen.getByText('togglable content')
    expect(element).not.toBeVisible()
  })

  test('after clicking the button, children are displayed', async () => {
    const user = userEvent.setup()
    const button = screen.getByText('show...')
    await user.click(button)

    const element = screen.getByText('togglable content')
    expect(element).toBeVisible()
  })
})
The beforeEach function gets called before each test, which then renders the Togglable component.
The first test verifies that the Togglable component renders its child component
<div>
  togglable content
</div>
The remaining tests use the toBeVisible method to verify that the child component of the Togglable component is not visible initially, i.e. that the style of the div element contains { display: 'none' }. Another test verifies that when the button is pressed the component is visible, meaning that the style for hiding it is no longer assigned to the component.
Let's also add a test that can be used to verify that the visible content can be hidden by clicking the second button of the component:
describe('<Togglable />', () => {

  // ...

  test('toggled content can be closed', async () => {
    const user = userEvent.setup()
    const button = screen.getByText('show...')
    await user.click(button)

    const closeButton = screen.getByText('cancel')
    await user.click(closeButton)

    const element = screen.getByText('togglable content')
    expect(element).not.toBeVisible()
  })
})
Testing the forms
We already used the click function of the user-event in our previous tests to click buttons.
const user = userEvent.setup()
const button = screen.getByText('show...')
await user.click(button)
We can also simulate text input with userEvent.
Let's make a test for the NoteForm component. The code of the component is as follows.
import { useState } from 'react'

const NoteForm = ({ createNote }) => {
  const [newNote, setNewNote] = useState('')

  const addNote = event => {
    event.preventDefault()
    createNote({
      content: newNote,
      important: true
    })

    setNewNote('')
  }

  return (
    <div>
      <h2>Create a new note</h2>

      <form onSubmit={addNote}>
        <input
          value={newNote}
          onChange={event => setNewNote(event.target.value)}
        />
        <button type="submit">save</button>
      </form>
    </div>
  )
}

export default NoteForm
The form works by calling the function received as props createNote, with the details of the new note.
The test is as follows:
import { render, screen } from '@testing-library/react'
import NoteForm from './NoteForm'
import userEvent from '@testing-library/user-event'

test('<NoteForm /> updates parent state and calls onSubmit', async () => {
  const createNote = vi.fn()
  const user = userEvent.setup()

  render(<NoteForm createNote={createNote} />)

  const input = screen.getByRole('textbox')
  const sendButton = screen.getByText('save')

  await user.type(input, 'testing a form...')
  await user.click(sendButton)

  expect(createNote.mock.calls).toHaveLength(1)
  expect(createNote.mock.calls[0][0].content).toBe('testing a form...')
})
Tests get access to the input field using the function getByRole.
The method type of the userEvent is used to write text to the input field.
The first test expectation ensures that submitting the form calls the createNote method. The second expectation checks that the event handler is called with the right parameters - that a note with the correct content is created when the form is filled.
It's worth noting that the good old console.log works as usual in the tests. For example, if you want to see what the calls stored by the mock-object look like, you can do the following
test('<NoteForm /> updates parent state and calls onSubmit', async() => {
  const user = userEvent.setup()
  const createNote = vi.fn()

  render(<NoteForm createNote={createNote} />)

  const input = screen.getByRole('textbox')
  const sendButton = screen.getByText('save')

  await user.type(input, 'testing a form...')
  await user.click(sendButton)

  console.log(createNote.mock.calls)})
In the middle of running the tests, the following is printed in the console:
[ [ { content: 'testing a form...', important: true } ] ]About finding the elements
Let us assume that the form has two input fields
const NoteForm = ({ createNote }) => {
  // ...

  return (
    <div>
      <h2>Create a new note</h2>

      <form onSubmit={addNote}>
        <input
          value={newNote}
          onChange={event => setNewNote(event.target.value)}
        />
        <input          value={...}          onChange={...}        />        <button type="submit">save</button>
      </form>
    </div>
  )
}
Now the approach that our test uses to find the input field
const input = screen.getByRole('textbox')would cause an error:
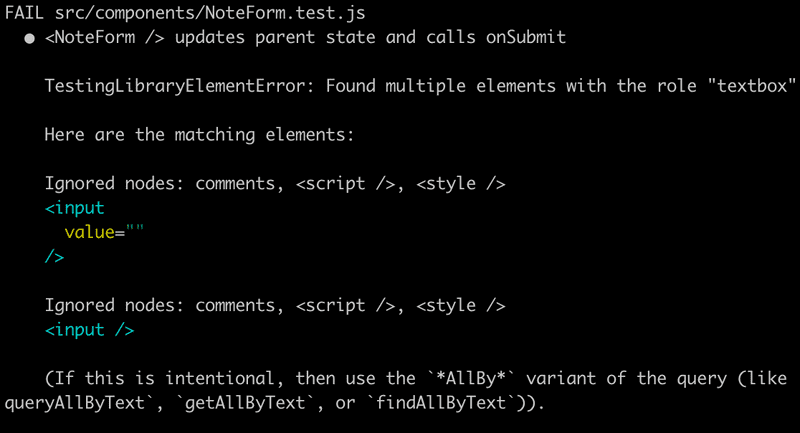
The error message suggests using getAllByRole. The test could be fixed as follows:
const inputs = screen.getAllByRole('textbox')

await user.type(inputs[0], 'testing a form...')
Method getAllByRole now returns an array and the right input field is the first element of the array. However, this approach is a bit suspicious since it relies on the order of the input fields.
If a label were defined for the input field, the input field could be located using it with the getByLabelText method. For example, if we added a label to the input field:
  // ...
  <label>    content    <input
      value={newNote}
      onChange={event => setNewNote(event.target.value)}
    />
  </label>  // ...
The test could locate the input field as follows:
test('<NoteForm /> updates parent state and calls onSubmit', async () => {
  const user = userEvent.setup()
  const createNote = vi.fn()

  render(<NoteForm createNote={createNote} />)

  const input = screen.getByLabelText('content')  const sendButton = screen.getByText('save')

  await user.type(input, 'testing a form...')
  await user.click(sendButton)

  expect(createNote.mock.calls).toHaveLength(1)
  expect(createNote.mock.calls[0][0].content).toBe('testing a form...')
})
Quite often input fields have a placeholder text that hints user what kind of input is expected. Let us add a placeholder to our form:
const NoteForm = ({ createNote }) => {
  // ...

  return (
    <div>
      <h2>Create a new note</h2>

      <form onSubmit={addNote}>
        <input
          value={newNote}
          onChange={event => setNewNote(event.target.value)}
          placeholder='write note content here'        />
        <input
          value={...}
          onChange={...}
        />
        <button type="submit">save</button>
      </form>
    </div>
  )
}
Now finding the right input field is easy with the method getByPlaceholderText:
test('<NoteForm /> updates parent state and calls onSubmit', async () => {
  const user = userEvent.setup()
  const createNote = vi.fn()

  render(<NoteForm createNote={createNote} />)

  const input = screen.getByPlaceholderText('write note content here')  const sendButton = screen.getByText('save')

  await user.type(input, 'testing a form...')
  await user.click(sendButton)

  expect(createNote.mock.calls).toHaveLength(1)
  expect(createNote.mock.calls[0][0].content).toBe('testing a form...')
})
Sometimes, finding the correct element using the methods described above can be challenging. In such cases, an alternative is the method querySelector of the container object, which is returned by render, as was mentioned earlier in this part. Any CSS selector can be used with this method for searching elements in tests.
Consider eg. that we would define a unique id to the input field:
const NoteForm = ({ createNote }) => {
  // ...

  return (
    <div>
      <h2>Create a new note</h2>

      <form onSubmit={addNote}>
        <input
          value={newNote}
          onChange={event => setNewNote(event.target.value)}
          id='note-input'        />
        <input
          value={...}
          onChange={...}
        />
        <button type="submit">save</button>
      </form>
    </div>
  )
}
The input element could now be found in the test as follows:
const { container } = render(<NoteForm createNote={createNote} />)

const input = container.querySelector('#note-input')
However, we shall stick to the approach of using getByPlaceholderText in the test.
Test coverage
We can easily find out the coverage of our tests by running them with the command.
npm test -- --coverageThe first time you run the command, Vitest will ask you if you want to install the required library @vitest/coverage-v8. Install it, and run the command again:
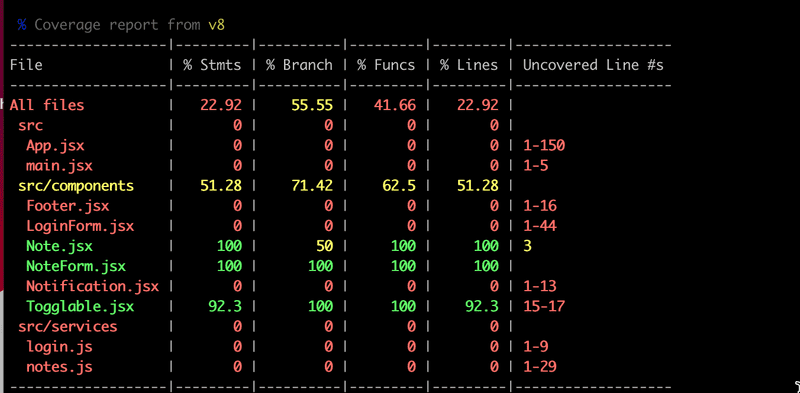
A HTML report will be generated to the coverage directory. The report will tell us the lines of untested code in each component:
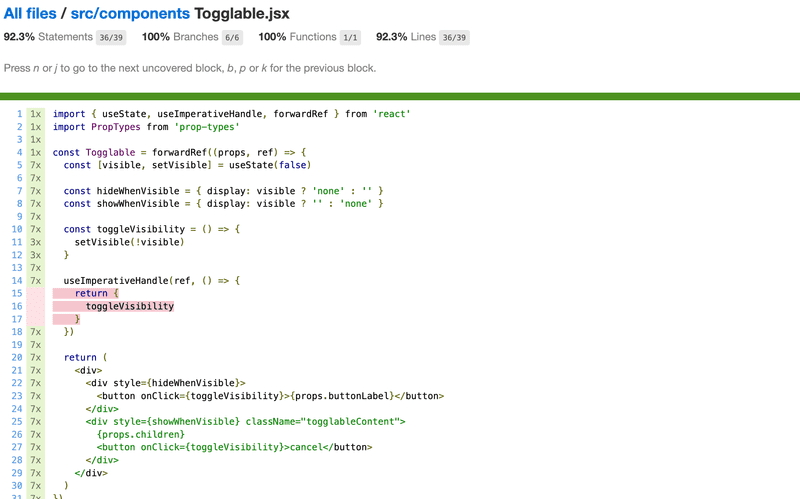
Let's add the directory coverage/ to the .gitignore file to exclude its contents from version control:
//...

coverage/
You can find the code for our current application in its entirety in the part5-8 branch of this GitHub repository.
Frontend integration tests
In the previous part of the course material, we wrote integration tests for the backend that tested its logic and connected the database through the API provided by the backend. When writing these tests, we made the conscious decision not to write unit tests, as the code for that backend is fairly simple, and it is likely that bugs in our application occur in more complicated scenarios than unit tests are well suited for.
So far all of our tests for the frontend have been unit tests that have validated the correct functioning of individual components. Unit testing is useful at times, but even a comprehensive suite of unit tests is not enough to validate that the application works as a whole.
We could also make integration tests for the frontend. Integration testing tests the collaboration of multiple components. It is considerably more difficult than unit testing, as we would have to for example mock data from the server. We chose to concentrate on making end-to-end tests to test the whole application. We will work on the end-to-end tests in the last chapter of this part.
Snapshot testing
Vitest offers a completely different alternative to "traditional" testing called snapshot testing. The interesting feature of snapshot testing is that developers do not need to define any tests themselves, it is simple enough to adopt snapshot testing.
The fundamental principle is to compare the HTML code defined by the component after it has changed to the HTML code that existed before it was changed.
If the snapshot notices some change in the HTML defined by the component, then either it is new functionality or a "bug" caused by accident. Snapshot tests notify the developer if the HTML code of the component changes. The developer has to tell Vitest if the change was desired or undesired. If the change to the HTML code is unexpected, it strongly implies a bug, and the developer can become aware of these potential issues easily thanks to snapshot testing.