a
Node.js and Express
In this part, our focus shifts towards the backend: that is, towards implementing functionality on the server side of the stack.
We will be building our backend on top of NodeJS, which is a JavaScript runtime based on Google's Chrome V8 JavaScript engine.
This course material was written with version v22.3.0 of Node.js. Please make sure that your version of Node is at least as new as the version used in the material (you can check the version by running node -v in the command line).
As mentioned in part 1, browsers don't yet support the newest features of JavaScript, and that is why the code running in the browser must be transpiled with e.g. babel. The situation with JavaScript running in the backend is different. The newest version of Node supports a large majority of the latest features of JavaScript, so we can use the latest features without having to transpile our code.
Our goal is to implement a backend that will work with the notes application from part 2. However, let's start with the basics by implementing a classic "hello world" application.
Notice that the applications and exercises in this part are not all React applications, and we will not use the create vite@latest -- --template react utility for initializing the project for this application.
We had already mentioned npm back in part 2, which is a tool used for managing JavaScript packages. In fact, npm originates from the Node ecosystem.
Let's navigate to an appropriate directory, and create a new template for our application with the npm init command. We will answer the questions presented by the utility, and the result will be an automatically generated package.json file at the root of the project that contains information about the project.
{
  "name": "backend",
  "version": "0.0.1",
  "description": "",
  "main": "index.js",
  "scripts": {
    "test": "echo \"Error: no test specified\" && exit 1"
  },
  "author": "Matti Luukkainen",
  "license": "MIT"
}
The file defines, for instance, that the entry point of the application is the index.js file.
Let's make a small change to the scripts object by adding a new script command.
{
  // ...
  "scripts": {
    "start": "node index.js",    "test": "echo \"Error: no test specified\" && exit 1"
  },
  // ...
}
Next, let's create the first version of our application by adding an index.js file to the root of the project with the following code:
console.log('hello world')We can run the program directly with Node from the command line:
node index.jsOr we can run it as an npm script:
npm startThe start npm script works because we defined it in the package.json file:
{
  // ...
  "scripts": {
    "start": "node index.js",
    "test": "echo \"Error: no test specified\" && exit 1"
  },
  // ...
}
Even though the execution of the project works when it is started by calling node index.js from the command line, it's customary for npm projects to execute such tasks as npm scripts.
By default, the package.json file also defines another commonly used npm script called npm test. Since our project does not yet have a testing library, the npm test command simply executes the following command:
echo "Error: no test specified" && exit 1Simple web server
Let's change the application into a web server by editing the index.js file as follows:
const http = require('http')

const app = http.createServer((request, response) => {
  response.writeHead(200, { 'Content-Type': 'text/plain' })
  response.end('Hello World')
})

const PORT = 3001
app.listen(PORT)
console.log(`Server running on port ${PORT}`)
Once the application is running, the following message is printed in the console:
Server running on port 3001We can open our humble application in the browser by visiting the address http://localhost:3001:

The server works the same way regardless of the latter part of the URL. Also the address http://localhost:3001/foo/bar will display the same content.
NB If port 3001 is already in use by some other application, then starting the server will result in the following error message:
➜  hello npm start

> hello@1.0.0 start /Users/mluukkai/opetus/_2019fullstack-code/part3/hello
> node index.js

Server running on port 3001
events.js:167
      throw er; // Unhandled 'error' event
      ^

Error: listen EADDRINUSE :::3001
    at Server.setupListenHandle [as _listen2] (net.js:1330:14)
    at listenInCluster (net.js:1378:12)
You have two options. Either shut down the application using port 3001 (the JSON Server in the last part of the material was using port 3001), or use a different port for this application.
Let's take a closer look at the first line of the code:
const http = require('http')In the first row, the application imports Node's built-in web server module. This is practically what we have already been doing in our browser-side code, but with a slightly different syntax:
import http from 'http'These days, code that runs in the browser uses ES6 modules. Modules are defined with an export and included in the current file with an import.
Node.js uses CommonJS modules. The reason for this is that the Node ecosystem needed modules long before JavaScript supported them in the language specification. Currently, Node also supports the use of ES6 modules, but since the support is not quite perfect yet, we'll stick to CommonJS modules.
CommonJS modules function almost exactly like ES6 modules, at least as far as our needs in this course are concerned.
The next chunk in our code looks like this:
const app = http.createServer((request, response) => {
response.writeHead(200, { 'Content-Type': 'text/plain' })
response.end('Hello World')
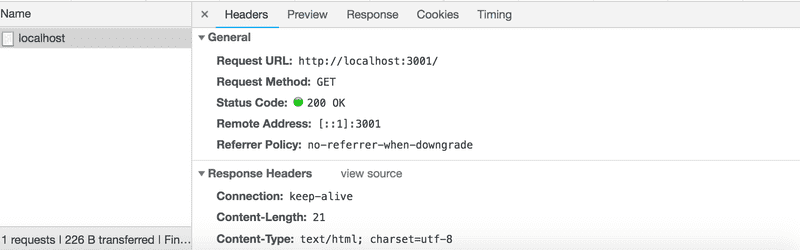
})The code uses the createServer method of the http module to create a new web server. An event handler is registered to the server that is called every time an HTTP request is made to the server's address http://localhost:3001.
The request is responded to with the status code 200, with the Content-Type header set to text/plain, and the content of the site to be returned set to Hello World.
The last rows bind the http server assigned to the app variable, to listen to HTTP requests sent to port 3001:
const PORT = 3001
app.listen(PORT)
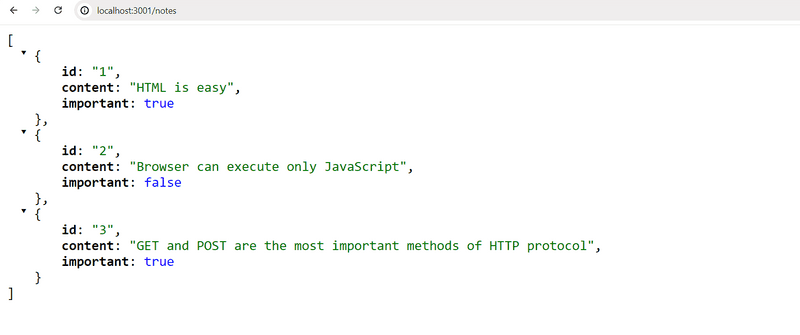
console.log(`Server running on port ${PORT}`)The primary purpose of the backend server in this course is to offer raw data in JSON format to the frontend. For this reason, let's immediately change our server to return a hardcoded list of notes in the JSON format:
const http = require('http')

let notes = [  {    id: "1",    content: "HTML is easy",    important: true  },  {    id: "2",    content: "Browser can execute only JavaScript",    important: false  },  {    id: "3",    content: "GET and POST are the most important methods of HTTP protocol",    important: true  }]const app = http.createServer((request, response) => {  response.writeHead(200, { 'Content-Type': 'application/json' })  response.end(JSON.stringify(notes))})
const PORT = 3001
app.listen(PORT)
console.log(`Server running on port ${PORT}`)
Let's restart the server (you can shut the server down by pressing Ctrl+C in the console) and let's refresh the browser.
The application/json value in the Content-Type header informs the receiver that the data is in the JSON format. The notes array gets transformed into JSON formatted string with the JSON.stringify(notes) method. This is necessary because the response.end() method expects a string or a buffer to send as the response body.
When we open the browser, the displayed format is exactly the same as in part 2 where we used json-server to serve the list of notes:
Express
Implementing our server code directly with Node's built-in http web server is possible. However, it is cumbersome, especially once the application grows in size.
Many libraries have been developed to ease server-side development with Node, by offering a more pleasing interface to work with the built-in http module. These libraries aim to provide a better abstraction for general use cases we usually require to build a backend server. By far the most popular library intended for this purpose is Express.
Let's take Express into use by defining it as a project dependency with the command:
npm install expressThe dependency is also added to our package.json file:
{
  // ...
  "dependencies": {
    "express": "^5.1.0"
  }
}
The source code for the dependency is installed in the node_modules directory located at the root of the project. In addition to Express, you can find a great number of other dependencies in the directory:
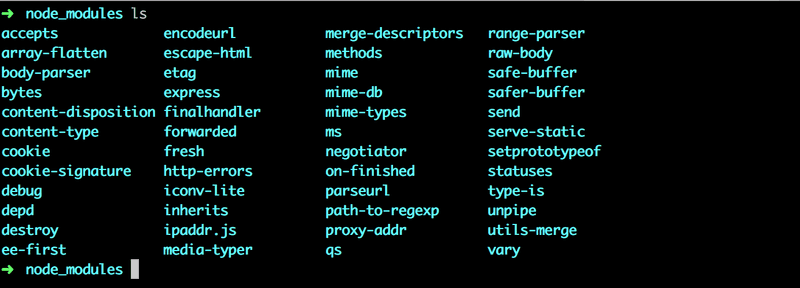
These are the dependencies of the Express library and the dependencies of all of its dependencies, and so forth. These are called the transitive dependencies of our project.
Version 5.1.0 of Express was installed in our project. What does the caret in front of the version number in package.json mean?
"express": "^5.1.0"The versioning model used in npm is called semantic versioning.
The caret in the front of ^5.1.0 means that if and when the dependencies of a project are updated, the version of Express that is installed will be at least 5.1.0. However, the installed version of Express can also have a larger patch number (the last number), or a larger minor number (the middle number). The major version of the library indicated by the first major number must be the same.
We can update the dependencies of the project with the command:
npm updateLikewise, if we start working on the project on another computer, we can install all up-to-date dependencies of the project defined in package.json by running this next command in the project's root directory:
npm installIf the major number of a dependency does not change, then the newer versions should be backwards compatible. This means that if our application happened to use version 5.99.175 of Express in the future, then all the code implemented in this part would still have to work without making changes to the code. In contrast, the future 6.0.0 version of Express may contain changes that would cause our application to no longer work.
Web and Express
Let's get back to our application and make the following changes:
const express = require('express')
const app = express()

let notes = [
  ...
]

app.get('/', (request, response) => {
  response.send('<h1>Hello World!</h1>')
})

app.get('/api/notes', (request, response) => {
  response.json(notes)
})

const PORT = 3001
app.listen(PORT, () => {
  console.log(`Server running on port ${PORT}`)
})
To get the new version of our application into use, first we have to restart it.
The application did not change a whole lot. Right at the beginning of our code, we're importing express, which this time is a function that is used to create an Express application stored in the app variable:
const express = require('express')
const app = express()
Next, we define two routes to the application. The first one defines an event handler that is used to handle HTTP GET requests made to the application's / root:
app.get('/', (request, response) => {
  response.send('<h1>Hello World!</h1>')
})
The event handler function accepts two parameters. The first request parameter contains all of the information of the HTTP request, and the second response parameter is used to define how the request is responded to.
In our code, the request is answered by using the send method of the response object. Calling the method makes the server respond to the HTTP request by sending a response containing the string <h1>Hello World!</h1> that was passed to the send method. Since the parameter is a string, Express automatically sets the value of the Content-Type header to be text/html. The status code of the response defaults to 200.
We can verify this from the Network tab in developer tools:
The second route defines an event handler that handles HTTP GET requests made to the notes path of the application:
app.get('/api/notes', (request, response) => {
  response.json(notes)
})
The request is responded to with the json method of the response object. Calling the method will send the notes array that was passed to it as a JSON formatted string. Express automatically sets the Content-Type header with the appropriate value of application/json.
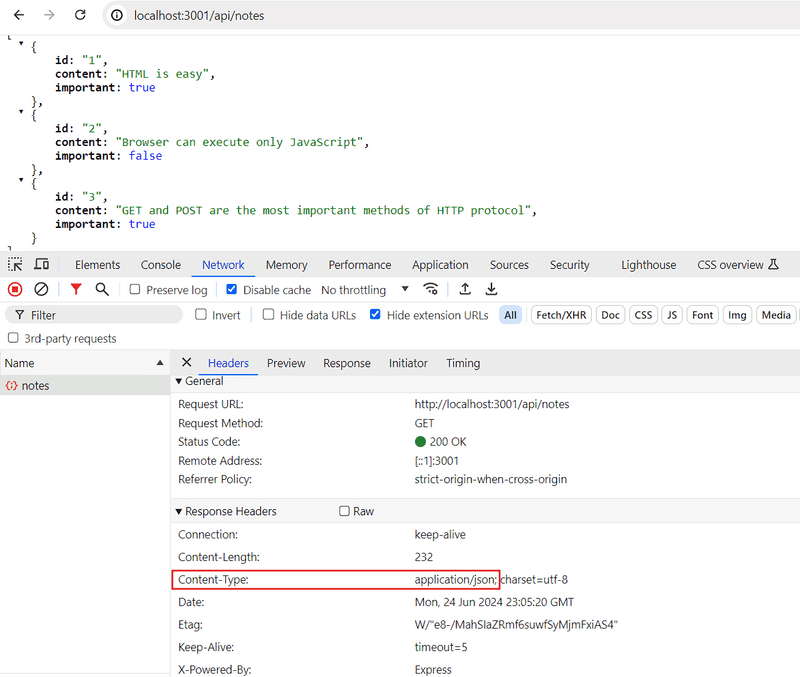
Next, let's take a quick look at the data sent in JSON format.
In the earlier version where we were only using Node, we had to transform the data into the JSON formatted string with the JSON.stringify method:
response.end(JSON.stringify(notes))With Express, this is no longer required, because this transformation happens automatically.
It's worth noting that JSON is a data format. However, it's often represented as a string and is not the same as a JavaScript object, like the value assigned to notes.
The experiment shown below illustrates this point:

The experiment above was done in the interactive node-repl. You can start the interactive node-repl by typing in node in the command line. The repl is particularly useful for testing how commands work while you're writing application code. I highly recommend this!
Automatic Change Tracking
If we change the application's code, we first need to stop the application from the console (ctrl + c) and then restart it for the changes to take effect. Restarting feels cumbersome compared to React's smooth workflow, where the browser automatically updates when the code changes.
You can make the server track our changes by starting it with the --watch option:
node --watch index.jsNow, changes to the application's code will cause the server to restart automatically. Note that although the server restarts automatically, you still need to refresh the browser. Unlike with React, we do not have, nor could we have, a hot reload functionality that updates the browser in this scenario (where we return JSON data).
Let's define a custom npm script in the package.json file to start the development server:
{
  // ..
  "scripts": {
    "start": "node index.js",
    "dev": "node --watch index.js",    "test": "echo \"Error: no test specified\" && exit 1"
  },
  // ..
}
We can now start the server in development mode with the command
npm run devUnlike when running the start or test scripts, the command must include run.
REST
Let's expand our application so that it provides the same RESTful HTTP API as json-server.
Representational State Transfer, aka REST, was introduced in 2000 in Roy Fielding's dissertation. REST is an architectural style meant for building scalable web applications.
We are not going to dig into Fielding's definition of REST or spend time pondering about what is and isn't RESTful. Instead, we take a more narrow view by only concerning ourselves with how RESTful APIs are typically understood in web applications. The original definition of REST is not even limited to web applications.
We mentioned in the previous part that singular things, like notes in the case of our application, are called resources in RESTful thinking. Every resource has an associated URL which is the resource's unique address.
One convention for creating unique addresses is to combine the name of the resource type with the resource's unique identifier.
Let's assume that the root URL of our service is www.example.com/api.
If we define the resource type of note to be notes, then the address of a note resource with the identifier 10, has the unique address www.example.com/api/notes/10.
The URL for the entire collection of all note resources is www.example.com/api/notes.
We can execute different operations on resources. The operation to be executed is defined by the HTTP verb:
| URL | verb | functionality |
|---|---|---|
| notes/10 | GET | fetches a single resource |
| notes | GET | fetches all resources in the collection |
| notes | POST | creates a new resource based on the request data |
| notes/10 | DELETE | removes the identified resource |
| notes/10 | PUT | replaces the entire identified resource with the request data |
| notes/10 | PATCH | replaces a part of the identified resource with the request data |
This is how we manage to roughly define what REST refers to as a uniform interface, which means a consistent way of defining interfaces that makes it possible for systems to cooperate.
This way of interpreting REST falls under the second level of RESTful maturity in the Richardson Maturity Model. According to the definition provided by Roy Fielding, we have not defined a REST API. In fact, a large majority of the world's purported "REST" APIs do not meet Fielding's original criteria outlined in his dissertation.
In some places (see e.g. Richardson, Ruby: RESTful Web Services) you will see our model for a straightforward CRUD API, being referred to as an example of resource-oriented architecture instead of REST. We will avoid getting stuck arguing semantics and instead return to working on our application.
Fetching a single resource
Let's expand our application so that it offers a REST interface for operating on individual notes. First, let's create a route for fetching a single resource.
The unique address we will use for an individual note is of the form notes/10, where the number at the end refers to the note's unique id number.
We can define parameters for routes in Express by using the colon syntax:
app.get('/api/notes/:id', (request, response) => {
  const id = request.params.id
  const note = notes.find(note => note.id === id)
  response.json(note)
})
Now app.get('/api/notes/:id', ...) will handle all HTTP GET requests that are of the form /api/notes/SOMETHING, where SOMETHING is an arbitrary string.
The id parameter in the route of a request can be accessed through the request object:
const id = request.params.idThe now familiar find method of arrays is used to find the note with an id that matches the parameter. The note is then returned to the sender of the request.
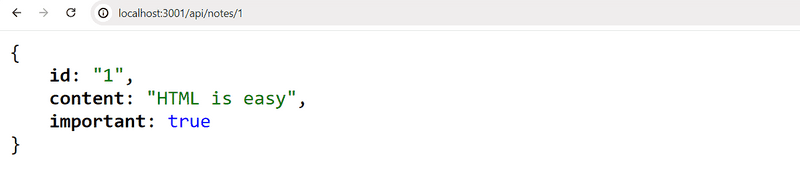
We can now test our application by going to http://localhost:3001/api/notes/1 in our browser:
However, there's another problem with our application.
If we search for a note with an id that does not exist, the server responds with:
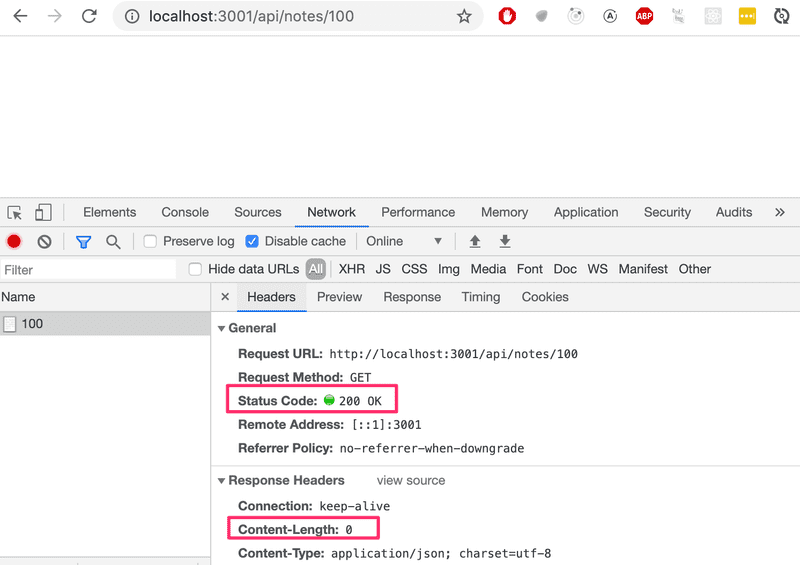
The HTTP status code that is returned is 200, which means that the response succeeded. There is no data sent back with the response, since the value of the content-length header is 0, and the same can be verified from the browser.
The reason for this behavior is that the note variable is set to undefined if no matching note is found. The situation needs to be handled on the server in a better way. If no note is found, the server should respond with the status code 404 not found instead of 200.
Let's make the following change to our code:
app.get('/api/notes/:id', (request, response) => {
  const id = request.params.id
  const note = notes.find(note => note.id === id)

  if (note) {    response.json(note)  } else {    response.status(404).end()  }})
Since no data is attached to the response, we use the status method for setting the status and the end method for responding to the request without sending any data.
The if-condition leverages the fact that all JavaScript objects are truthy, meaning that they evaluate to true in a comparison operation. However, undefined is falsy meaning that it will evaluate to false.
Our application works and sends the error status code if no note is found. However, the application doesn't return anything to show to the user, like web applications normally do when we visit a page that does not exist. We do not need to display anything in the browser because REST APIs are interfaces that are intended for programmatic use, and the error status code is all that is needed.
Anyway, it's possible to give a clue about the reason for sending a 404 error by overriding the default NOT FOUND message.
Deleting resources
Next, let's implement a route for deleting resources. Deletion happens by making an HTTP DELETE request to the URL of the resource:
app.delete('/api/notes/:id', (request, response) => {
  const id = request.params.id
  notes = notes.filter(note => note.id !== id)

  response.status(204).end()
})
If deleting the resource is successful, meaning that the note exists and is removed, we respond to the request with the status code 204 no content and return no data with the response.
There's no consensus on what status code should be returned to a DELETE request if the resource does not exist. The only two options are 204 and 404. For the sake of simplicity, our application will respond with 204 in both cases.
Postman
So how do we test the delete operation? HTTP GET requests are easy to make from the browser. We could write some JavaScript for testing deletion, but writing test code is not always the best solution in every situation.
Many tools exist for making the testing of backends easier. One of these is a command line program curl. However, instead of curl, we will take a look at using Postman for testing the application.
Let's install the Postman desktop client from here and try it out:

Using Postman is quite easy in this situation. It's enough to define the URL and then select the correct request type (DELETE).
The backend server appears to respond correctly. By making an HTTP GET request to http://localhost:3001/api/notes we see that the note with the id 2 is no longer in the list, which indicates that the deletion was successful.
Currently, the notes in the application are hard-coded and not yet saved in a database, so the list of notes will reset to its original state when we restart the application.
The Visual Studio Code REST client
If you use Visual Studio Code, you can use the VS Code REST client plugin instead of Postman.
Once the plugin is installed, using it is very simple. We make a directory at the root of the application named requests. We save all the REST client requests in the directory as files that end with the .rest extension.
Let's create a new get_all_notes.rest file and define the request that fetches all notes.
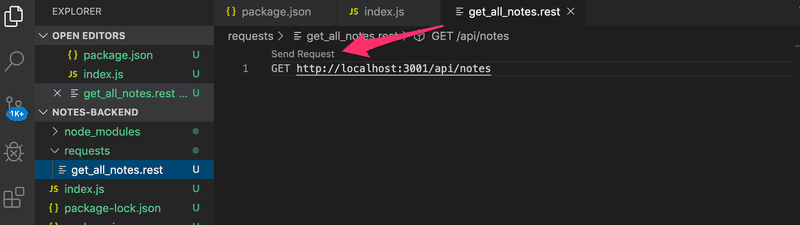
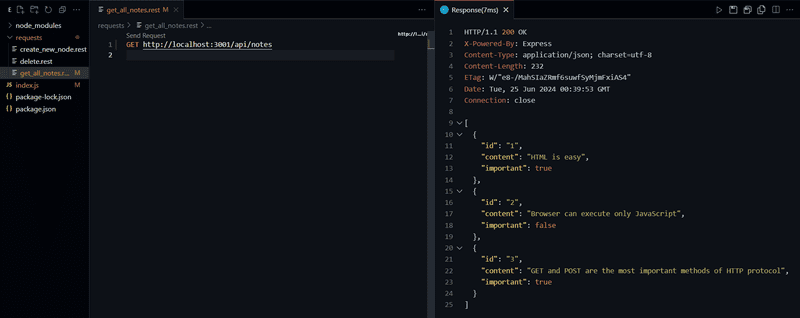
By clicking the Send Request text, the REST client will execute the HTTP request and the response from the server is opened in the editor.
The WebStorm HTTP Client
If you use IntelliJ WebStorm instead, you can use a similar procedure with its built-in HTTP Client. Create a new file with extension .rest and the editor will display your options to create and run your requests. You can learn more about it by following this guide.
Receiving data
Next, let's make it possible to add new notes to the server. Adding a note happens by making an HTTP POST request to the address http://localhost:3001/api/notes, and by sending all the information for the new note in the request body in JSON format.
To access the data easily, we need the help of the Express json-parser that we can use with the command app.use(express.json()).
Let's activate the json-parser and implement an initial handler for dealing with the HTTP POST requests:
const express = require('express')
const app = express()

app.use(express.json())
//...

app.post('/api/notes', (request, response) => {  const note = request.body  console.log(note)  response.json(note)})
The event handler function can access the data from the body property of the request object.
Without the json-parser, the body property would be undefined. The json-parser takes the JSON data of a request, transforms it into a JavaScript object and then attaches it to the body property of the request object before the route handler is called.
For the time being, the application does not do anything with the received data besides printing it to the console and sending it back in the response.
Before we implement the rest of the application logic, let's verify with Postman that the data is in fact received by the server. In addition to defining the URL and request type in Postman, we also have to define the data sent in the body:
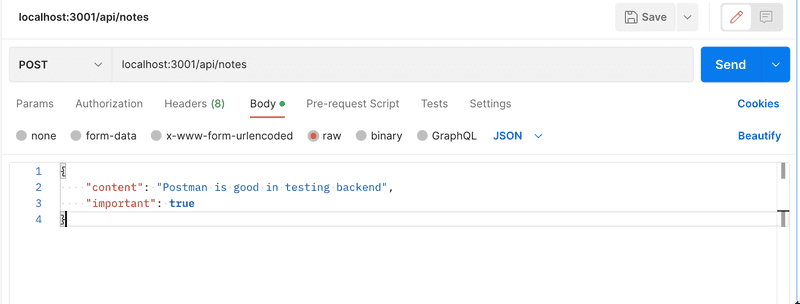
The application prints the data that we sent in the request to the console:

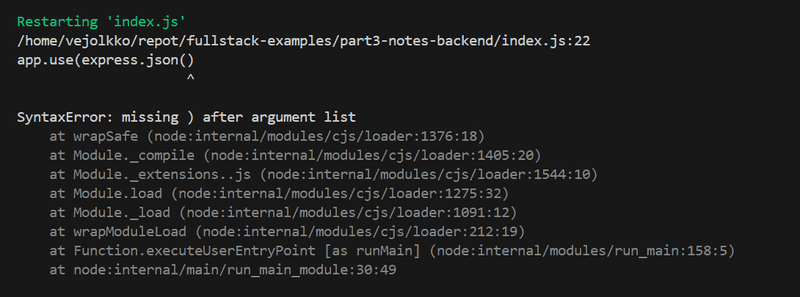
NOTE: When programming the backend, keep the console running the application visible at all times. The development server will restart if changes are made to the code, so by monitoring the console, you will immediately notice if there is an error in the application's code:
Similarly, it is useful to check the console to make sure that the backend behaves as we expect it to in different situations, like when we send data with an HTTP POST request. Naturally, it's a good idea to add lots of console.log commands to the code while the application is still being developed.
A potential cause for issues is an incorrectly set Content-Type header in requests. This can happen with Postman if the type of body is not defined correctly:
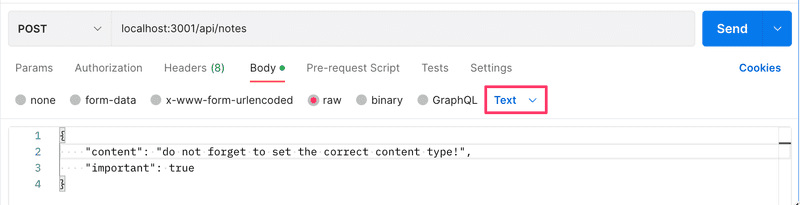
The Content-Type header is set to text/plain:
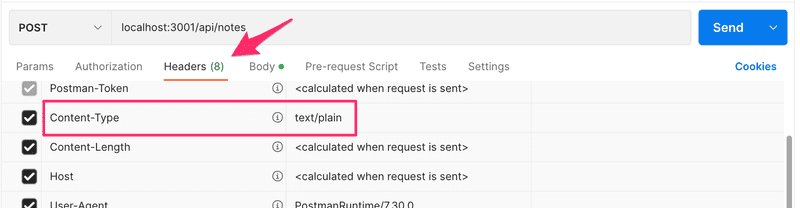
The server appears to only receive an empty object:

The server will not be able to parse the data correctly without the correct value in the header. It won't even try to guess the format of the data since there's a massive amount of potential Content-Types.
If you are using VS Code, then you should install the REST client from the previous chapter now, if you haven't already. The POST request can be sent with the REST client like this:
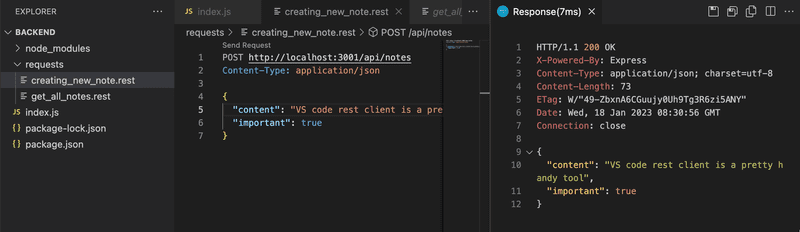
We created a new create_note.rest file for the request. The request is formatted according to the instructions in the documentation.
One benefit that the REST client has over Postman is that the requests are handily available at the root of the project repository, and they can be distributed to everyone in the development team. You can also add multiple requests in the same file using ### separators:
GET http://localhost:3001/api/notes/

###
POST http://localhost:3001/api/notes/ HTTP/1.1
content-type: application/json

{
    "name": "sample",
    "time": "Wed, 21 Oct 2015 18:27:50 GMT"
}
Postman also allows users to save requests, but the situation can get quite chaotic especially when you're working on multiple unrelated projects.
Important sidenote
Sometimes when you're debugging, you may want to find out what headers have been set in the HTTP request. One way of accomplishing this is through the get method of the request object, that can be used for getting the value of a single header. The request object also has the headers property, that contains all of the headers of a specific request.
Problems can occur with the VS REST client if you accidentally add an empty line between the top row and the row specifying the HTTP headers. In this situation, the REST client interprets this to mean that all headers are left empty, which leads to the backend server not knowing that the data it has received is in the JSON format.
You will be able to spot this missing Content-Type header if at some point in your code you print all of the request headers with the console.log(request.headers) command.
Let's return to the application. Once we know that the application receives data correctly, it's time to finalize the handling of the request:
app.post('/api/notes', (request, response) => {
  const maxId = notes.length > 0
    ? Math.max(...notes.map(n => Number(n.id)))
    : 0

  const note = request.body
  note.id = String(maxId + 1)

  notes = notes.concat(note)

  response.json(note)
})
We need a unique id for the note. First, we find out the largest id number in the current list and assign it to the maxId variable. The id of the new note is then defined as maxId + 1 as a string. This method is not recommended, but we will live with it for now as we will replace it soon enough.
The current version still has the problem that the HTTP POST request can be used to add objects with arbitrary properties. Let's improve the application by defining that the content property may not be empty. The important property will be given a default value of false. All other properties are discarded:
const generateId = () => {
  const maxId = notes.length > 0
    ? Math.max(...notes.map(n => Number(n.id)))
    : 0
  return String(maxId + 1)
}

app.post('/api/notes', (request, response) => {
  const body = request.body

  if (!body.content) {
    return response.status(400).json({
      error: 'content missing'
    })
  }

  const note = {
    content: body.content,
    important: body.important || false,
    id: generateId(),
  }

  notes = notes.concat(note)

  response.json(note)
})
The logic for generating the new id number for notes has been extracted into a separate generateId function.
If the received data is missing a value for the content property, the server will respond to the request with the status code 400 bad request:
if (!body.content) {
  return response.status(400).json({
    error: 'content missing'
  })
}
Notice that calling return is crucial because otherwise the code will execute to the very end and the malformed note gets saved to the application.
If the content property has a value, the note will be based on the received data. If the important property is missing, we will default the value to false. The default value is currently generated in a rather odd-looking way:
important: body.important || false,If the data saved in the body variable has the important property and its value is truthy, the expression will evaluate to that value. If the property does not exist, its value will be undefined, which is falsy, and the expression will therefore evaluate to false, which is defined on the right-hand side of the vertical lines.
To be exact, when the important property is false, then the body.important || false expression will in fact return the false from the right-hand side. If the property has any truthy value, that value itself will be returned.
You can find the code for our current application in its entirety in the part3-1 branch of this GitHub repository.
If you clone the project, run the npm install command before starting the application with npm start or npm run dev.
One more thing before we move on to the exercises. The function for generating IDs looks currently like this:
const generateId = () => {
  const maxId = notes.length > 0
    ? Math.max(...notes.map(n => Number(n.id)))
    : 0
  return String(maxId + 1)
}
The function body contains a row that looks a bit intriguing:
Math.max(...notes.map(n => Number(n.id)))What exactly is happening in that line of code? notes.map(n => Number(n.id)) creates a new array that contains all the ids of the notes in number form. Math.max returns the maximum value of the numbers that are passed to it. However, notes.map(n => Number(n.id)) is an array so it can't directly be given as a parameter to Math.max. The array can be transformed into individual numbers by using the "three dot" spread syntax ....
Exercises 3.1.-3.6.
NB: Since this is not about the frontend and React, the application is not created with Vite, but with the npm init command, as described earlier in this part of the material.
Do not add the node_modules directory to version control. The npm init command does not automatically create a .gitignore file, so create one in the root of your project and add the line node_modules to it. This way Git will no longer track that directory in version control.
Strong recommendation: When you are working on backend code, always keep an eye on what's going on in the terminal that is running your application.
3.1: Phonebook backend step 1
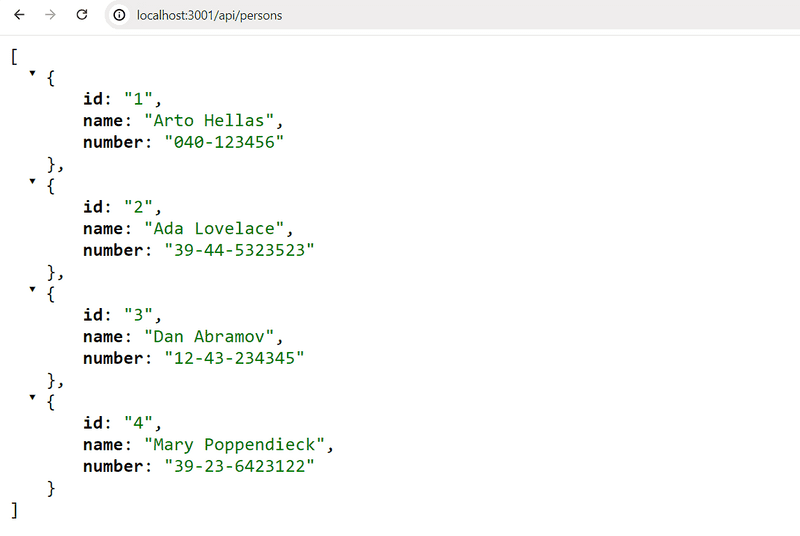
Implement a Node application that returns a hardcoded list of phonebook entries from the address http://localhost:3001/api/persons.
Data:
[
    {
      "id": "1",
      "name": "Arto Hellas",
      "number": "040-123456"
    },
    {
      "id": "2",
      "name": "Ada Lovelace",
      "number": "39-44-5323523"
    },
    {
      "id": "3",
      "name": "Dan Abramov",
      "number": "12-43-234345"
    },
    {
      "id": "4",
      "name": "Mary Poppendieck",
      "number": "39-23-6423122"
    }
]
Output in the browser after GET request:
Notice that the forward slash in the route api/persons is not a special character, and is just like any other character in the string.
The application must be started with the command npm start.
The application must also offer an npm run dev command that will run the application and restart the server whenever changes are made and saved to a file in the source code.
3.2: Phonebook backend step 2
Implement a page at the address http://localhost:3001/info that looks roughly like this:

The page has to show the time that the request was received and how many entries are in the phonebook at the time of processing the request.
3.3: Phonebook backend step 3
Implement the functionality for displaying the information for a single phonebook entry. The url for getting the data for a person with the id 5 should be http://localhost:3001/api/persons/5
If an entry for the given id is not found, the server has to respond with the appropriate status code.
3.4: Phonebook backend step 4
Implement functionality that makes it possible to delete a single phonebook entry by making an HTTP DELETE request to the unique URL of that phonebook entry.
Test that your functionality works with either Postman or the Visual Studio Code REST client.
3.5: Phonebook backend step 5
Expand the backend so that new phonebook entries can be added by making HTTP POST requests to the address http://localhost:3001/api/persons.
Generate a new id for the phonebook entry with the Math.random function. Use a big enough range for your random values so that the likelihood of creating duplicate ids is small.
3.6: Phonebook backend step 6
Implement error handling for creating new entries. The request is not allowed to succeed, if:
- The name or number is missing
- The name already exists in the phonebook
Respond to requests like these with the appropriate status code, and also send back information that explains the reason for the error, e.g.:
{ error: 'name must be unique' }About HTTP request types
The HTTP standard talks about two properties related to request types, safety and idempotency.
The HTTP GET request should be safe:
In particular, the convention has been established that the GET and HEAD methods SHOULD NOT have the significance of taking an action other than retrieval. These methods ought to be considered "safe".
Safety means that the executing request must not cause any side effects on the server. By side effects, we mean that the state of the database must not change as a result of the request, and the response must only return data that already exists on the server.
Nothing can ever guarantee that a GET request is safe, this is just a recommendation that is defined in the HTTP standard. By adhering to RESTful principles in our API, GET requests are always used in a way that they are safe.
The HTTP standard also defines the request type HEAD, which ought to be safe. In practice, HEAD should work exactly like GET but it does not return anything but the status code and response headers. The response body will not be returned when you make a HEAD request.
All HTTP requests except POST should be idempotent:
Methods can also have the property of "idempotence" in that (aside from error or expiration issues) the side-effects of N > 0 identical requests is the same as for a single request. The methods GET, HEAD, PUT and DELETE share this property
This means that if a request does generate side effects, then the result should be the same regardless of how many times the request is sent.
If we make an HTTP PUT request to the URL /api/notes/10 and with the request we send the data { content: "no side effects!", important: true }, the result is the same regardless of how many times the request is sent.
Like safety for the GET request, idempotence is also just a recommendation in the HTTP standard and not something that can be guaranteed simply based on the request type. However, when our API adheres to RESTful principles, then GET, HEAD, PUT, and DELETE requests are used in such a way that they are idempotent.
POST is the only HTTP request type that is neither safe nor idempotent. If we send 5 different HTTP POST requests to /api/notes with a body of {content: "many same", important: true}, the resulting 5 notes on the server will all have the same content.
Middleware
The Express json-parser used earlier is a middleware.
Middleware are functions that can be used for handling request and response objects.
The json-parser we used earlier takes the raw data from the requests that are stored in the request object, parses it into a JavaScript object and assigns it to the request object as a new property body.
In practice, you can use several middlewares at the same time. When you have more than one, they're executed one by one in the order that they were listed in the application code.
Let's implement our own middleware that prints information about every request that is sent to the server.
Middleware is a function that receives three parameters:
const requestLogger = (request, response, next) => {
  console.log('Method:', request.method)
  console.log('Path:  ', request.path)
  console.log('Body:  ', request.body)
  console.log('---')
  next()
}
At the end of the function body, the next function that was passed as a parameter is called. The next function yields control to the next middleware.
Middleware is used like this:
app.use(requestLogger)Remember, middleware functions are called in the order that they're encountered by the JavaScript engine. Notice that json-parser is listed before requestLogger , because otherwise request.body will not be initialized when the logger is executed!
Middleware functions have to be used before routes when we want them to be executed by the route event handlers. Sometimes, we want to use middleware functions after routes. We do this when the middleware functions are only called if no route handler processes the HTTP request.
Let's add the following middleware after our routes. This middleware will be used for catching requests made to non-existent routes. For these requests, the middleware will return an error message in the JSON format.
const unknownEndpoint = (request, response) => {
  response.status(404).send({ error: 'unknown endpoint' })
}

app.use(unknownEndpoint)
You can find the code for our current application in its entirety in the part3-2 branch of this GitHub repository.
Exercises 3.7.-3.8.
3.7: Phonebook backend step 7
Add the morgan middleware to your application for logging. Configure it to log messages to your console based on the tiny configuration.
The documentation for Morgan is not the best, and you may have to spend some time figuring out how to configure it correctly. However, most documentation in the world falls under the same category, so it's good to learn to decipher and interpret cryptic documentation in any case.
Morgan is installed just like all other libraries with the npm install command. Taking morgan into use happens the same way as configuring any other middleware by using the app.use command.
3.8*: Phonebook backend step 8
Configure morgan so that it also shows the data sent in HTTP POST requests:

Note that logging data even in the console can be dangerous since it can contain sensitive data and may violate local privacy law (e.g. GDPR in EU) or business-standard. In this exercise, you don't have to worry about privacy issues, but in practice, try not to log any sensitive data.
This exercise can be quite challenging, even though the solution does not require a lot of code.
This exercise can be completed in a few different ways. One of the possible solutions utilizes these two techniques: