c
Saving data to MongoDB
Before we move into the main topic of persisting data in a database, we will take a look at a few different ways of debugging Node applications.
Debugging Node applications
Debugging Node applications is slightly more difficult than debugging JavaScript running in your browser. Printing to the console is a tried and true method, and it's always worth doing. Some people think that more sophisticated methods should be used instead, but I disagree. Even the world's elite open-source developers use this method.
Visual Studio Code
The Visual Studio Code debugger can be useful in some situations. You can launch the application in debugging mode like this (in this and the next few images, the notes have a field date which has been removed from the current version of the application):
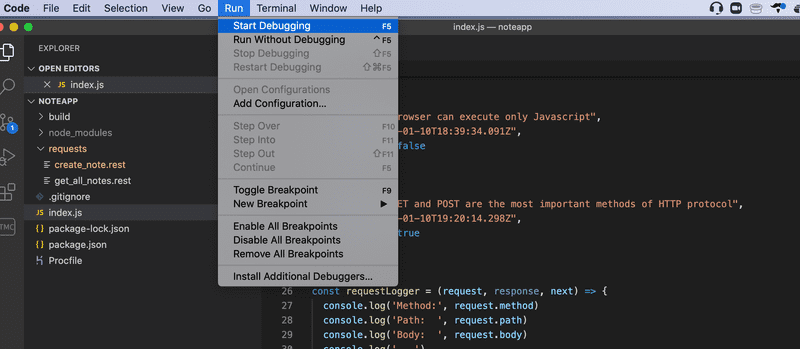
Note that the application shouldn't be running in another console, otherwise the port will already be in use.
NB A newer version of Visual Studio Code may have Run instead of Debug. Furthermore, you may have to configure your launch.json file to start debugging. This can be done by choosing Add Configuration... on the drop-down menu, which is located next to the green play button and above VARIABLES menu, and select Run "npm start" in a debug terminal. For more detailed setup instructions, visit Visual Studio Code's Debugging documentation.
Below you can see a screenshot where the code execution has been paused in the middle of saving a new note:
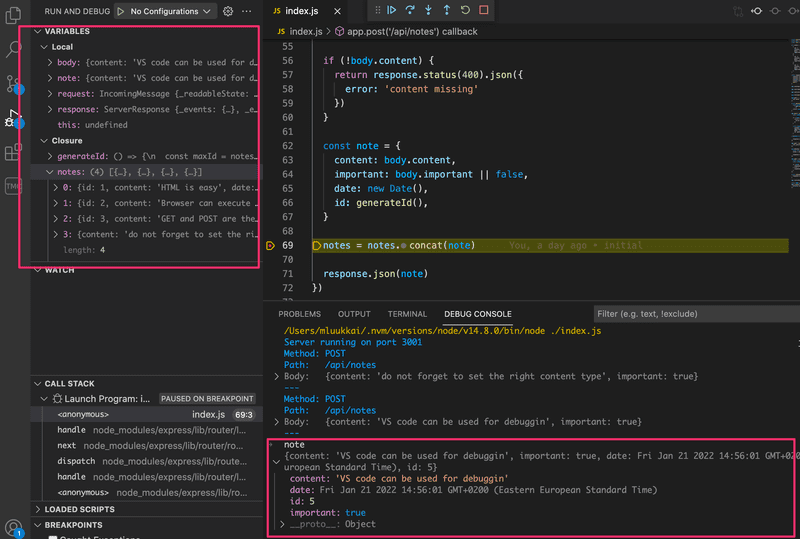
The execution stopped at the breakpoint in line 69. In the console, you can see the value of the note variable. In the top left window, you can see other things related to the state of the application.
The arrows at the top can be used for controlling the flow of the debugger.
For some reason, I don't use the Visual Studio Code debugger a whole lot.
Chrome dev tools
Debugging is also possible with the Chrome developer console by starting your application with the command:
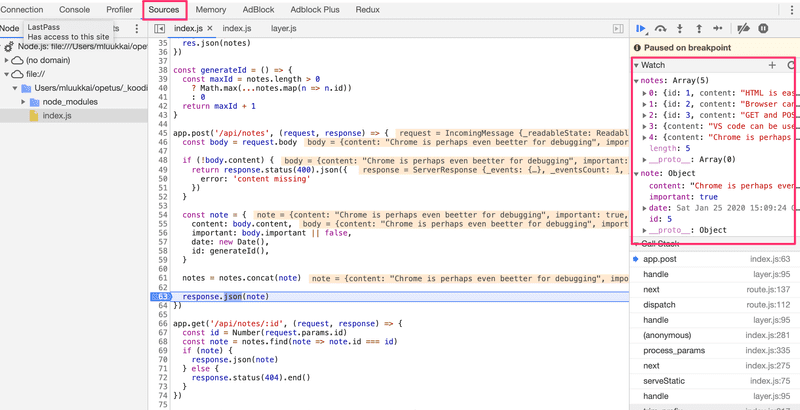
node --inspect index.jsYou can access the debugger by clicking the green icon - the node logo - that appears in the Chrome developer console:

The debugging view works the same way as it did with React applications. The Sources tab can be used for setting breakpoints where the execution of the code will be paused.
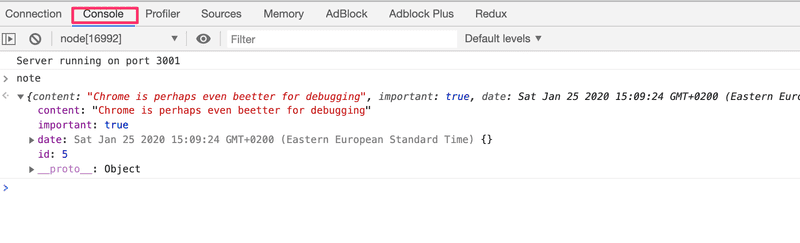
All of the application's console.log messages will appear in the Console tab of the debugger. You can also inspect values of variables and execute your own JavaScript code.
Question everything
Debugging Full Stack applications may seem tricky at first. Soon our application will also have a database in addition to the frontend and backend, and there will be many potential areas for bugs in the application.
When the application "does not work", we have to first figure out where the problem actually occurs. It's very common for the problem to exist in a place where you didn't expect it, and it can take minutes, hours, or even days before you find the source of the problem.
The key is to be systematic. Since the problem can exist anywhere, you must question everything, and eliminate all possibilities one by one. Logging to the console, Postman, debuggers, and experience will help.
When bugs occur, the worst of all possible strategies is to continue writing code. It will guarantee that your code will soon have even more bugs, and debugging them will be even more difficult. The Jidoka (stop and fix) principle from Toyota Production Systems is very effective in this situation as well.
MongoDB
To store our saved notes indefinitely, we need a database. Most of the courses taught at the University of Helsinki use relational databases. In most parts of this course, we will use MongoDB which is a document database.
The reason for using Mongo as the database is its lower complexity compared to a relational database. Part 13 of the course shows how to build Node.js backends that use a relational database.
Document databases differ from relational databases in how they organize data as well as in the query languages they support. Document databases are usually categorized under the NoSQL umbrella term.
You can read more about document databases and NoSQL from the course material for week 7 of the Introduction to Databases course. Unfortunately, the material is currently only available in Finnish.
Read now the chapters on collections and documents from the MongoDB manual to get a basic idea of how a document database stores data.
Naturally, you can install and run MongoDB on your computer. However, the internet is also full of Mongo database services that you can use. Our preferred MongoDB provider in this course will be MongoDB Atlas.
Once you've created and logged into your account, let's create a new cluster using the button visible on the front page. From the view that opens, select the free plan, determine the cloud provider and data center, and create the cluster:
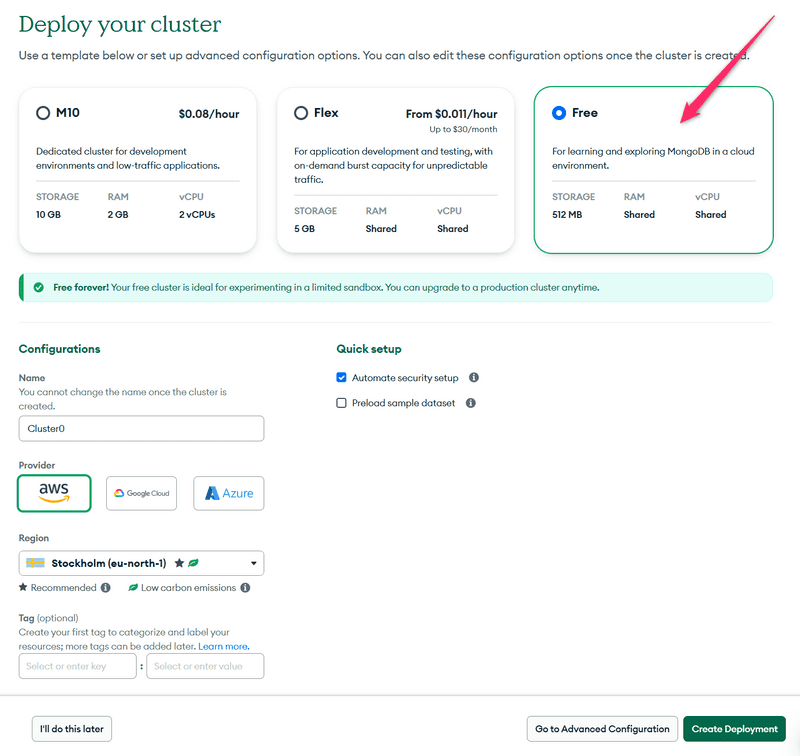
The provider selected is AWS and the region is Stockholm (eu-north-1). Note that if you choose something else, your database connection string will be slightly different from this example. Wait for the cluster to be ready, which will take a few minutes.
NB do not continue before the cluster is ready.
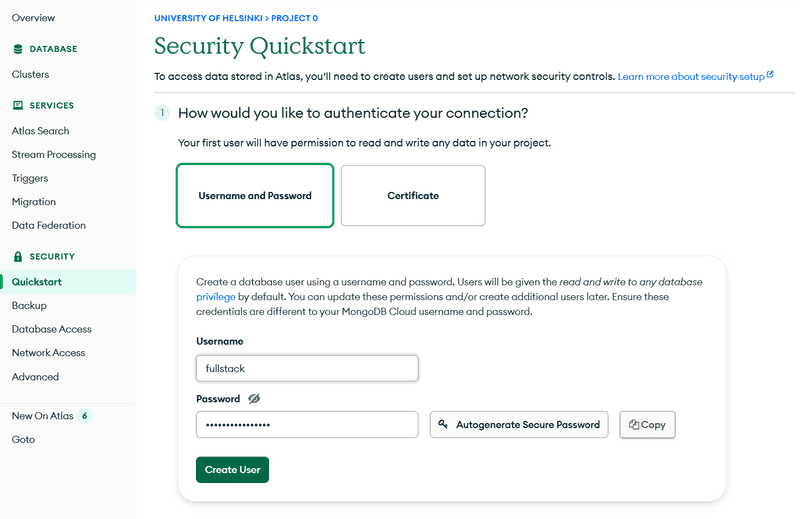
Let's use the security tab for creating user credentials for the database. Please note that these are not the same credentials you use for logging into MongoDB Atlas. These will be used for your application to connect to the database.
Next, we have to define the IP addresses that are allowed access to the database. For the sake of simplicity we will allow access from all IP addresses:

Note: In case the modal menu is different for you, according to MongoDB documentation, adding 0.0.0.0 as an IP allows access from anywhere as well.
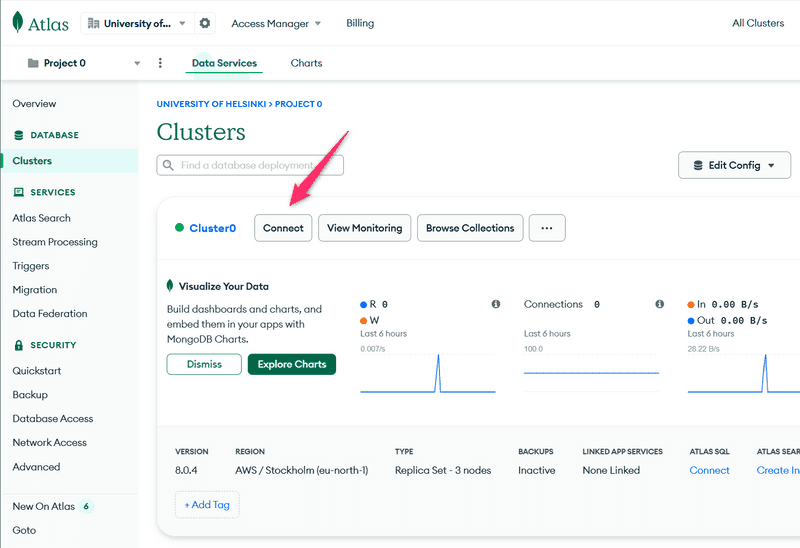
Finally, we are ready to connect to our database. To do this, we need the database connection string, which can be found by selecting Connect and then Drivers from the view, under the Connect to your application section:
The view displays the MongoDB URI, which is the address of the database that we will supply to the MongoDB client library we will add to our application:
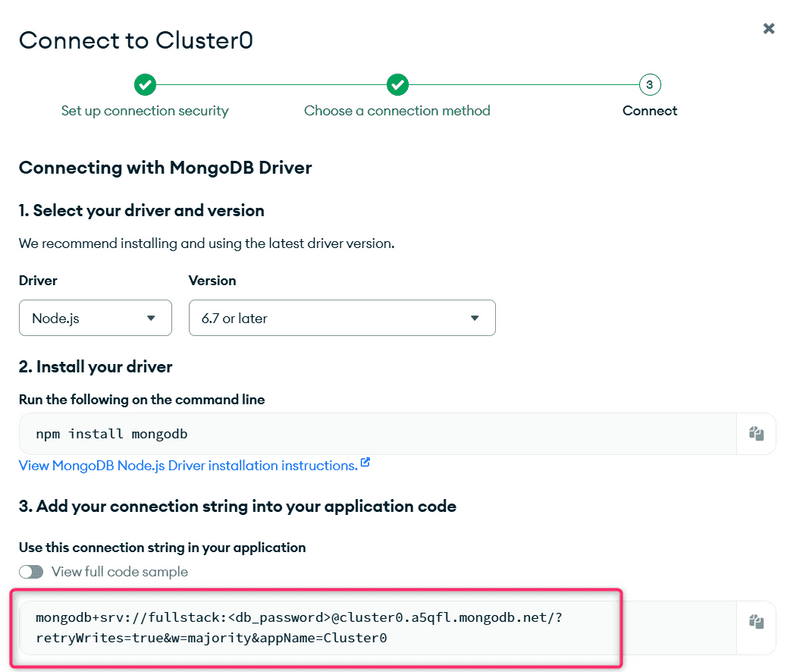
The address looks like this:
mongodb+srv://fullstack:thepasswordishere@cluster0.a5qfl.mongodb.net/?retryWrites=true&w=majority&appName=Cluster0We are now ready to use the database.
We could use the database directly from our JavaScript code with the official MongoDB Node.js driver library, but it is quite cumbersome to use. We will instead use the Mongoose library that offers a higher-level API.
Mongoose could be described as an object document mapper (ODM), and saving JavaScript objects as Mongo documents is straightforward with this library.
Let's install Mongoose in our notes project backend:
npm install mongooseLet's not add any code dealing with Mongo to our backend just yet. Instead, let's make a practice application by creating a new file, mongo.js in the root of the notes backend application:
const mongoose = require('mongoose')

if (process.argv.length < 3) {
  console.log('give password as argument')
  process.exit(1)
}

const password = process.argv[2]

const url = `mongodb+srv://fullstack:${password}@cluster0.a5qfl.mongodb.net/?retryWrites=true&w=majority&appName=Cluster0`

mongoose.set('strictQuery',false)

mongoose.connect(url, { family: 4 })

const noteSchema = new mongoose.Schema({
  content: String,
  important: Boolean,
})

const Note = mongoose.model('Note', noteSchema)

const note = new Note({
  content: 'HTML is easy',
  important: true,
})

note.save().then(result => {
  console.log('note saved!')
  mongoose.connection.close()
})
NB: Depending on which region you selected when building your cluster, the MongoDB URI may be different from the example provided above. You should verify and use the correct URI that was generated from MongoDB Atlas.
The connection to the database is established with the command:
mongoose.connect(url, { family: 4 })The method takes the database URL as the first argument and an object that defines the required settings as the second argument. MongoDB Atlas supports only IPv4 addresses, so with the object { family: 4 } we specify that the connection should always use IPv4.
The practice application assumes that it will be passed the password from the credentials we created in MongoDB Atlas, as a command line parameter. We can access the command line parameter like this:
const password = process.argv[2]When the code is run with the command node mongo.js yourPassword, Mongo will add a new document to the database.
NB: Please note the password is the password created for the database user, not your MongoDB Atlas password. Also, if you created a password with special characters, then you'll need to URL encode that password.
We can view the current state of the database from the MongoDB Atlas from Browse collections, in the Database tab.
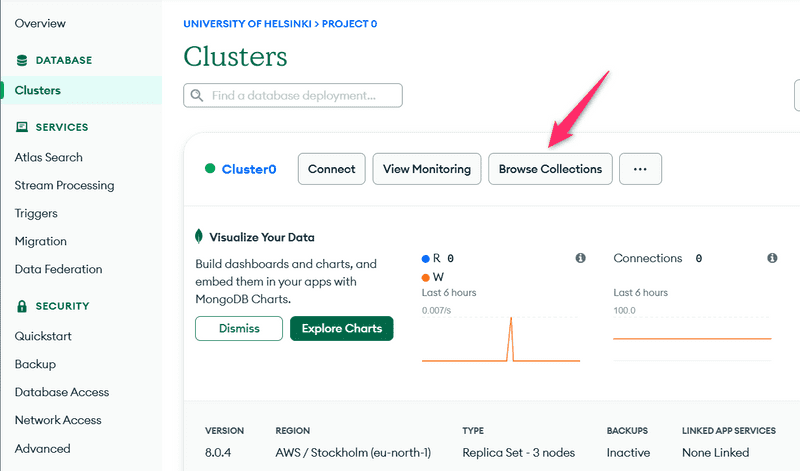
As the view states, the document matching the note has been added to the notes collection in the myFirstDatabase database.
Let's destroy the default database test and change the name of the database referenced in our connection string to noteApp instead, by modifying the URI:
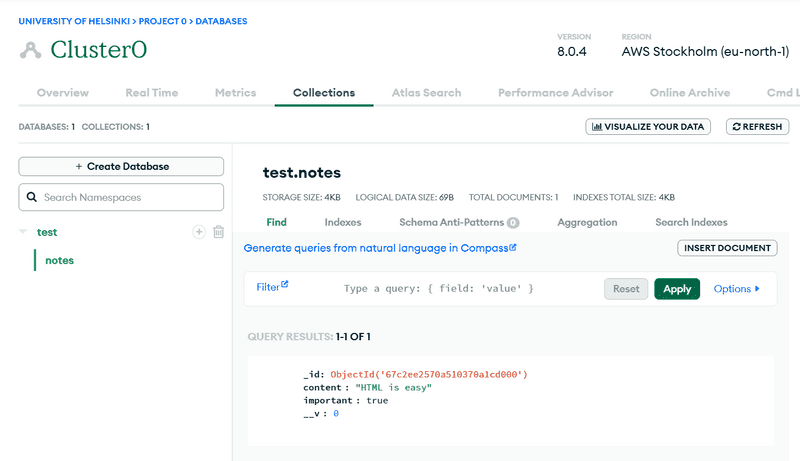
const url = `mongodb+srv://fullstack:${password}@cluster0.a5qfl.mongodb.net/noteApp?retryWrites=true&w=majority&appName=Cluster0`Let's run our code again:

The data is now stored in the right database. The view also offers the create database functionality, that can be used to create new databases from the website. Creating a database like this is not necessary, since MongoDB Atlas automatically creates a new database when an application tries to connect to a database that does not exist yet.
Schema
After establishing the connection to the database, we define the schema for a note and the matching model:
const noteSchema = new mongoose.Schema({
  content: String,
  important: Boolean,
})

const Note = mongoose.model('Note', noteSchema)
First, we define the schema of a note that is stored in the noteSchema variable. The schema tells Mongoose how the note objects are to be stored in the database.
In the Note model definition, the first "Note" parameter is the singular name of the model. The name of the collection will be the lowercase plural notes, because the Mongoose convention is to automatically name collections as the plural (e.g. notes) when the schema refers to them in the singular (e.g. Note).
Document databases like Mongo are schemaless, meaning that the database itself does not care about the structure of the data that is stored in the database. It is possible to store documents with completely different fields in the same collection.
The idea behind Mongoose is that the data stored in the database is given a schema at the level of the application that defines the shape of the documents stored in any given collection.
Creating and saving objects
Next, the application creates a new note object with the help of the Note model:
const note = new Note({
  content: 'HTML is Easy',
  important: false,
})
Models are constructor functions that create new JavaScript objects based on the provided parameters. Since the objects are created with the model's constructor function, they have all the properties of the model, which include methods for saving the object to the database.
Saving the object to the database happens with the appropriately named save method, which can be provided with an event handler with the then method:
note.save().then(result => {
  console.log('note saved!')
  mongoose.connection.close()
})
When the object is saved to the database, the event handler provided to then gets called. The event handler closes the database connection with the command mongoose.connection.close(). If the connection is not closed, the connection remains open until the program terminates.
The result of the save operation is in the result parameter of the event handler. The result is not that interesting when we're storing one object in the database. You can print the object to the console if you want to take a closer look at it while implementing your application or during debugging.
Let's also save a few more notes by modifying the data in the code and by executing the program again.
NB: Unfortunately the Mongoose documentation is not very consistent, with parts of it using callbacks in its examples and other parts, other styles, so it is not recommended to copy and paste code directly from there. Mixing promises with old-school callbacks in the same code is not recommended.
Fetching objects from the database
Let's comment out the code for generating new notes and replace it with the following:
Note.find({}).then(result => {
  result.forEach(note => {
    console.log(note)
  })
  mongoose.connection.close()
})
When the code is executed, the program prints all the notes stored in the database:
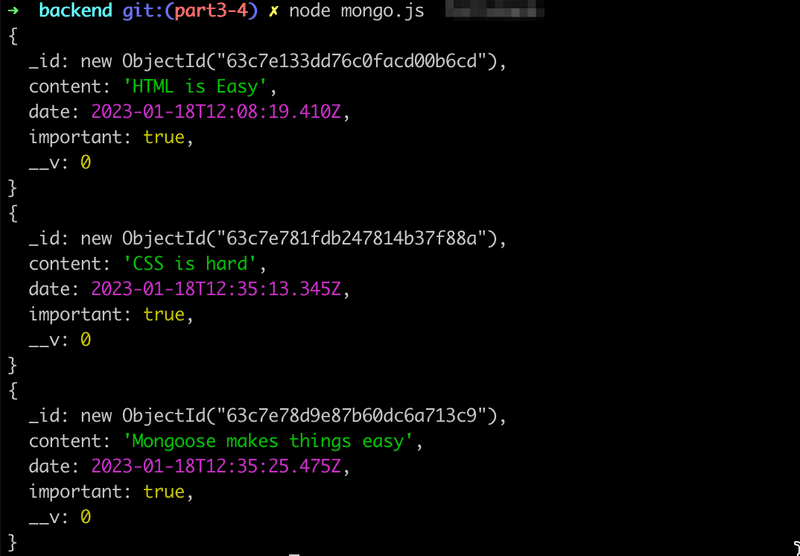
The objects are retrieved from the database with the find method of the Note model. The parameter of the method is an object expressing search conditions. Since the parameter is an empty object{}, we get all of the notes stored in the notes collection.
The search conditions adhere to the Mongo search query syntax.
We could restrict our search to only include important notes like this:
Note.find({ important: true }).then(result => {
  // ...
})Connecting the backend to a database
Now we have enough knowledge to start using Mongo in our notes application backend.
Let's get a quick start by copy-pasting the Mongoose definitions to the index.js file:
const mongoose = require('mongoose')

// DO NOT SAVE YOUR PASSWORD TO GITHUB!!
const password = process.argv[2]
const url = `mongodb+srv://fullstack:${password}@cluster0.a5qfl.mongodb.net/noteApp?retryWrites=true&w=majority&appName=Cluster0`

mongoose.set('strictQuery',false)
mongoose.connect(url, { family: 4 })

const noteSchema = new mongoose.Schema({
  content: String,
  important: Boolean,
})

const Note = mongoose.model('Note', noteSchema)
Let's change the handler for fetching all notes to the following form:
app.get('/api/notes', (request, response) => {
  Note.find({}).then(notes => {
    response.json(notes)
  })
})
Let's start the backend with the command node --watch index.js yourpassword so we can verify in the browser that the backend correctly displays all notes saved to the database:
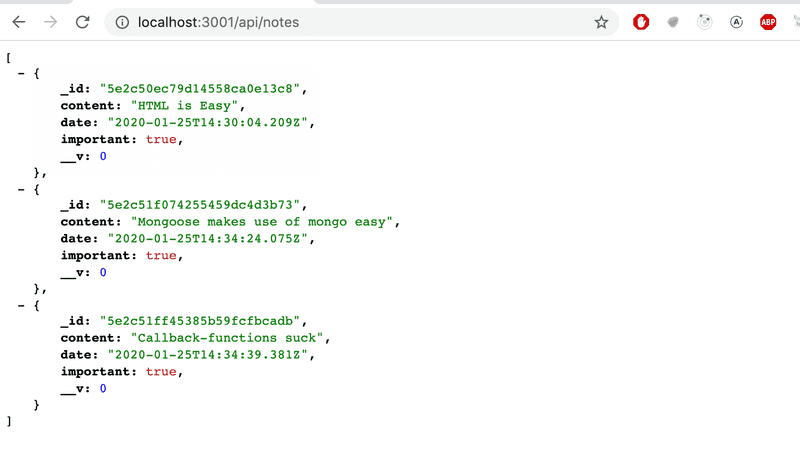
The application works almost perfectly. The frontend assumes that every object has a unique id in the id field. We also don't want to return the mongo versioning field __v to the frontend.
One way to format the objects returned by Mongoose is to modify the toJSON method of the schema, which is used on all instances of the models produced with that schema. Modification can be done as follows:
noteSchema.set('toJSON', {
  transform: (document, returnedObject) => {
    returnedObject.id = returnedObject._id.toString()
    delete returnedObject._id
    delete returnedObject.__v
  }
})
Even though the _id property of Mongoose objects looks like a string, it is in fact an object. The toJSON method we defined transforms it into a string just to be safe. If we didn't make this change, it would cause more harm to us in the future once we start writing tests.
No changes are needed in the handler:
app.get('/api/notes', (request, response) => {
  Note.find({}).then(notes => {
    response.json(notes)
  })
})
The code automatically uses the defined toJSON when formatting notes to the response.
Moving db configuration to its own module
Before we refactor the rest of the backend to use the database, let's extract the Mongoose-specific code into its own module.
Let's create a new directory for the module called models, and add a file called note.js:
const mongoose = require('mongoose')

mongoose.set('strictQuery', false)

const url = process.env.MONGODB_URI
console.log('connecting to', url)
mongoose.connect(url, { family: 4 })
  .then(result => {    console.log('connected to MongoDB')  })  .catch(error => {    console.log('error connecting to MongoDB:', error.message)  })
const noteSchema = new mongoose.Schema({
  content: String,
  important: Boolean,
})

noteSchema.set('toJSON', {
  transform: (document, returnedObject) => {
    returnedObject.id = returnedObject._id.toString()
    delete returnedObject._id
    delete returnedObject.__v
  }
})

module.exports = mongoose.model('Note', noteSchema)
There are some changes in the code compared to before. The database connection URL is now passed to the application via the MONGODB_URI environment variable, as hardcoding it into the application is not a good idea:
const url = process.env.MONGODB_URIThere are many ways to define the value of an environment variable. For example, we can define it when starting the application as follows:
MONGODB_URI="your_connection_string_here" npm run devWe will soon learn a more sophisticated way to define environment variables.
The way that the connection is made has changed slightly:
mongoose.connect(url, { family: 4 })
  .then(result => {
    console.log('connected to MongoDB')
  })
  .catch(error => {
    console.log('error connecting to MongoDB:', error.message)
  })
The method for establishing the connection is now given functions for dealing with a successful and unsuccessful connection attempt. Both functions just log a message to the console about the success status:

Defining Node modules differs slightly from the way of defining ES6 modules in part 2.
The public interface of the module is defined by setting a value to the module.exports variable. We will set the value to be the Note model. The other things defined inside of the module, like the variables mongoose and url will not be accessible or visible to users of the module.
Importing the module happens by adding the following line to index.js:
const Note = require('./models/note')This way the Note variable will be assigned to the same object that the module defines.
Defining environment variables using the dotenv library
A more sophisticated way to define environment variables is to use the dotenv library. You can install the library with the command:
npm install dotenvTo use the library, we create a .env file at the root of the project. The environment variables are defined inside of the file, and it can look like this:
MONGODB_URI=mongodb+srv://fullstack:thepasswordishere@cluster0.a5qfl.mongodb.net/noteApp?retryWrites=true&w=majority&appName=Cluster0
PORT=3001
We also added the hardcoded port of the server into the PORT environment variable.
The .env file should be gitignored right away since we do not want to publish any confidential information publicly online!

The environment variables defined in the .env file can be taken into use with the expression require('dotenv').config() and you can reference them in your code just like you would reference normal environment variables, with the process.env.MONGODB_URI syntax.
Let's load the environment variables at the beginning of the index.js file so that they are available throughout the entire application. Let's change the index.js file in the following way:
require('dotenv').config()const express = require('express')
const Note = require('./models/note')
const app = express()
// ..

const PORT = process.env.PORTapp.listen(PORT, () => {
  console.log(`Server running on port ${PORT}`)
})
It's important that dotenv gets imported before the note model is imported. This ensures that the environment variables from the .env file are available globally before the code from the other modules is imported.
Important note about defining environment variables in Fly.io and Render
Fly.io users: Because GitHub is not used with Fly.io, the file .env also gets to the Fly.io servers when the app is deployed. Because of this, the env variables defined in the file will be available there.
However, a better option is to prevent .env from being copied to Fly.io by creating in the project root the file .dockerignore, with the following contents
.envand set the env value from the command line with the command:
fly secrets set MONGODB_URI="mongodb+srv://fullstack:thepasswordishere@cluster0.a5qfl.mongodb.net/noteApp?retryWrites=true&w=majority&appName=Cluster0"Render users: When using Render, the database url is given by defining the proper env in the dashboard:
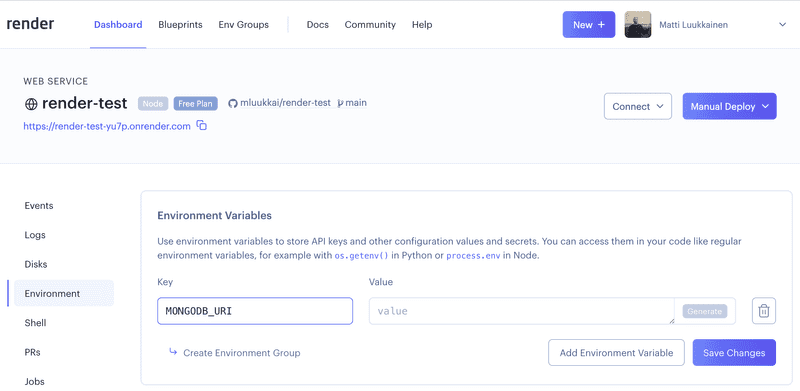
Set just the URL starting with mongodb+srv://... to the value field.
Using database in route handlers
Next, let's change the rest of the backend functionality to use the database.
Creating a new note is accomplished like this:
app.post('/api/notes', (request, response) => {
  const body = request.body

  if (!body.content) {
    return response.status(400).json({ error: 'content missing' })
  }

  const note = new Note({
    content: body.content,
    important: body.important || false,
  })

  note.save().then(savedNote => {
    response.json(savedNote)
  })
})
The note objects are created with the Note constructor function. The response is sent inside of the callback function for the save operation. This ensures that the response is sent only if the operation succeeded. We will discuss error handling a little bit later.
The savedNote parameter in the callback function is the saved and newly created note. The data sent back in the response is the formatted version created automatically with the toJSON method:
response.json(savedNote)Using Mongoose's findById method, fetching an individual note gets changed into the following:
app.get('/api/notes/:id', (request, response) => {
  Note.findById(request.params.id).then(note => {
    response.json(note)
  })
})
Verifying frontend and backend integration
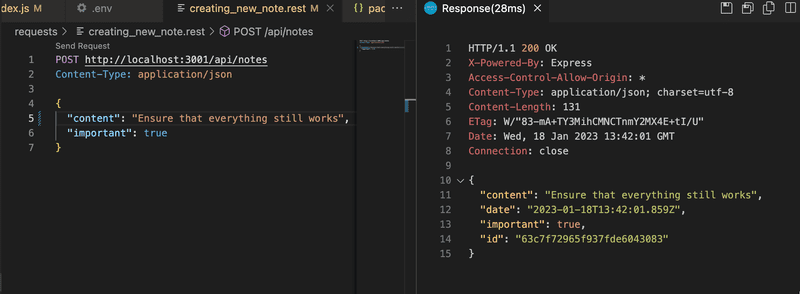
When the backend gets expanded, it's a good idea to test the backend first with the browser, Postman or the VS Code REST client. Next, let's try creating a new note after taking the database into use:
Only once everything has been verified to work in the backend, is it a good idea to test that the frontend works with the backend. It is highly inefficient to test things exclusively through the frontend.
It's probably a good idea to integrate the frontend and backend one functionality at a time. First, we could implement fetching all of the notes from the database and test it through the backend endpoint in the browser. After this, we could verify that the frontend works with the new backend. Once everything seems to be working, we would move on to the next feature.
Once we introduce a database into the mix, it is useful to inspect the state persisted in the database, e.g. from the control panel in MongoDB Atlas. Quite often little Node helper programs like the mongo.js program we wrote earlier can be very helpful during development.
You can find the code for our current application in its entirety in the part3-4 branch of this GitHub repository.
A true full stack developer's oath
It is again time for the exercises. The complexity of our app has now taken another step since besides frontend and backend we also have a database. There are indeed really many potential sources of error.
So we should once more extend our oath:
Full stack development is extremely hard, that is why I will use all the possible means to make it easier
- I will have my browser developer console open all the time
- I will use the network tab of the browser dev tools to ensure that frontend and backend are communicating as I expect
- I will constantly keep an eye on the state of the server to make sure that the data sent there by the frontend is saved there as I expect
- I will keep an eye on the database: does the backend save data there in the right format
- I progress with small steps
- I will write lots of console.log statements to make sure I understand how the code behaves and to help pinpoint problems
- If my code does not work, I will not write more code. Instead, I start deleting the code until it works or just return to a state when everything was still working
- When I ask for help in the course Discord channel or elsewhere I formulate my questions properly, see here how to ask for help
Error handling
If we try to visit the URL of a note with an id that does not exist e.g. http://localhost:3001/api/notes/5c41c90e84d891c15dfa3431 where 5c41c90e84d891c15dfa3431 is not an id stored in the database, then the response will be null.
Let's change this behavior so that if a note with the given id doesn't exist, the server will respond to the request with the HTTP status code 404 not found. In addition let's implement a simple catch block to handle cases where the promise returned by the findById method is rejected:
app.get('/api/notes/:id', (request, response) => {
  Note.findById(request.params.id)
    .then(note => {
      if (note) {        response.json(note)      } else {        response.status(404).end()      }    })
    .catch(error => {      console.log(error)      response.status(500).end()    })})
If no matching object is found in the database, the value of note will be null and the else block is executed. This results in a response with the status code 404 not found. If a promise returned by the findById method is rejected, the response will have the status code 500 internal server error. The console displays more detailed information about the error.
On top of the non-existing note, there's one more error situation that needs to be handled. In this situation, we are trying to fetch a note with the wrong kind of id, meaning an id that doesn't match the Mongo identifier format.
If we make the following request, we will get the error message shown below:
Method: GET
Path:   /api/notes/someInvalidId
Body:   {}
---
{ CastError: Cast to ObjectId failed for value "someInvalidId" at path "_id"
    at CastError (/Users/mluukkai/opetus/_fullstack/osa3-muisiinpanot/node_modules/mongoose/lib/error/cast.js:27:11)
    at ObjectId.cast (/Users/mluukkai/opetus/_fullstack/osa3-muisiinpanot/node_modules/mongoose/lib/schema/objectid.js:158:13)
    ...
Given a malformed id as an argument, the findById method will throw an error causing the returned promise to be rejected. This will cause the callback function defined in the catch block to be called.
Let's make some small adjustments to the response in the catch block:
app.get('/api/notes/:id', (request, response) => {
  Note.findById(request.params.id)
    .then(note => {
      if (note) {
        response.json(note)
      } else {
        response.status(404).end()
      }
    })
    .catch(error => {
      console.log(error)
      response.status(400).send({ error: 'malformatted id' })    })
})
If the format of the id is incorrect, then we will end up in the error handler defined in the catch block. The appropriate status code for the situation is 400 Bad Request because the situation fits the description perfectly:
The 400 (Bad Request) status code indicates that the server cannot or will not process the request due to something that is perceived to be a client error (e.g., malformed request syntax, invalid request message framing, or deceptive request routing).
We have also added some data to the response to shed some light on the cause of the error.
When dealing with Promises, it's almost always a good idea to add error and exception handling. Otherwise, you will find yourself dealing with strange bugs.
It's never a bad idea to print the object that caused the exception to the console in the error handler:
.catch(error => {
  console.log(error)  response.status(400).send({ error: 'malformatted id' })
})
The reason the error handler gets called might be something completely different than what you had anticipated. If you log the error to the console, you may save yourself from long and frustrating debugging sessions. Moreover, most modern services where you deploy your application support some form of logging system that you can use to check these logs. As mentioned, Fly.io is one.
Every time you're working on a project with a backend, it is critical to keep an eye on the console output of the backend. If you are working on a small screen, it is enough to just see a tiny slice of the output in the background. Any error messages will catch your attention even when the console is far back in the background:

Moving error handling into middleware
We have written the code for the error handler among the rest of our code. This can be a reasonable solution at times, but there are cases where it is better to implement all error handling in a single place. This can be particularly useful if we want to report data related to errors to an external error-tracking system like Sentry later on.
Let's change the handler for the /api/notes/:id route so that it passes the error forward with the next function. The next function is passed to the handler as the third parameter:
app.get('/api/notes/:id', (request, response, next) => {  Note.findById(request.params.id)
    .then(note => {
      if (note) {
        response.json(note)
      } else {
        response.status(404).end()
      }
    })
    .catch(error => next(error))})
The error that is passed forward is given to the next function as a parameter. If next was called without an argument, then the execution would simply move onto the next route or middleware. If the next function is called with an argument, then the execution will continue to the error handler middleware.
Express error handlers are middleware that are defined with a function that accepts four parameters. Our error handler looks like this:
const errorHandler = (error, request, response, next) => {
  console.error(error.message)

  if (error.name === 'CastError') {
    return response.status(400).send({ error: 'malformatted id' })
  }

  next(error)
}

// this has to be the last loaded middleware, also all the routes should be registered before this!
app.use(errorHandler)
The error handler checks if the error is a CastError exception, in which case we know that the error was caused by an invalid object id for Mongo. In this situation, the error handler will send a response to the browser with the response object passed as a parameter. In all other error situations, the middleware passes the error forward to the default Express error handler.
Note that the error-handling middleware has to be the last loaded middleware, also all the routes should be registered before the error-handler!
The order of middleware loading
The execution order of middleware is the same as the order that they are loaded into Express with the app.use function. For this reason, it is important to be careful when defining middleware.
The correct order is the following:
app.use(express.static('dist'))
app.use(express.json())
app.use(requestLogger)

app.post('/api/notes', (request, response) => {
  const body = request.body
  // ...
})

const unknownEndpoint = (request, response) => {
  response.status(404).send({ error: 'unknown endpoint' })
}

// handler of requests with unknown endpoint
app.use(unknownEndpoint)

const errorHandler = (error, request, response, next) => {
  // ...
}

// handler of requests that result in errors
app.use(errorHandler)
The json-parser middleware should be among the very first middleware loaded into Express. If the order was the following:
app.use(requestLogger) // request.body is undefined!

app.post('/api/notes', (request, response) => {
  // request.body is undefined!
  const body = request.body
  // ...
})

app.use(express.json())
Then the JSON data sent with the HTTP requests would not be available for the logger middleware or the POST route handler, since the request.body would be undefined at that point.
It's also important that the middleware for handling unsupported routes is loaded only after all the endpoints have been defined, just before the error handler. For example, the following loading order would cause an issue:
const unknownEndpoint = (request, response) => {
  response.status(404).send({ error: 'unknown endpoint' })
}

// handler of requests with unknown endpoint
app.use(unknownEndpoint)

app.get('/api/notes', (request, response) => {
  // ...
})
Now the handling of unknown endpoints is ordered before the HTTP request handler. Since the unknown endpoint handler responds to all requests with 404 unknown endpoint, no routes or middleware will be called after the response has been sent by unknown endpoint middleware. The only exception to this is the error handler which needs to come at the very end, after the unknown endpoints handler.
Other operations
Let's add some missing functionality to our application, including deleting and updating an individual note.
The easiest way to delete a note from the database is with the findByIdAndDelete method:
app.delete('/api/notes/:id', (request, response, next) => {
  Note.findByIdAndDelete(request.params.id)
    .then(result => {
      response.status(204).end()
    })
    .catch(error => next(error))
})
In both of the "successful" cases of deleting a resource, the backend responds with the status code 204 no content. The two different cases are deleting a note that exists, and deleting a note that does not exist in the database. The result callback parameter could be used for checking if a resource was actually deleted, and we could use that information for returning different status codes for the two cases if we deem it necessary. Any exception that occurs is passed onto the error handler.
Let's implement the functionality to update a single note, allowing the importance of the note to be changed. The note updating is done as follows:
app.put('/api/notes/:id', (request, response, next) => {
  const { content, important } = request.body

  Note.findById(request.params.id)
    .then(note => {
      if (!note) {
        return response.status(404).end()
      }

      note.content = content
      note.important = important

      return note.save().then((updatedNote) => {
        response.json(updatedNote)
      })
    })
    .catch(error => next(error))
})
The note to be updated is first fetched from the database using the findById method. If no object is found in the database with the given id, the value of the variable note is null, and the query responds with the status code 404 Not Found.
If an object with the given id is found, its content and important fields are updated with the data provided in the request, and the modified note is saved to the database using the save() method. The HTTP request responds by sending the updated note in the response.
One notable point is that the code now has nested promises, meaning that within the outer .then method, another promise chain is defined:
    .then(note => {
      if (!note) {
        return response.status(404).end()
      }

      note.content = content
      note.important = important

      return note.save().then((updatedNote) => {        response.json(updatedNote)      })
Usually, this is not recommended because it can make the code difficult to read. In this case, however, the solution works because it ensures that the .then block following the save() method is only executed if a note with the given id is found in the database and the save() method is called. In the fourth part of the course, we will explore the async/await syntax, which offers an easier and clearer way to handle such situations.
Mongoose also provides the method findByIdAndUpdate, which can be used to find a document by its id and update it with a single method call. However, this approach does not fully suit our needs, because later in this part we define certain requirements for the data stored in the database, and findByIdAndUpdate does not fully support Mongoose's validations. Mongoose's documentation also notes that the save() method is generally the correct choice for updating a document, as it provides full validation.
After testing the backend directly with Postman or the VS Code REST client, we can verify that it seems to work. The frontend also appears to work with the backend using the database.
You can find the code for our current application in its entirety in the part3-5 branch of this GitHub repository.
Exercises 3.15.-3.18.
3.15: Phonebook database, step 3
Change the backend so that deleting phonebook entries is reflected in the database.
Verify that the frontend still works after making the changes.
3.16: Phonebook database, step 4
Move the error handling of the application to a new error handler middleware.
3.17*: Phonebook database, step 5
If the user tries to create a new phonebook entry for a person whose name is already in the phonebook, the frontend will try to update the phone number of the existing entry by making an HTTP PUT request to the entry's unique URL.
Modify the backend to support this request.
Verify that the frontend works after making your changes.
3.18*: Phonebook database step 6
Also update the handling of the HTTP GET api/persons/:id and info routes to use the database, and verify that they work directly with the browser, Postman, or VS Code REST client.
Inspecting an individual phonebook entry from the browser should look like this:
