a
Using relational databases with Sequelize
In this section we will explore node applications that use relational databases. During the section we will build a Node-backend using a relational database for a familiar note application from sections 3-5. To complete this part, you will need a reasonable knowledge of relational databases and SQL. There are many online courses on SQL databases, eg. SQLbolt and Intro to SQL by Khan Academy.
There are 24 exercises in this part, and you need to complete each exercise for completing the course. Exercises are submitted via the submissions system just like in the previous parts, but unlike parts 0 to 7, the submission goes to a different "course instance".
Advantages and disadvantages of document databases
We have used the MongoDB database in all the previous sections of the course. Mongo is a document database and one of its most characteristic features is that it is schemaless, i.e. the database has only a very limited awareness of what kind of data is stored in its collections. The schema of the database exists only in the program code, which interprets the data in a specific way, e.g. by identifying that some of the fields are references to objects in another collection.
In the example application of parts 3 and 4, the database stores notes and users.
A collection of notes that stores notes looks like the following:
[
  {
    "_id": "600c0e410d10256466898a6c",
    "content": "HTML is easy"
    "date": 2021-01-23T11:53:37.292+00:00,
    "important": false
    "__v": 0
  },
  {
    "_id": "600c0edde86c7264ace9bb78",
    "content": "CSS is hard"
    "date": 2021-01-23T11:56:13.912+00:00,
    "important": true
    "__v": 0
  },
]
Users saved in the users collection looks like the following:
[
  {
    "_id": "600c0e410d10256466883a6a",
    "username": "mluukkai",
    "name": "Matti Luukkainen",
    "passwordHash" : "$2b$10$Df1yYJRiQuu3Sr4tUrk.SerVz1JKtBHlBOARfY0PBn/Uo7qr8Ocou",
    "__v": 9,
    notes: [
      "600c0edde86c7264ace9bb78",
      "600c0e410d10256466898a6c"
    ]
  },
]
MongoDB does know the types of the fields of the stored entities, but it has no information about which collection of entities the user record ids are referring to. MongoDB also does not care what fields the entities stored in the collections have. Therefore MongoDB leaves it entirely up to the programmer to ensure that the correct information is being stored in the database.
There are both advantages and disadvantages to not having a schema. One of the advantages is the flexibility that schema agnosticism brings: since the schema does not need to be defined at the database level, application development may be faster in certain cases, and easier, with less effort needed in defining and modifying the schema in any case. Problems with not having a schema are related to error-proneness: everything is left up to the programmer. The database itself has no way of checking whether the data in it is honest, i.e. whether all mandatory fields have values, whether the reference type fields refer to existing entities of the right type in general, etc.
The relational databases that are the focus of this section, on the other hand, lean heavily on the existence of a schema, and the advantages and disadvantages of schema databases are almost the opposite compared of the non-schema databases.
The reason why the previous sections of the course used MongoDB is precisely because of its schema-less nature, which has made it easier to use the database for someone with little knowledge of relational databases. For most of the use cases of this course, I personally would have chosen to use a relational database.
Application database
For our application we need a relational database. There are many options, but we will be using the currently most popular Open Source solution PostgreSQL. You can install Postgres (as the database is often called) on your machine, if you wish to do so.
However, we will be taking advantage of the fact that it is possible to create a Postgres database for the application on the Fly.io and Heroku cloud service platforms, which are familiar from the parts 3 and 4.
In the theory material of this section, we will be building a Postgres-enabled version from the backend of the notes-storage application, which was built in sections 3 and 4.
Since we don't need any database in the cloud in this part (we only use the application locally), there is a possibility to use the lessons of the course part 12 and use Postgres locally with Docker. After the Postgres instructions for cloud services, we also give a short instruction on how to easily get Postgres up and running with Docker.
Fly.io
Let us create a new Fly.io-app by running the command fly launch in a directory where we shall add the code of the app. Let us also create the Postgres database for the app:
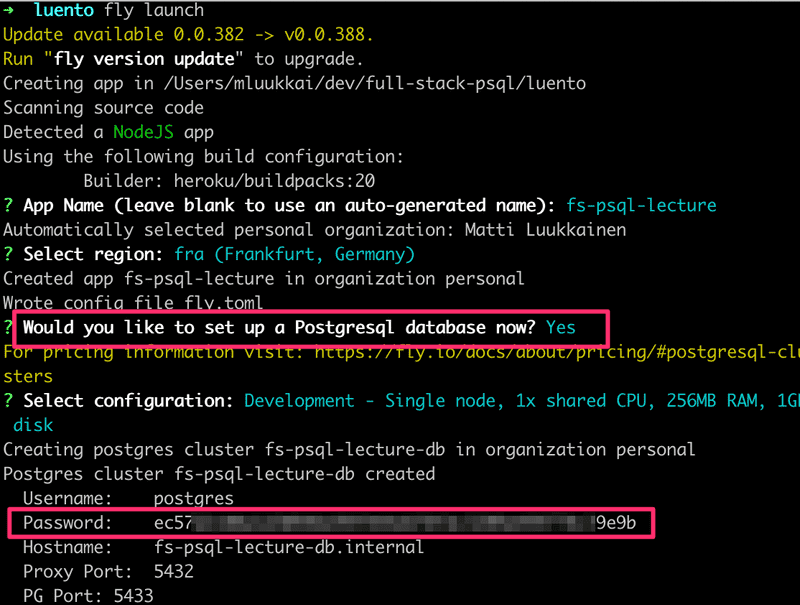
When creating the app, Fly.io reveals the password of the database that will be needed when connecting the app to the database. This is the only time it is shown in plain text so it is essential to save it somewhere (but not in any public place such as GitHub).
Note that if you only need the database, and are not planning to deploy the app to Fly.io, it is also possible to just create the database to Fly.io.
A psql console connection to the database can be opened as follows
flyctl postgres connect -a <app_name-db>in my case the app name is fs-psql-lecture so the command is the following:
flyctl postgres connect -a fs-psql-lecture-dbHeroku
If Heroku is used, a new Heroku application is created when inside a suitable directory. After that a database is added to to the app:
heroku create
# Returns an app-name for the app you just created in heroku.

heroku addons:create heroku-postgresql:hobby-dev -a <app-name>
We can use the heroku config command to get the connect string, which is required to connect to the database:
heroku config -a <app-name>
=== cryptic-everglades-76708 Config Vars
DATABASE_URL: postgres://<username>:thepasswordishere@<host-of-postgres-addon>:5432/<db-name>
The database can be accessed by running psql command on the Heroku server as follows (note that the command parameters depend on the connection url of the Heroku database):
heroku run psql -h <host-of-postgres-addon> -p 5432 -U <username> <dbname> -a <app-name>The commands asks the password and opens the psql console:
Password for user <username>:
psql (13.4 (Ubuntu 13.4-1.pgdg20.04+1))
SSL connection (protocol: TLSv1.3, cipher: TLS_AES_256_GCM_SHA384, bits: 256, compression: off)
Type "help" for help.

postgres=#
Docker
This instruction assumes that you master the basic use of Docker to the extent taught by e.g. part 12.
Start Postgres Docker image with the command
docker run -e POSTGRES_PASSWORD=mysecretpassword -p 5432:5432 postgresA psql console connection to the database can be opened using the docker exec command. First you need to find out the id of the container:
$ docker ps
CONTAINER ID   IMAGE      COMMAND                  CREATED          STATUS          PORTS                    NAMES
ff3f49eadf27   postgres   "docker-entrypoint.s…"   31 minutes ago   Up 31 minutes   0.0.0.0:5432->5432/tcp   great_raman
docker exec -it ff3f49eadf27 psql -U postgres postgres
psql (15.2 (Debian 15.2-1.pgdg110+1))
Type "help" for help.

postgres=#
Defined in this way, the data stored in the database is persisted only as long as the container exists. The data can be preserved by defining a volume for the data, see more here.
Using the psql console
Particularly when using a relational database, it is essential to access the database directly as well. There are many ways to do this, there are several different graphical user interfaces, such as pgAdmin. However, we will be using Postgres psql command-line tool.
When the console is opened, let's try the main psql command \d, which tells you the contents of the database:
Password for user <username>:
psql (13.4 (Ubuntu 13.4-1.pgdg20.04+1))
SSL connection (protocol: TLSv1.3, cipher: TLS_AES_256_GCM_SHA384, bits: 256, compression: off)
Type "help" for help.

postgres=# \d
Did not find any relations.
As you might guess, there is currently nothing in the database.
Let's create a table for notes:
CREATE TABLE notes (
    id SERIAL PRIMARY KEY,
    content text NOT NULL,
    important boolean,
    date time
);
A few points: column id is defined as a primary key, which means that the value in the column id must be unique for each row in the table and the value must not be empty. The type for this column is defined as SERIAL, which is not the actual type but an abbreviation for an integer column to which Postgres automatically assigns a unique, increasing value when creating rows. The column named content with type text is defined in such a way that it must be assigned a value.
Let's look at the situation from the console. First, the \d command, which tells us what tables are in the database:
postgres=# \d
            List of relations
 Schema |     Name     |   Type   |  Owner
--------+--------------+----------+----------
 public | notes        | table    | username
 public | notes_id_seq | sequence | username
(2 rows)
In addition to the notes table, Postgres created a subtable called notes_id_seq, which keeps track of what value is assigned to the id column when creating the next note.
With the command \d notes, we can see how the notes table is defined:
postgres=# \d notes;
                                 Table "public.notes"
 Column    |          Type          | Collation | Nullable |             Default
-----------+------------------------+-----------+----------+-----------------------------------
 id        | integer                |           | not null | nextval('notes_id_seq'::regclass)
 content   | text                   |           | not null |
 important | boolean                |           |          |
 date      | time without time zone |           |          |
Indexes:
    "notes_pkey" PRIMARY KEY, btree (id)
Therefore the column id has a default value, which is obtained by calling the internal function of Postgres nextval.
Let's add some content to the table:
insert into notes (content, important) values ('Relational databases rule the world', true);
insert into notes (content, important) values ('MongoDB is webscale', false);
And let's see what the created content looks like:
postgres=# select * from notes;
 id |               content               | important | date
----+-------------------------------------+-----------+------
  1 | relational databases rule the world | t         |
  2 | MongoDB is webscale                 | f         |
(2 rows)
If we try to store data in the database that is not according to the schema, it will not succeed. The value of a mandatory column cannot be missing:
postgres=# insert into notes (important) values (true);
ERROR: null value in column "content" of relation "notes" violates not-null constraint
DETAIL: Failing row contains (9, null, t, null).
The column value cannot be of the wrong type:
postgres=# insert into notes (content, important) values ('only valid data can be saved', 1);
ERROR: column "important" is of type boolean but expression is of type integer
LINE 1: ...tent, important) values ('only valid data can be saved', 1); ^
Columns that don't exist in the schema are not accepted either:
postgres=# insert into notes (content, important, value) values ('only valid data can be saved', true, 10);
ERROR: column "value" of relation "notes" does not exist
LINE 1: insert into notes (content, important, value) values ('only ...
Next it's time to move on to accessing the database from the application.
Node application using a relational database
Let's start the application as usual with the npm init and install nodemon as a development dependency and also the following runtime dependencies:
npm install express dotenv pg sequelizeOf these, the latter sequelize is the library through which we use Postgres. Sequelize is a so-called Object relational mapping (ORM) library that allows you to store JavaScript objects in a relational database without using the SQL language itself, similar to Mongoose that we used with MongoDB.
Let's test that we can connect successfully. Create the file index.js and add the following content:
require('dotenv').config()
const { Sequelize } = require('sequelize')

const sequelize = new Sequelize(process.env.DATABASE_URL)

const main = async () => {
  try {
    await sequelize.authenticate()
    console.log('Connection has been established successfully.')
    sequelize.close()
  } catch (error) {
    console.error('Unable to connect to the database:', error)
  }
}

main()
Note: if you use Heroku, you might need an extra option in connecting the database
const sequelize = new Sequelize(process.env.DATABASE_URL, {
  dialectOptions: {    ssl: {      require: true,      rejectUnauthorized: false    }  },})
The database connect string, that contains the database address and the credentials must be defined in the file .env
If Heroku is used, the connect string can be seen by using the command heroku config. The contents of the file .env should be something like the following:
$ cat .env
DATABASE_URL=postgres://<username>:thepasswordishere@ec2-54-83-137-206.compute-1.amazonaws.com:5432/<databasename>
When using Fly.io, the local connection to the database should first be enabled by tunneling the localhost port 5432 to the Fly.io database port using the following command
flyctl proxy 5432 -a <app-name>-dbin my case the command is
flyctl proxy 5432 -a fs-psql-lecture-dbThe command must be left running while the database is used. So do not close the console!
The Fly.io connect-string is of the form
$ cat .env
DATABASE_URL=postgres://postgres:thepasswordishere@127.0.0.1:5432/postgres
Password was shown when the database was created, so hopefully you have not lost it!
The last part of the connect string, postgres refers to the database name. The name could be any string but we use here postgres since it is the default database that is automatically created within a Postgres database. If needed, new databases can be created with the command CREATE DATABASE.
If you use Docker, the connect string is:
DATABASE_URL=postgres://postgres:mysecretpassword@localhost:5432/postgresOnce the connect string has been set up in the file .env we can test for a connection:
$ node index.js
Executing (default): SELECT 1+1 AS result
Connection has been established successfully.
If and when the connection works, we can then run the first query. Let's modify the program as follows:
require('dotenv').config()
const { Sequelize, QueryTypes } = require('sequelize')
const sequelize = new Sequelize(process.env.DATABASE_URL, {
  dialectOptions: {
    ssl: {
      require: true,
      rejectUnauthorized: false
    }
  },
});

const main = async () => {
  try {
    await sequelize.authenticate()
    const notes = await sequelize.query("SELECT * FROM notes", { type: QueryTypes.SELECT })    console.log(notes)    sequelize.close()  } catch (error) {
    console.error('Unable to connect to the database:', error)
  }
}

main()
Executing the application should print as follows:
Executing (default): SELECT * FROM notes
[
  {
    id: 1,
    content: 'Relational databases rule the world',
    important: true,
    date: null
  },
  {
    id: 2,
    content: 'MongoDB is webscale',
    important: false,
    date: null
  }
]
Even though Sequelize is an ORM library, which means there is little need to write SQL yourself when using it, we just used direct SQL with the sequelize method query.
Since everything seems to be working, let's change the application into a web application.
require('dotenv').config()
const { Sequelize, QueryTypes } = require('sequelize')
const express = require('express')const app = express()
const sequelize = new Sequelize(process.env.DATABASE_URL, {
  dialectOptions: {
    ssl: {
      require: true,
      rejectUnauthorized: false
    }
  },
});

app.get('/api/notes', async (req, res) => {  const notes = await sequelize.query("SELECT * FROM notes", { type: QueryTypes.SELECT })  res.json(notes)})const PORT = process.env.PORT || 3001app.listen(PORT, () => {  console.log(`Server running on port ${PORT}`)})
The application seems to be working. However, let's now switch to using Sequelize instead of SQL as it is intended to be used.
Model
When using Sequelize, each table in the database is represented by a model, which is effectively it's own JavaScript class. Let's now define the model Note corresponding to the table notes for the application by changing the code to the following format:
require('dotenv').config()
const { Sequelize, Model, DataTypes } = require('sequelize')const express = require('express')
const app = express()

const sequelize = new Sequelize(process.env.DATABASE_URL, {
  dialectOptions: {
    ssl: {
      require: true,
      rejectUnauthorized: false
    }
  },
});

class Note extends Model {}Note.init({  id: {    type: DataTypes.INTEGER,    primaryKey: true,    autoIncrement: true  },  content: {    type: DataTypes.TEXT,    allowNull: false  },  important: {    type: DataTypes.BOOLEAN  },  date: {    type: DataTypes.DATE  }}, {  sequelize,  underscored: true,  timestamps: false,  modelName: 'note'})
app.get('/api/notes', async (req, res) => {
  const notes = await Note.findAll()  res.json(notes)
})

const PORT = process.env.PORT || 3001
app.listen(PORT, () => {
  console.log(`Server running on port ${PORT}`)
})
A few comments on the code: There is nothing very surprising about the Note definition of the model, each column has a type defined, as well as other properties if necessary, such as whether it is the main key of the table. The second parameter in the model definition contains the sequelize attribute as well as other configuration information. We also defined that the table does not have to use the timestamps columns (created_at and updated_at).
We also defined underscored: true, which means that table names are derived from model names as plural snake case versions. Practically this means that, if the name of the model, as in our case is "Note", then the name of the corresponding table is its plural version written with a lower case initial letter, i.e. notes. If, on the other hand, the name of the model would be "two-part", e.g. StudyGroup, then the name of the table would be study_groups. Sequelize automatically infers table names, but also allows explicitly defining them.
The same naming policy applies to columns as well. If we had defined that a note is associated with creationYear, i.e. information about the year it was created, we would define it in the model as follows:
Note.init({
  // ...
  creationYear: {
    type: DataTypes.INTEGER,
  },
})
The name of the corresponding column in the database would be creation_year. In code, reference to the column is always in the same format as in the model, i.e. in "camel case" format.
We have also defined modelName: 'note', the default "model name" would be capitalized Note. However we want to have a lowercase initial, it will make a few things a bit more convenient going forward.
The database operation is easy to do using the query interface provided by models, the method findAll works exactly as it is assumed by it's name to work:
app.get('/api/notes', async (req, res) => {
  const notes = await Note.findAll()  res.json(notes)
})
The console tells you that the method call Note.findAll() causes the following query:
Executing (default): SELECT "id", "content", "important", "date" FROM "notes" AS "note";Next, let's implement an endpoint for creating new notes:
app.use(express.json())

// ...

app.post('/api/notes', async (req, res) => {
  console.log(req.body)
  const note = await Note.create(req.body)
  res.json(note)
})
Creating a new note is done by calling the model's Note method create and passing as a parameter an object that defines the values of the columns.
Instead of the create method, it is also possible to save to a database using the build method first to create a Model-object from the desired data, and then calling the save method on it:
const note = Note.build(req.body)
await note.save()
Calling the build method does not save the object in the database yet, so it is still possible to edit the object before the actual save event:
const note = Note.build(req.body)
note.important = trueawait note.save()
For the use case of the example code, the create method is better suited, so let's stick to that.
If the object being created is not valid, there is an error message as a result. For example, when trying to create a note without content, the operation fails, and the console reveals the reason to be SequelizeValidationError: notNull Violation Note.content cannot be null:
(node:39109) UnhandledPromiseRejectionWarning: SequelizeValidationError: notNull Violation: Note.content cannot be null
    at InstanceValidator._validate (/Users/mluukkai/opetus/fs-psql/node_modules/sequelize/lib/instance-validator.js:78:13)
    at processTicksAndRejections (internal/process/task_queues.js:93:5)
Let's add some simple error handling when adding a new note:
app.post('/api/notes', async (req, res) => {
  try {
    const note = await Note.create(req.body)
    return res.json(note)
  } catch(error) {
    return res.status(400).json({ error })
  }
})Creating database tables automatically
Our application now has one unpleasant side, it assumes that a database with exactly the right schema exists, i.e. that the table notes has been created with the appropriate create table command.
Since the program code is being stored on GitHub, it would make sense to also store the commands that create the database in the context of the program code, so that the database schema is definitely the same as what the program code is expecting. Sequelize is actually able to generate a schema automatically from the model definition by using the models method sync.
Let's now destroy the database from the console by entering the following command:
drop table notes;The \d command reveals that the table has been lost from the database:
postgres=# \d
Did not find any relations.
The application no longer works.
Let's add the following command to the application immediately after the model Note is defined:
Note.sync()When the application starts, the following is printed on the console:
Executing (default): CREATE TABLE IF NOT EXISTS "notes" ("id" SERIAL , "content" TEXT NOT NULL, "important" BOOLEAN, "date" TIMESTAMP WITH TIME ZONE, PRIMARY KEY ("id"));That is, when the application starts, the command CREATE TABLE IF NOT EXISTS "notes"... is executed which creates the table notes if it does not already exist.
Other operations
Let's complete the application with a few more operations.
Searching for a single note is possible with the method findByPk, because it is retrieved based on the id of the primary key:
app.get('/api/notes/:id', async (req, res) => {
  const note = await Note.findByPk(req.params.id)
  if (note) {
    res.json(note)
  } else {
    res.status(404).end()
  }
})
Retrieving a single note causes the following SQL command:
Executing (default): SELECT "id", "content", "important", "date" FROM "notes" AS "note" WHERE "note". "id" = '1';If no note is found, the operation returns null, and in this case the relevant status code is given.
Modifying the note is done as follows. Only the modification of the important field is supported, since the application's frontend does not need anything else:
app.put('/api/notes/:id', async (req, res) => {
  const note = await Note.findByPk(req.params.id)
  if (note) {
    note.important = req.body.important
    await note.save()
    res.json(note)
  } else {
    res.status(404).end()
  }
})
The object corresponding to the database row is retrieved from the database using the findByPk method, the object is modified and the result is saved by calling the save method of the object corresponding to the database row.
The current code for the application is in its entirety on GitHub, branch part13-1.
Printing the objects returned by Sequelize to the console
The JavaScript programmer's most important tool is console.log, whose aggressive use gets even the worst bugs under control. Let's add console printing to the single note path:
app.get('/api/notes/:id', async (req, res) => {
  const note = await Note.findByPk(req.params.id)
  if (note) {
    console.log(note)    res.json(note)
  } else {
    res.status(404).end()
  }
})
We can see that the end result is not exactly what we expected:
note {
  dataValues: {
    id: 1,
    content: 'Notes are attached to a user',
    important: true,
    date: 2021-10-03T15:00:24.582Z,
  },
  _previousDataValues: {
    id: 1,
    content: 'Notes are attached to a user',
    important: true,
    date: 2021-10-03T15:00:24.582Z,
  },
  _changed: Set(0) {},
  _options: {
    isNewRecord: false,
    _schema: null,
    _schemaDelimiter: '',
    raw: true,
    attributes: [ 'id', 'content', 'important', 'date' ]
  },
  isNewRecord: false
}
In addition to the note information, all sorts of other things are printed on the console. We can reach the desired result by calling the model-object method toJSON:
app.get('/api/notes/:id', async (req, res) => {
  const note = await Note.findByPk(req.params.id)
  if (note) {
    console.log(note.toJSON())    res.json(note)
  } else {
    res.status(404).end()
  }
})
Now the result is exactly what we want:
{ id: 1,
  content: 'MongoDB is webscale',
  important: false,
  date: 2021-10-09T13:52:58.693Z }
In the case of a collection of objects, the method toJSON does not work directly, the method must be called separately for each object in the collection:
app.get('/api/notes', async (req, res) => {
  const notes = await Note.findAll()

  console.log(notes.map(n=>n.toJSON()))
  res.json(notes)
})
The print looks like the following:
[ { id: 1,
    content: 'MongoDB is webscale',
    important: false,
    date: 2021-10-09T13:52:58.693Z },
  { id: 2,
    content: 'Relational databases rule the world',
    important: true,
    date: 2021-10-09T13:53:10.710Z } ]
However, perhaps a better solution is to turn the collection into JSON for printing by using the method JSON.stringify:
app.get('/api/notes', async (req, res) => {
  const notes = await Note.findAll()

  console.log(JSON.stringify(notes))
  res.json(notes)
})
This way is better especially if the objects in the collection contain other objects. It is also often useful to format the objects on the screen in a slightly more reader-friendly format. This can be done with the following command:
console.log(JSON.stringify(notes, null, 2))The print looks like the following:
[
  {
    "id": 1,
    "content": "MongoDB is webscale",
    "important": false,
    "date": "2021-10-09T13:52:58.693Z"
  },
  {
    "id": 2,
    "content": "Relational databases rule the world",
    "important": true,
    "date": "2021-10-09T13:53:10.710Z"
  }
]