d
Testing and extending our application
Now that we have established a good foundation for our project, it is time to start expanding it. In this section you can put to use all the React Native knowledge you have gained so far. Along with expanding our application we will cover some new areas, such as testing, and additional resources.
Testing React Native applications
To start testing code of any kind, the first thing we need is a testing framework, which we can use to run a set of test cases and inspect their results. For testing a JavaScript application, Jest is a popular candidate for such testing framework. For testing an Expo based React Native application with Jest, Expo provides a set of Jest configuration in a form of jest-expo preset. In order to use ESLint in the Jest's test files, we also need the eslint-plugin-jest plugin for ESLint. Let's get started by installing the packages:
npm install --save-dev jest jest-expo eslint-plugin-jestTo use the jest-expo preset in Jest, we need to add the following Jest configuration to the package.json file along with the test script:
{
  // ...
  "scripts": {
    // other scripts...
    "test": "jest"  },
  "jest": {    "preset": "jest-expo",    "transform": {      "^.+\\.jsx?$": "babel-jest"    },    "transformIgnorePatterns": [      "node_modules/(?!((jest-)?react-native|@react-native(-community)?)|expo(nent)?|@expo(nent)?/.*|@expo-google-fonts/.*|react-navigation|@react-navigation/.*|@unimodules/.*|unimodules|sentry-expo|native-base|react-native-svg|react-router-native)"    ]  },  // ...
}
The transform option tells Jest to transform .js and .jsx files with the Babel compiler. The transformIgnorePatterns option is for ignoring certain directories in the node_modules directory while transforming files. This Jest configuration is almost identical to the one proposed in the Expo's documentation.
To use the eslint-plugin-jest plugin in ESLint, we need to include it in the plugins and extensions array in the .eslintrc.json file:
{
  "plugins": ["react", "react-native"],
  "settings": {
    "react": {
      "version": "detect"
    }
  },
  "extends": ["eslint:recommended", "plugin:react/recommended", "plugin:jest/recommended"],  "parser": "@babel/eslint-parser",
  "env": {
    "react-native/react-native": true
  },
  "rules": {
    "react/prop-types": "off",
    "react/react-in-jsx-scope": "off"
  }
}
To see that the setup is working, create a directory __tests__ in the src directory and in the created directory create a file example.test.js. In that file, add this simple test:
describe('Example', () => {
  it('works', () => {
    expect(1).toBe(1);
  });
});
Now, let's run our example test by running npm test. The command's output should indicate that the test located in the src/__tests__/example.test.js file is passed.
Organizing tests
Organizing test files in a single __tests__ directory is one approach in organizing the tests. When choosing this approach, it is recommended to put the test files in their corresponding subdirectories just like the code itself. This means that for example tests related to components are in the components directory, tests related to utilities are in the utils directory, and so on. This will result in the following structure:
src/
  __tests__/
    components/
      AppBar.js
      RepositoryList.js
      ...
    utils/
      authStorage.js
      ...
    ...
Another approach is to organize the tests near the implementation. This means that for example, the test file containing tests for the AppBar component is in the same directory as the component's code. This will result in the following structure:
src/
  components/
    AppBar/
      AppBar.test.jsx
      index.jsx
    ...
  ...
In this example, the component's code is in the index.jsx file and the test in the AppBar.test.jsx file. Note that in order for Jest to find your test files you either have to put them into a __tests__ directory, use the .test or .spec suffix, or manually configure the global patterns.
Testing components
Now that we have managed to set up Jest and run a very simple test, it is time to find out how to test components. As we know, testing components requires a way to serialize a component's render output and simulate firing different kind of events, such as pressing a button. For these purposes, there is the Testing Library family, which provides libraries for testing user interface components in different platforms. All of these libraries share similar API for testing user interface components in a user-centric way.
In part 5 we got familiar with one of these libraries, the React Testing Library. Unfortunately, this library is only suitable for testing React web applications. Luckily, there exists a React Native counterpart for this library, which is the React Native Testing Library. This is the library we will be using while testing our React Native application's components. The good news is, that these libraries share a very similar API, so there aren't too many new concepts to learn. In addition to the React Native Testing Library, we need a set of React Native specific Jest matchers such as toHaveTextContent and toHaveProp. These matchers are provided by the jest-native library. Before getting into the details, let's install these packages:
npm install --save-dev --legacy-peer-deps react-test-renderer@18.2.0 @testing-library/react-native @testing-library/jest-nativeNB: If you face peer dependency issues, make sure that the react-test-renderer version matches the project's React version in the npm install command above. You can check the React version by running npm list react --depth=0.
If the installation fails due to peer dependency issues, try again using the --legacy-peer-deps flag with the npm install command.
To be able to use these matchers we need to extend the Jest's expect object. This can be done by using a global setup file. Create a file setupTests.js in the root directory of your project, that is, the same directory where the package.json file is located. In that file add the following line:
import '@testing-library/jest-native/extend-expect';Next, configure this file as a setup file in the Jest's configuration in the package.json file (note that the <rootDir> in the path is intentional and there is no need to replace it):
{
  // ...
  "jest": {
    "preset": "jest-expo",
    "transform": {
      "^.+\\.jsx?$": "babel-jest"
    },
    "transformIgnorePatterns": [
      "node_modules/(?!(jest-)?react-native|react-clone-referenced-element|@react-native-community|expo(nent)?|@expo(nent)?/.*|react-navigation|@react-navigation/.*|@unimodules/.*|unimodules|sentry-expo|native-base|@sentry/.*|react-router-native)"
    ],
    "setupFilesAfterEnv": ["<rootDir>/setupTests.js"]  }
  // ...
}
The main concepts of the React Native Testing Library are the queries and firing events. Queries are used to extract a set of nodes from the component that is rendered using the render function. Queries are useful in tests where we expect for example some text, such as the name of a repository, to be present in the rendered component. Here's an example how to use the ByText query to check if the component's Text element has the correct textual content:
import { Text, View } from 'react-native';
import { render, screen } from '@testing-library/react-native';

const Greeting = ({ name }) => {
  return (
    <View>
      <Text>Hello {name}!</Text>
    </View>
  );
};

describe('Greeting', () => {
  it('renders a greeting message based on the name prop', () => {
    render(<Greeting name="Kalle" />);

    screen.debug();

    expect(screen.getByText('Hello Kalle!')).toBeDefined();
  });
});
Tests use the object screen to do the queries to the rendered component.
We acquire the Text node containing certain text by using the getByText function. The Jest matcher toBeDefined is used to ensure that the query has found the element.
React Native Testing Library's documentation has some good hints on how to query different kinds of elements. Another guide worth reading is Kent C. Dodds article Making your UI tests resilient to change.
The object screen also has a helper method debug that prints the rendered React tree in a user-friendly format. Use it if you are unsure what the React tree rendered by the render function looks like.
For all available queries, check the React Native Testing Library's documentation. The full list of available React Native specific matchers can be found in the documentation of the jest-native library. Jest's documentation contains every universal Jest matcher.
The second very important React Native Testing Library concept is firing events. We can fire an event in a provided node by using the fireEvent object's methods. This is useful for example typing text into a text field or pressing a button. Here is an example of how to test submitting a simple form:
import { useState } from 'react';
import { Text, TextInput, Pressable, View } from 'react-native';
import { render, fireEvent, screen } from '@testing-library/react-native';

const Form = ({ onSubmit }) => {
  const [username, setUsername] = useState('');
  const [password, setPassword] = useState('');

  const handleSubmit = () => {
    onSubmit({ username, password });
  };

  return (
    <View>
      <View>
        <TextInput
          value={username}
          onChangeText={(text) => setUsername(text)}
          placeholder="Username"
        />
      </View>
      <View>
        <TextInput
          value={password}
          onChangeText={(text) => setPassword(text)}
          placeholder="Password"
        />
      </View>
      <View>
        <Pressable onPress={handleSubmit}>
          <Text>Submit</Text>
        </Pressable>
      </View>
    </View>
  );
};

describe('Form', () => {
  it('calls function provided by onSubmit prop after pressing the submit button', () => {
    const onSubmit = jest.fn();
    render(<Form onSubmit={onSubmit} />);

    fireEvent.changeText(screen.getByPlaceholderText('Username'), 'kalle');
    fireEvent.changeText(screen.getByPlaceholderText('Password'), 'password');
    fireEvent.press(screen.getByText('Submit'));

    expect(onSubmit).toHaveBeenCalledTimes(1);

    // onSubmit.mock.calls[0][0] contains the first argument of the first call
    expect(onSubmit.mock.calls[0][0]).toEqual({
      username: 'kalle',
      password: 'password',
    });
  });
});
In this test, we want to test that after filling the form's fields using the fireEvent.changeText method and pressing the submit button using the fireEvent.press method, the onSubmit callback function is called correctly. To inspect whether the onSubmit function is called and with which arguments, we can use a mock function. Mock functions are functions with preprogrammed behavior such as a specific return value. In addition, we can create expectations for the mock functions such as "expect the mock function to have been called once". The full list of available expectations can be found in the Jest's expect documentation.
Before heading further into the world of testing React Native applications, play around with these examples by adding a test file in the __tests__ directory we created earlier.
Handling dependencies in tests
Components in the previous examples are quite easy to test because they are more or less pure. Pure components don't depend on side effects such as network requests or using some native API such as the AsyncStorage. The Form component is much less pure than the Greeting component because its state changes can be counted as a side effect. Nevertheless, testing it isn't too difficult.
Next, let's have a look at a strategy for testing components with side effects. Let's pick the RepositoryList component from our application as an example. At the moment the component has one side effect, which is a GraphQL query for fetching the reviewed repositories. The current implementation of the RepositoryList component looks something like this:
const RepositoryList = () => {
  const { repositories } = useRepositories();

  const repositoryNodes = repositories
    ? repositories.edges.map((edge) => edge.node)
    : [];

  return (
    <FlatList
      data={repositoryNodes}
      // ...
    />
  );
};

export default RepositoryList;
The only side effect is the use of the useRepositories hook, which sends a GraphQL query. There are a few ways to test this component. One way is to mock the Apollo Client's responses as instructed in the Apollo Client's documentation. A more simple way is to assume that the useRepositories hook works as intended (preferably through testing it) and extract the components "pure" code into another component, such as the RepositoryListContainer component:
export const RepositoryListContainer = ({ repositories }) => {
  const repositoryNodes = repositories
    ? repositories.edges.map((edge) => edge.node)
    : [];

  return (
    <FlatList
      data={repositoryNodes}
      // ...
    />
  );
};

const RepositoryList = () => {
  const { repositories } = useRepositories();

  return <RepositoryListContainer repositories={repositories} />;
};

export default RepositoryList;
Now, the RepositoryList component contains only the side effects and its implementation is quite simple. We can test the RepositoryListContainer component by providing it with paginated repository data through the repositories prop and checking that the rendered content has the correct information.
Extending our application
It is time to put everything we have learned so far to good use and start extending our application. Our application still lacks a few important features such as reviewing a repository and registering a user. The upcoming exercises will focus on these essential features.
Exercises 10.19. - 10.26
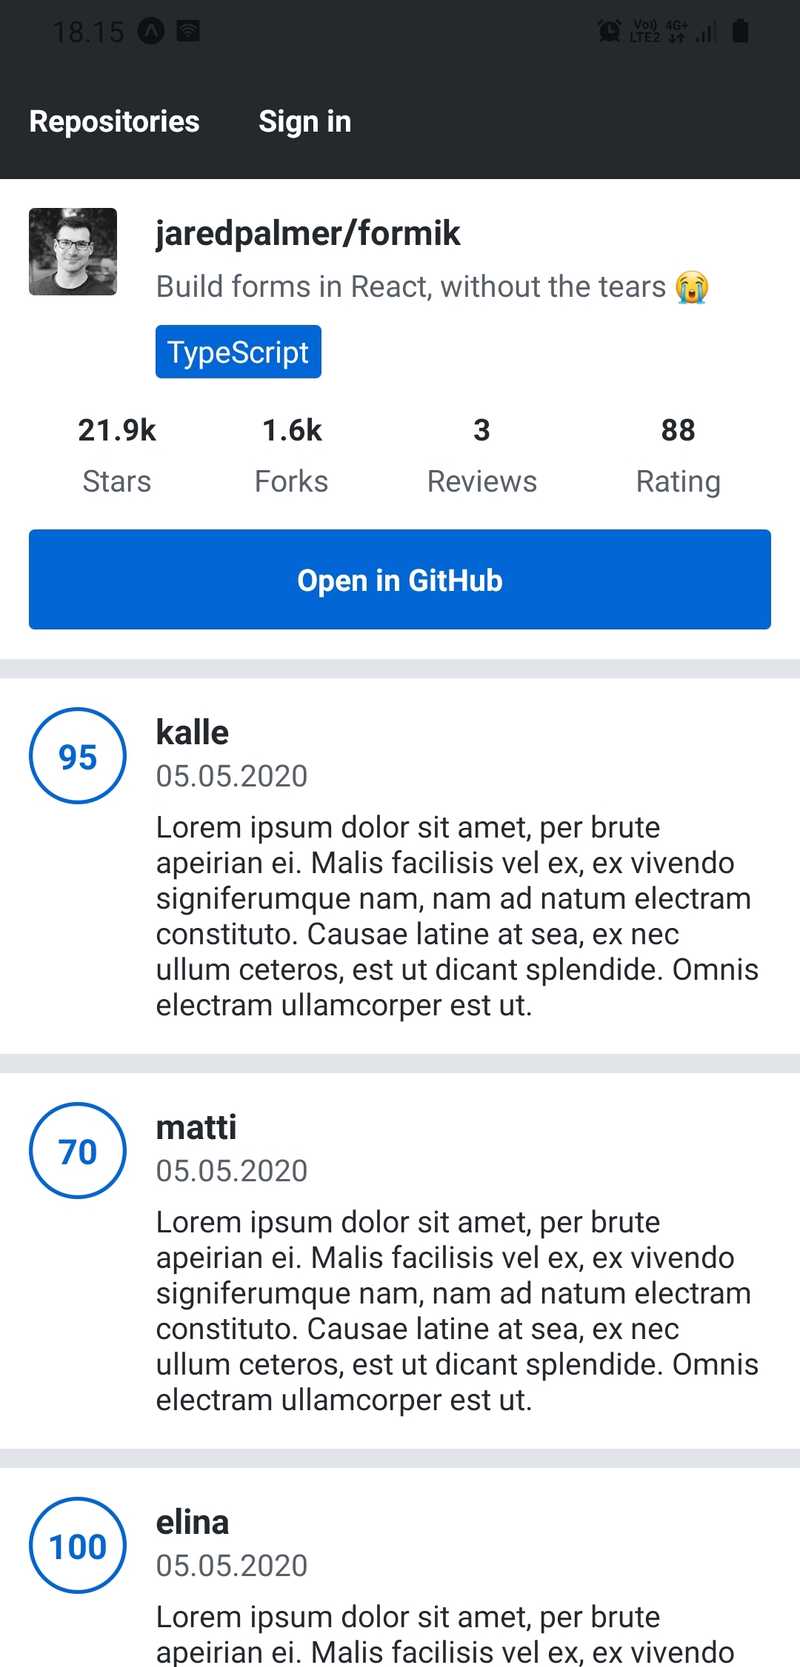
Exercise 10.19: the single repository view
Implement a view for a single repository, which contains the same repository information as in the reviewed repositories list but also a button for opening the repository in GitHub. It would be a good idea to reuse the RepositoryItem component used in the RepositoryList component and display the GitHub repository button for example based on a boolean prop.
The repository's URL is in the url field of the Repository type in the GraphQL schema. You can fetch a single repository from the Apollo server with the repository query. The query has a single argument, which is the id of the repository. Here's a simple example of the repository query:
{
  repository(id: "jaredpalmer.formik") {
    id
    fullName
    url
  }
}
As always, test your queries in the Apollo Sandbox first before using them in your application. If you are unsure about the GraphQL schema or what are the available queries, take a look at the documentation next to the operations editor. If you have trouble using the id as a variable in the query, take a moment to study the Apollo Client's documentation on queries.
To learn how to open a URL in a browser, read the Expo's Linking API documentation. You will need this feature while implementing the button for opening the repository in GitHub. Hint: Linking.openURL method will come in handy.
The view should have its own route. It would be a good idea to define the repository's id in the route's path as a path parameter, which you can access by using the useParams hook. The user should be able to access the view by pressing a repository in the reviewed repositories list. You can achieve this by for example wrapping the RepositoryItem with a Pressable component in the RepositoryList component and using navigate function to change the route in an onPress event handler. You can access the navigate function with the useNavigate hook.
The final version of the single repository view should look something like this:

Note if the peer depencendy issues prevent installing the library, try the --legacy-peer-deps option:
npm install expo-linking --legacy-peer-depsExercise 10.20: repository's review list
Now that we have a view for a single repository, let's display repository's reviews there. Repository's reviews are in the reviews field of the Repository type in the GraphQL schema. reviews is a similar paginated list as in the repositories query. Here's an example of getting reviews of a repository:
{
  repository(id: "jaredpalmer.formik") {
    id
    fullName
    reviews {
      edges {
        node {
          id
          text
          rating
          createdAt
          user {
            id
            username
          }
        }
      }
    }
  }
}
Review's text field contains the textual review, rating field a numeric rating between 0 and 100, and createdAt the date when the review was created. Review's user field contains the reviewer's information, which is of type User.
We want to display reviews as a scrollable list, which makes FlatList a suitable component for the job. To display the previous exercise's repository's information at the top of the list, you can use the FlatList component's ListHeaderComponent prop. You can use the ItemSeparatorComponent to add some space between the items like in the RepositoryList component. Here's an example of the structure:
const RepositoryInfo = ({ repository }) => {
  // Repository's information implemented in the previous exercise
};

const ReviewItem = ({ review }) => {
  // Single review item
};

const SingleRepository = () => {
  // ...

  return (
    <FlatList
      data={reviews}
      renderItem={({ item }) => <ReviewItem review={item} />}
      keyExtractor={({ id }) => id}
      ListHeaderComponent={() => <RepositoryInfo repository={repository} />}
      // ...
    />
  );
};

export default SingleRepository;
The final version of the repository's reviews list should look something like this:
The date under the reviewer's username is the creation date of the review, which is in the createdAt field of the Review type. The date format should be user-friendly such as day.month.year. You can for example install the date-fns library and use the format function for formatting the creation date.
The round shape of the rating's container can be achieved with the borderRadius style property. You can make it round by fixing the container's width and height style property and setting the border-radius as width / 2.
Exercise 10.21: the review form
Implement a form for creating a review using Formik. The form should have four fields: repository owner's GitHub username (for example "jaredpalmer"), repository's name (for example "formik"), a numeric rating, and a textual review. Validate the fields using Yup schema so that it contains the following validations:
- Repository owner's username is a required string
- Repository's name is a required string
- Rating is a required number between 0 and 100
- Review is a optional string
Explore Yup's documentation to find suitable validators. Use sensible error messages with the validators. The validation message can be defined as the validator method's message argument. You can make the review field expand to multiple lines by using TextInput component's multiline prop.
You can create a review using the createReview mutation. Check this mutation's arguments in the Apollo Sandbox. You can use the useMutation hook to send a mutation to the Apollo Server.
After a successful createReview mutation, redirect the user to the repository's view you implemented in the previous exercise. This can be done with the navigate function after you have obtained it using the useNavigate hook. The created review has a repositoryId field which you can use to construct the route's path.
To prevent getting cached data with the repository query in the single repository view, use the cache-and-network fetch policy in the query. It can be used with the useQuery hook like this:
useQuery(GET_REPOSITORY, {
  fetchPolicy: 'cache-and-network',
  // Other options
});
Note that only an existing public GitHub repository can be reviewed and a user can review the same repository only once. You don't have to handle these error cases, but the error payload includes specific codes and messages for these errors. You can try out your implementation by reviewing one of your own public repositories or any other public repository.
The review form should be accessible through the app bar. Create a tab to the app bar with a label "Create a review". This tab should only be visible to users who have signed in. You will also need to define a route for the review form.
The final version of the review form should look something like this:
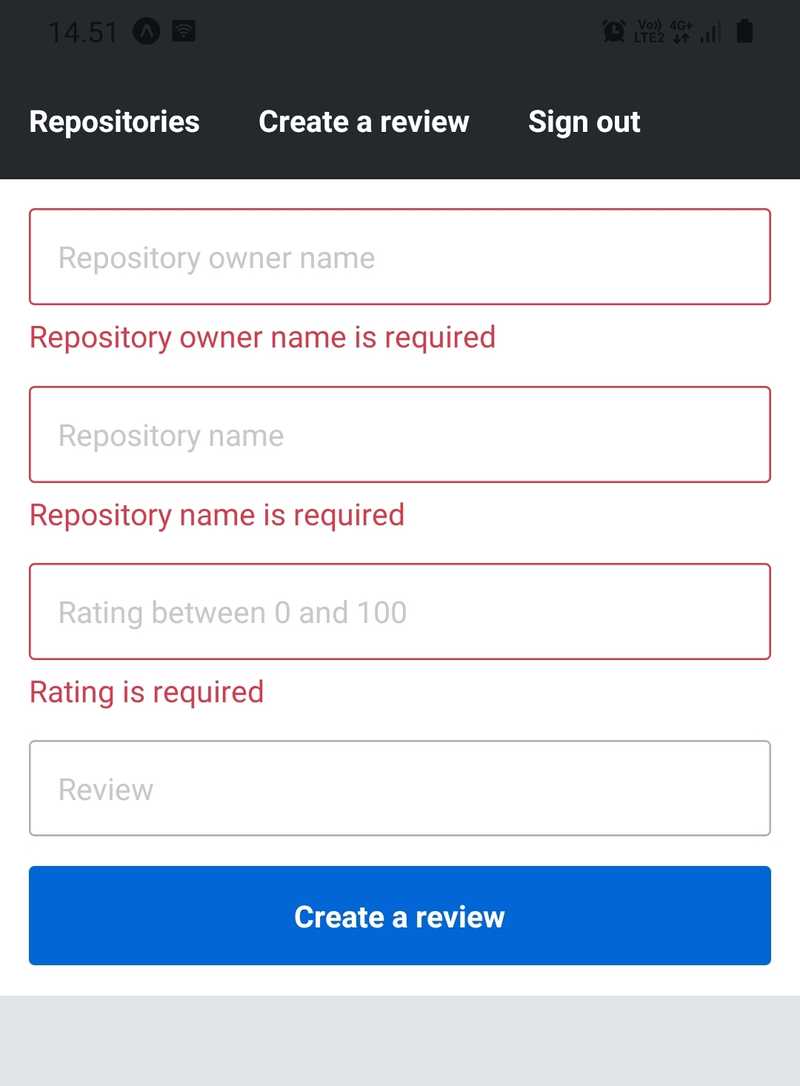
This screenshot has been taken after invalid form submission to present what the form should look like in an invalid state.
Exercise 10.22: the sign up form
Implement a sign up form for registering a user using Formik. The form should have three fields: username, password, and password confirmation. Validate the form using Yup schema so that it contains the following validations:
- Username is a required string with a length between 5 and 30
- Password is a required string with a length between 5 and 50
- Password confirmation matches the password
The password confirmation field's validation can be a bit tricky, but it can be done for example by using the oneOf and ref methods like suggested in this issue.
You can create a new user by using the createUser mutation. Find out how this mutation works by exploring the documentation in the Apollo Sandbox. After a successful createUser mutation, sign the created user in by using the useSignIn hook as we did in the sign in the form. After the user has been signed in, redirect the user to the reviewed repositories list view.
The user should be able to access the sign-up form through the app bar by pressing a "Sign up" tab. This tab should only be visible to users that aren't signed in.
The final version of the sign up form should look something like this:
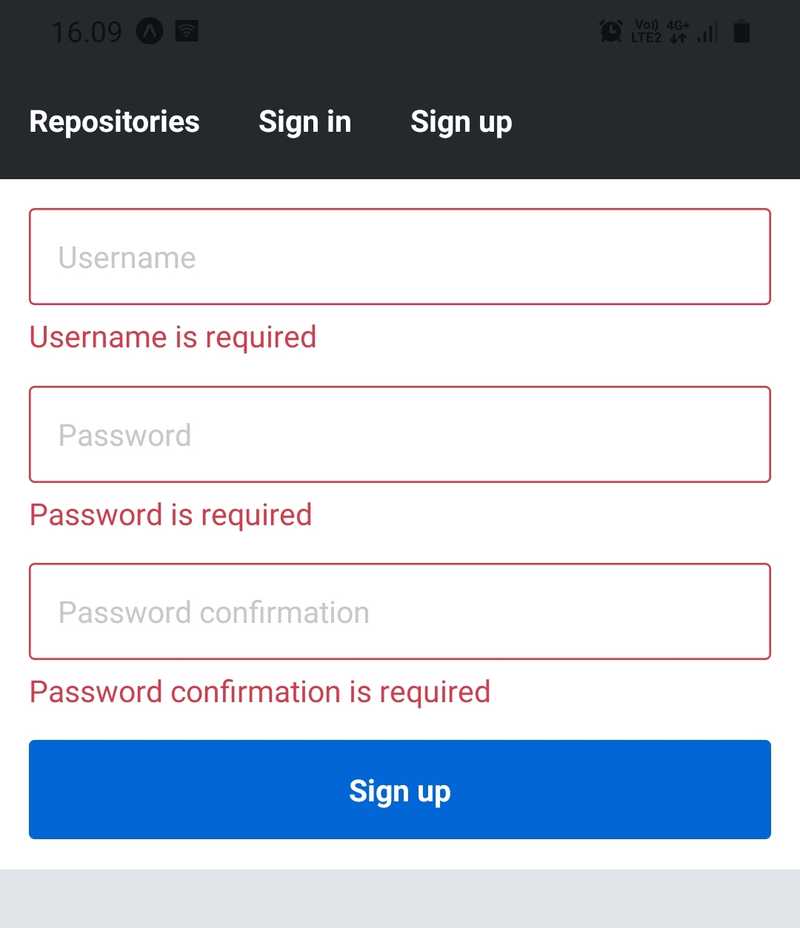
This screenshot has been taken after invalid form submission to present what the form should look like in an invalid state.
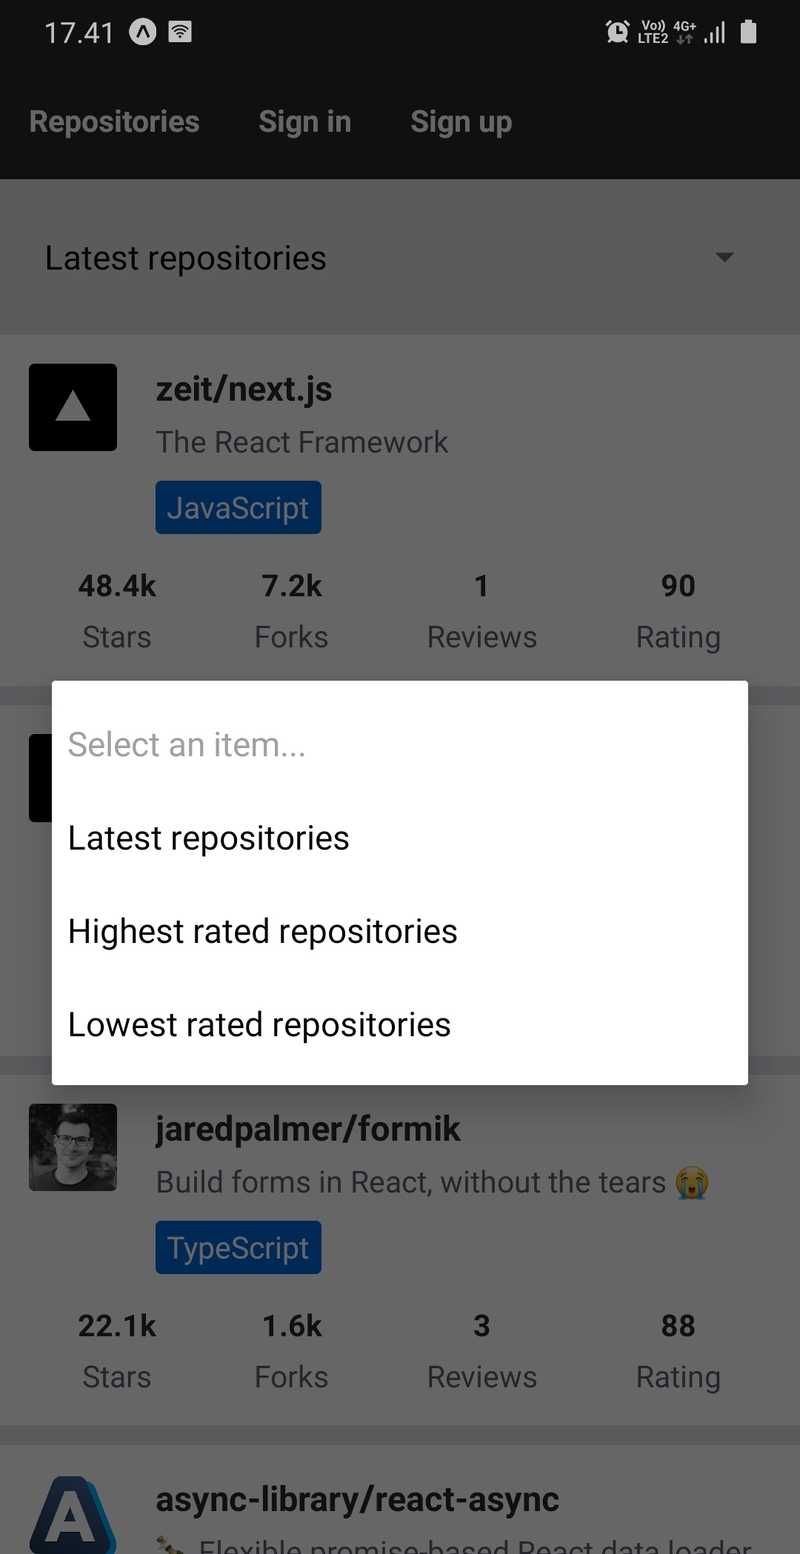
Exercise 10.23: sorting the reviewed repositories list
At the moment repositories in the reviewed repositories list are ordered by the date of repository's first review. Implement a feature that allows users to select the principle, which is used to order the repositories. The available ordering principles should be:
- Latest repositories. The repository with the latest first review is on the top of the list. This is the current behavior and should be the default principle.
- Highest rated repositories. The repository with the highest average rating is on the top of the list.
- Lowest rated repositories. The repository with the lowest average rating is on the top of the list.
The repositories query used to fetch the reviewed repositories has an argument called orderBy, which you can use to define the ordering principle. The argument has two allowed values: CREATED_AT (order by the date of repository's first review) and RATING_AVERAGE, (order by the repository's average rating). The query also has an argument called orderDirection which can be used to change the order direction. The argument has two allowed values: ASC (ascending, smallest value first) and DESC (descending, biggest value first).
The selected ordering principle state can be maintained for example using the React's useState hook. The variables used in the repositories query can be given to the useRepositories hook as an argument.
You can use for example @react-native-picker/picker library, or React Native Paper library's Menu component to implement the ordering principle's selection. You can use the FlatList component's ListHeaderComponent prop to provide the list with a header containing the selection component.
The final version of the feature, depending on the selection component in use, should look something like this:
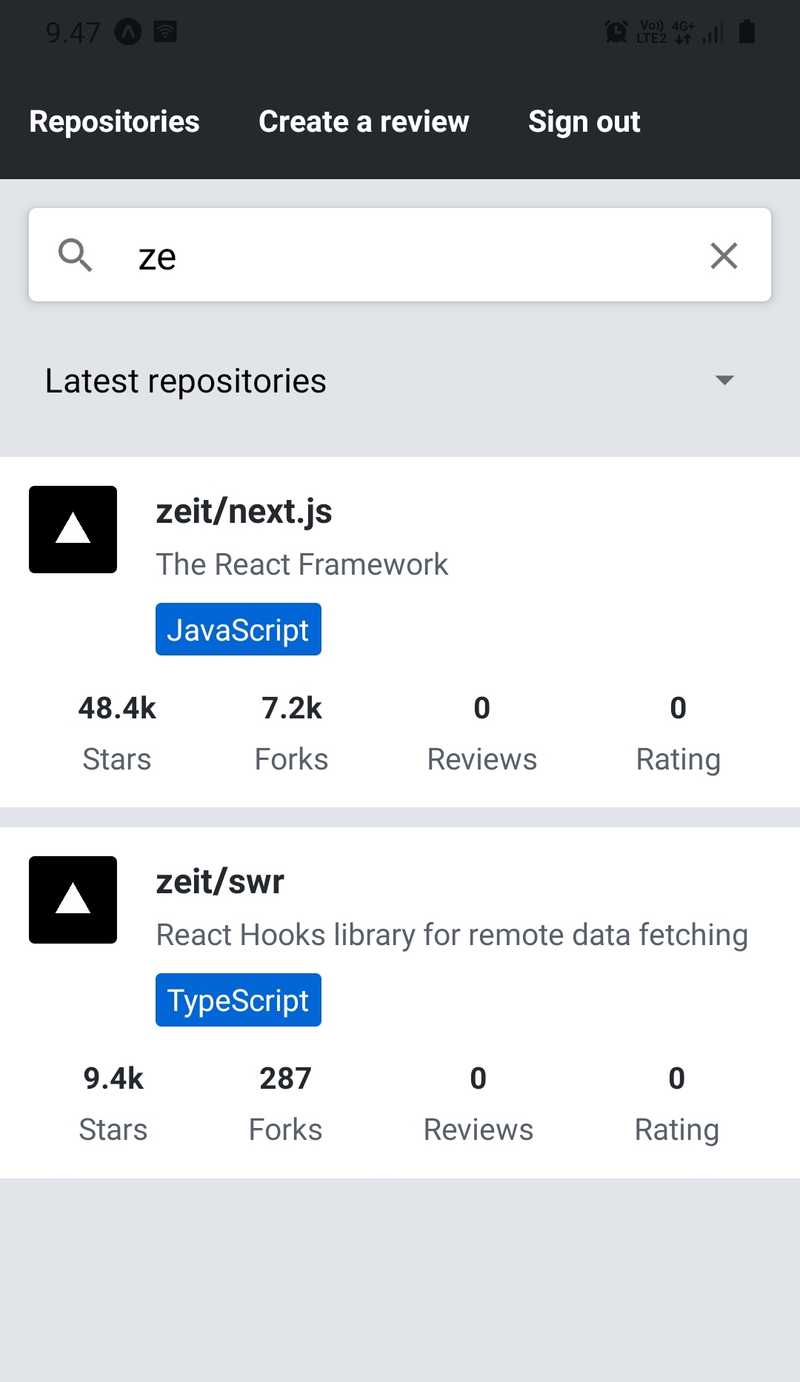
Exercise 10.24: filtering the reviewed repositories list
The Apollo Server allows filtering repositories using the repository's name or the owner's username. This can be done using the searchKeyword argument in the repositories query. Here's an example of how to use the argument in a query:
{
  repositories(searchKeyword: "ze") {
    edges {
      node {
        id
        fullName
      }
    }
  }
}
Implement a feature for filtering the reviewed repositories list based on a keyword. Users should be able to type in a keyword into a text input and the list should be filtered as the user types. You can use a simple TextInput component or something a bit fancier such as React Native Paper's Searchbar component as the text input. Put the text input component in the FlatList component's header.
To avoid a multitude of unnecessary requests while the user types the keyword fast, only pick the latest input after a short delay. This technique is often referred to as debouncing. use-debounce library is a handy hook for debouncing a state variable. Use it with a sensible delay time, such as 500 milliseconds. Store the text input's value by using the useState hook and then pass the debounced value to the query as the value of the searchKeyword argument.
You probably face an issue that the text input component loses focus after each keystroke. This is because the content provided by the ListHeaderComponent prop is constantly unmounted. This can be fixed by turning the component rendering the FlatList component into a class component and defining the header's render function as a class property like this:
export class RepositoryListContainer extends React.Component {
  renderHeader = () => {
    // this.props contains the component's props
    const props = this.props;

    // ...

    return (
      <RepositoryListHeader
      // ...
      />
    );
  };

  render() {
    return (
      <FlatList
        // ...
        ListHeaderComponent={this.renderHeader}
      />
    );
  }
}
The final version of the filtering feature should look something like this:
Exercise 10.25: the user's reviews view
Implement a feature which allows user to see their reviews. Once signed in, the user should be able to access this view by pressing a "My reviews" tab in the app bar. Here is what the review list view should roughly look like:

Remember that you can fetch the authenticated user from the Apollo Server with the me query. This query returns a User type, which has a field reviews. If you have already implemented a reusable me query in your code, you can customize this query to fetch the reviews field conditionally. This can be done using GraphQL's include directive.
Let's say that the current query is implemented roughly in the following manner:
const GET_CURRENT_USER = gql`
  query {
    me {
      # user fields...
    }
  }
`;
You can provide the query with an includeReviews argument and use that with the include directive:
const GET_CURRENT_USER = gql`
  query getCurrentUser($includeReviews: Boolean = false) {
    me {
      # user fields...
      reviews @include(if: $includeReviews) {
        edges {
          node {
            # review fields...
          }
        }
      }
    }
  }
`;
The includeReviews argument has a default value of false, because we don't want to cause additional server overhead unless we explicitly want to fetch authenticated user's reviews. The principle of the include directive is quite simple: if the value of the if argument is true, include the field, otherwise omit it.
Exercise 10.26: review actions
Now that user can see their reviews, let's add some actions to the reviews. Under each review on the review list, there should be two buttons. One button is for viewing the review's repository. Pressing this button should take the user to the single repository view implemented in one of the earlier exercises. The other button is for deleting the review. Pressing this button should delete the review. Here is what the actions should roughly look like:
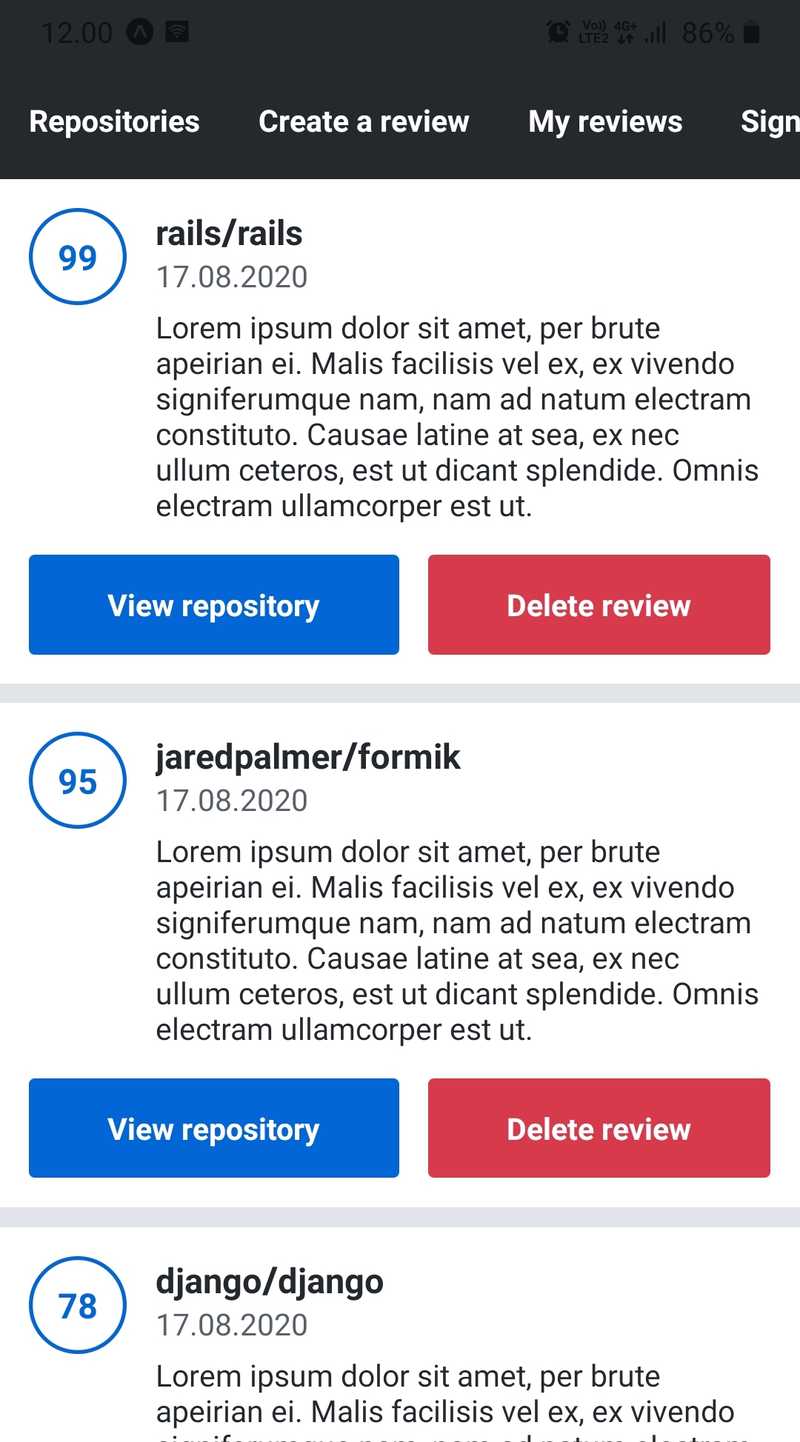
Pressing the delete button should be followed by a confirmation alert. If the user confirms the deletion, the review is deleted. Otherwise, the deletion is discarded. You can implement the confirmation using the Alert module. Note that calling the Alert.alert method won't open any window in Expo web preview. Use either Expo mobile app or an emulator to see the what the alert window looks like.
Here is the confirmation alert that should pop out once the user presses the delete button:
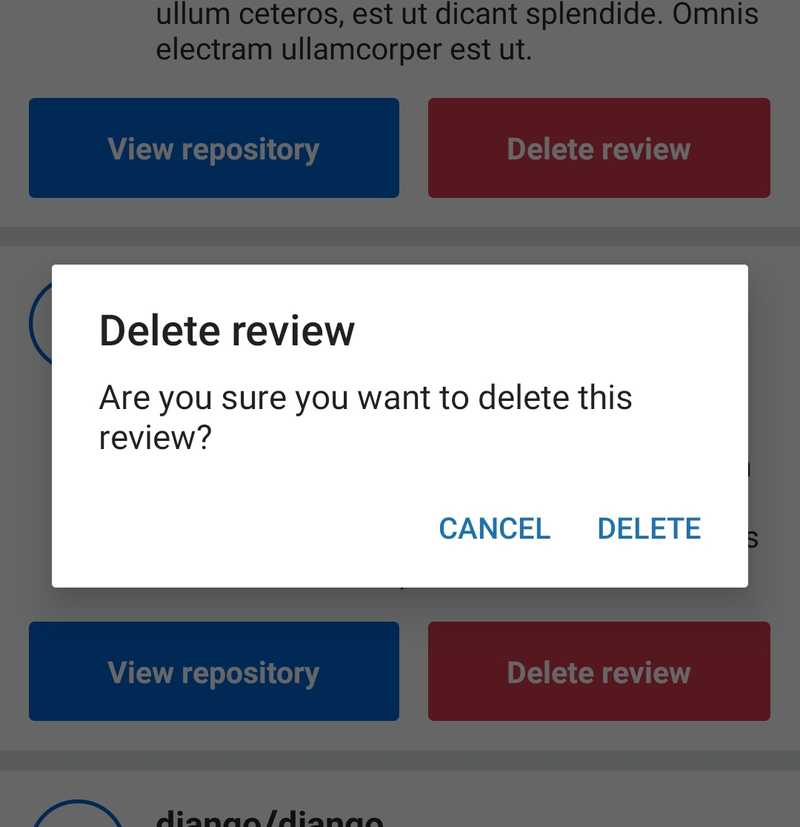
You can delete a review using the deleteReview mutation. This mutation has a single argument, which is the id of the review to be deleted. After the mutation has been performed, the easiest way to update the review list's query is to call the refetch function.
Cursor-based pagination
When an API returns an ordered list of items from some collection, it usually returns a subset of the whole set of items to reduce the required bandwidth and to decrease the memory usage of the client applications. The desired subset of items can be parameterized so that the client can request for example the first twenty items on the list after some index. This technique is commonly referred to as pagination. When items can be requested after a certain item defined by a cursor, we are talking about cursor-based pagination.
So cursor is just a serialized presentation of an item in an ordered list. Let's have a look at the paginated repositories returned by the repositories query using the following query:
{
  repositories(first: 2) {
    totalCount
    edges {
      node {
        id
        fullName
        createdAt
      }
      cursor
    }
    pageInfo {
      endCursor
      startCursor
      hasNextPage
    }
  }
}
The first argument tells the API to return only the first two repositories. Here's an example of a result of the query:
{
  "data": {
    "repositories": {
      "totalCount": 10,
      "edges": [
        {
          "node": {
            "id": "zeit.next.js",
            "fullName": "zeit/next.js",
            "createdAt": "2020-05-15T11:59:57.557Z"
          },
          "cursor": "WyJ6ZWl0Lm5leHQuanMiLDE1ODk1NDM5OTc1NTdd"
        },
        {
          "node": {
            "id": "zeit.swr",
            "fullName": "zeit/swr",
            "createdAt": "2020-05-15T11:58:53.867Z"
          },
          "cursor": "WyJ6ZWl0LnN3ciIsMTU4OTU0MzkzMzg2N10="
        }
      ],
      "pageInfo": {
        "endCursor": "WyJ6ZWl0LnN3ciIsMTU4OTU0MzkzMzg2N10=",
        "startCursor": "WyJ6ZWl0Lm5leHQuanMiLDE1ODk1NDM5OTc1NTdd",
        "hasNextPage": true
      }
    }
  }
}
The format of the result object and the arguments are based on the Relay's GraphQL Cursor Connections Specification, which has become a quite common pagination specification and has been widely adopted for example in the GitHub's GraphQL API. In the result object, we have the edges array containing items with node and cursor attributes. As we know, the node contains the repository itself. The cursor on the other hand is a Base64 encoded representation of the node. In this case, it contains the repository's id and date of repository's creation as a timestamp. This is the information we need to point to the item when they are ordered by the creation time of the repository. The pageInfo contains information such as the cursor of the first and the last item in the array.
Let's say that we want to get the next set of items after the last item of the current set, which is the "zeit/swr" repository. We can set the after argument of the query as the value of the endCursor like this:
{
  repositories(first: 2, after: "WyJ6ZWl0LnN3ciIsMTU4OTU0MzkzMzg2N10=") {
    totalCount
    edges {
      node {
        id
        fullName
        createdAt
      }
      cursor
    }
    pageInfo {
      endCursor
      startCursor
      hasNextPage
    }
  }
}
Now that we have the next two items and we can keep on doing this until the hasNextPage has the value false, meaning that we have reached the end of the list. To dig deeper into cursor-based pagination, read Shopify's article Pagination with Relative Cursors. It provides great details on the implementation itself and the benefits over the traditional index-based pagination.
Infinite scrolling
Vertically scrollable lists in mobile and desktop applications are commonly implemented using a technique called infinite scrolling. The principle of infinite scrolling is quite simple:
- Fetch the initial set of items
- When the user reaches the last item, fetch the next set of items after the last item
The second step is repeated until the user gets tired of scrolling or some scrolling limit is exceeded. The name "infinite scrolling" refers to the way the list seems to be infinite - the user can just keep on scrolling and new items keep on appearing on the list.
Let's have a look at how this works in practice using the Apollo Client's useQuery hook. Apollo Client has a great documentation on implementing the cursor-based pagination. Let's implement infinite scrolling for the reviewed repositories list as an example.
First, we need to know when the user has reached the end of the list. Luckily, the FlatList component has a prop onEndReached, which will call the provided function once the user has scrolled to the last item on the list. You can change how early the onEndReach callback is called using the onEndReachedThreshold prop. Alter the RepositoryList component's FlatList component so that it calls a function once the end of the list is reached:
export const RepositoryListContainer = ({
  repositories,
  onEndReach,
  /* ... */,
}) => {
  const repositoryNodes = repositories
    ? repositories.edges.map((edge) => edge.node)
    : [];

  return (
    <FlatList
      data={repositoryNodes}
      // ...
      onEndReached={onEndReach}
      onEndReachedThreshold={0.5}
    />
  );
};

const RepositoryList = () => {
  // ...

  const { repositories } = useRepositories(/* ... */);

  const onEndReach = () => {
    console.log('You have reached the end of the list');
  };

  return (
    <RepositoryListContainer
      repositories={repositories}
      onEndReach={onEndReach}
      // ...
    />
  );
};

export default RepositoryList;
Try scrolling to the end of the reviewed repositories list and you should see the message in the logs.
Next, we need to fetch more repositories once the end of the list is reached. This can be achieved using the fetchMore function provided by the useQuery hook. To describe to Apollo Client how to merge the existing repositories in the cache with the next set of repositories, we can use a field policy. In general, field policies can be used to customize the cache behavior during read and write operations with read and merge functions.
Let's add a field policy for the repositories query in the apolloClient.js file:
import { ApolloClient, InMemoryCache, createHttpLink } from '@apollo/client';
import { setContext } from '@apollo/client/link/context';
import Constants from 'expo-constants';
import { relayStylePagination } from '@apollo/client/utilities';
const { apolloUri } = Constants.manifest.extra;

const httpLink = createHttpLink({
  uri: apolloUri,
});

const cache = new InMemoryCache({  typePolicies: {    Query: {      fields: {        repositories: relayStylePagination(),      },    },  },});
const createApolloClient = (authStorage) => {
  const authLink = setContext(async (_, { headers }) => {
    try {
      const accessToken = await authStorage.getAccessToken();

      return {
        headers: {
          ...headers,
          authorization: accessToken ? `Bearer ${accessToken}` : '',
        },
      };
    } catch (e) {
      console.log(e);

      return {
        headers,
      };
    }
  });

  return new ApolloClient({
    link: authLink.concat(httpLink),
    cache,  });
};

export default createApolloClient;
As mentioned earlier, the format of the pagination's result object and the arguments are based on the Relay's pagination specification. Luckily, Apollo Client provides a predefined field policy, relayStylePagination, which can be used in this case.
Next, let's alter the useRepositories hook so that it returns a decorated fetchMore function, which calls the actual fetchMore function with appropriate arguments so that we can fetch the next set of repositories:
const useRepositories = (variables) => {
  const { data, loading, fetchMore, ...result } = useQuery(GET_REPOSITORIES, {
    variables,
    // ...
  });

  const handleFetchMore = () => {
    const canFetchMore = !loading && data?.repositories.pageInfo.hasNextPage;

    if (!canFetchMore) {
      return;
    }

    fetchMore({
      variables: {
        after: data.repositories.pageInfo.endCursor,
        ...variables,
      },
    });
  };

  return {
    repositories: data?.repositories,
    fetchMore: handleFetchMore,
    loading,
    ...result,
  };
};
Make sure you have the pageInfo and the cursor fields in your repositories query as described in the pagination examples. You will also need to include the after and first arguments for the query.
The handleFetchMore function will call the Apollo Client's fetchMore function if there are more items to fetch, which is determined by the hasNextPage property. We also want to prevent fetching more items if fetching is already in process. In this case, loading will be true. In the fetchMore function we are providing the query with an after variable, which receives the latest endCursor value.
The final step is to call the fetchMore function in the onEndReach handler:
const RepositoryList = () => {
  // ...

  const { repositories, fetchMore } = useRepositories({
    first: 8,
    // ...
  });

  const onEndReach = () => {
    fetchMore();
  };

  return (
    <RepositoryListContainer
      repositories={repositories}
      onEndReach={onEndReach}
      // ...
    />
  );
};

export default RepositoryList;
Use a relatively small first argument value such as 3 while trying out the infinite scrolling. This way you don't need to review too many repositories. You might face an issue that the onEndReach handler is called immediately after the view is loaded. This is most likely because the list contains so few repositories that the end of the list is reached immediately. You can get around this issue by increasing the value of first argument. Once you are confident that the infinite scrolling is working, feel free to use a larger value for the first argument.
Additional resources
As we are getting closer to the end of this part, let's take a moment to look at some additional React Native related resources. Awesome React Native is an extremely encompassing curated list of React Native resources such as libraries, tutorials, and articles. Because the list is exhaustively long, let's have a closer look at few of its highlights
React Native Paper
Paper is a collection of customizable and production-ready components for React Native, following Google’s Material Design guidelines.
React Native Paper is for React Native what Material-UI is for React web applications. It offers a wide range of high-quality UI components, support for custom themes and a fairly simple setup for Expo based React Native applications.
Styled-components
Utilising tagged template literals (a recent addition to JavaScript) and the power of CSS, styled-components allows you to write actual CSS code to style your components. It also removes the mapping between components and styles – using components as a low-level styling construct could not be easier!
Styled-components is a library for styling React components using CSS-in-JS technique. In React Native we are already used to defining component's styles as a JavaScript object, so CSS-in-JS is not so uncharted territory. However, the approach of styled-components is quite different from using the StyleSheet.create method and the style prop.
In styled-components components' styles are defined with the component using a feature called tagged template literal or a plain JavaScript object. Styled-components makes it possible to define new style properties for component based on its props at runtime. This brings many possibilities, such as seamlessly switching between a light and a dark theme. It also has a full theming support. Here is an example of creating a Text component with style variations based on props:
import styled from 'styled-components/native';
import { css } from 'styled-components';

const FancyText = styled.Text`
  color: grey;
  font-size: 14px;

  ${({ isBlue }) =>
    isBlue &&
    css`
      color: blue;
    `}

  ${({ isBig }) =>
    isBig &&
    css`
      font-size: 24px;
      font-weight: 700;
    `}
`;

const Main = () => {
  return (
    <>
      <FancyText>Simple text</FancyText>
      <FancyText isBlue>Blue text</FancyText>
      <FancyText isBig>Big text</FancyText>
      <FancyText isBig isBlue>
        Big blue text
      </FancyText>
    </>
  );
};
Because styled-components processes the style definitions, it is possible to use CSS-like snake case syntax with the property names and units in property values. However, units don't have any effect because property values are internally unitless. For more information on styled-components, head out to the documentation.
React-spring
react-spring is a spring-physics based animation library that should cover most of your UI related animation needs. It gives you tools flexible enough to confidently cast your ideas into moving interfaces.
React-spring is a library that provides a clean API for animating React Native components.
React Navigation
Routing and navigation for your React Native apps
React Navigation is a routing library for React Native. It shares some similarities with the React Router library we have been using during this and earlier parts. However, unlike React Router, React Navigation offers more native features such as native gestures and animations to transition between views.
Closing words
That's it, our application is ready. Good job! We have learned many new concepts during our journey such as setting up our React Native application using Expo, using React Native's core components and adding style to them, communicating with the server, and testing React Native applications. The final piece of the puzzle would be to deploy the application to the Apple App Store and Google Play Store.
Deploying the application is entirely optional and it isn't quite trivial, because you also need to fork and deploy the rate-repository-api. For the React Native application itself, you first need to create either iOS or Android builds by following Expo's documentation. Then you can upload these builds to either Apple App Store or Google Play Store. Expo has documentation for this as well.