c
Communicating with server
So far we have implemented features to our application without any actual server communication. For example, the reviewed repositories list we have implemented uses mock data and the sign in form doesn't send the user's credentials to any authentication endpoint. In this section, we will learn how to communicate with a server using HTTP requests, how to use Apollo Client in a React Native application, and how to store data in the user's device.
Soon we will learn how to communicate with a server in our application. Before we get to that, we need a server to communicate with. For this purpose, we have a completed server implementation in the rate-repository-api repository. The rate-repository-api server fulfills all our application's API needs during this part. It uses SQLite database which doesn't need any setup and provides an Apollo GraphQL API along with a few REST API endpoints.
Before heading further into the material, set up the rate-repository-api server by following the setup instructions in the repository's README. Note that if you are using an emulator for development it is recommended to run the server and the emulator on the same computer. This eases network requests considerably.
HTTP requests
React Native provides Fetch API for making HTTP requests in our applications. React Native also supports the good old XMLHttpRequest API which makes it possible to use third-party libraries such as Axios. These APIs are the same as the ones in the browser environment and they are globally available without the need for an import.
People who have used both Fetch API and XMLHttpRequest API most likely agree that the Fetch API is easier to use and more modern. However, this doesn't mean that XMLHttpRequest API doesn't have its uses. For the sake of simplicity, we will be only using the Fetch API in our examples.
Sending HTTP requests using the Fetch API can be done using the fetch function. The first argument of the function is the URL of the resource:
fetch('https://my-api.com/get-end-point');The default request method is GET. The second argument of the fetch function is an options object, which you can use to for example to specify a different request method, request headers, or request body:
fetch('https://my-api.com/post-end-point', {
  method: 'POST',
  headers: {
    Accept: 'application/json',
    'Content-Type': 'application/json',
  },
  body: JSON.stringify({
    firstParam: 'firstValue',
    secondParam: 'secondValue',
  }),
});
Note that these URLs are made up and won't (most likely) send a response to your requests. In comparison to Axios, the Fetch API operates on a bit lower level. For example, there isn't any request or response body serialization and parsing. This means that you have to for example set the Content-Type header by yourself and use JSON.stringify method to serialize the request body.
The fetch function returns a promise which resolves a Response object. Note that error status codes such as 400 and 500 are not rejected like for example in Axios. In case of a JSON formatted response we can parse the response body using the Response.json method:
const fetchMovies = async () => {
  const response = await fetch('https://reactnative.dev/movies.json');
  const json = await response.json();

  return json;
};
For a more detailed introduction to the Fetch API, read the Using Fetch article in the MDN web docs.
Next, let's try the Fetch API in practice. The rate-repository-api server provides an endpoint for returning a paginated list of reviewed repositories. Once the server is running, you should be able to access the endpoint at http://localhost:5000/api/repositories (unless you have changed the port). The data is paginated in a common cursor based pagination format. The actual repository data is behind the node key in the edges array.
Unfortunately, if we´re using external device, we can't access the server directly in our application by using the http://localhost:5000/api/repositories URL. To make a request to this endpoint in our application we need to access the server using its IP address in its local network. To find out what it is, open the Expo development tools by running npm start. In the console you should be able to see an URL starting with exp:// below the QR code, after the "Metro waiting on" text:
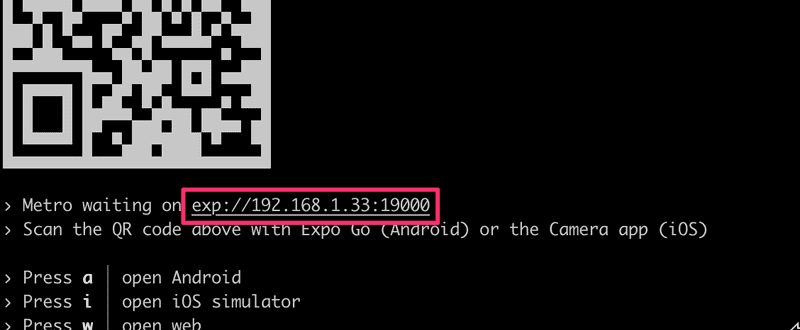
Copy the IP address between the exp:// and :, which is in this example 192.168.1.33. Construct an URL in format http://<IP_ADDRESS>:5000/api/repositories and open it in the browser. You should see the same response as you did with the localhost URL.
Now that we know the end point's URL let's use the actual server-provided data in our reviewed repositories list. We are currently using mock data stored in the repositories variable. Remove the repositories variable and replace the usage of the mock data with this piece of code in the RepositoryList.jsx file in the components directory:
import { useState, useEffect } from 'react';
// ...

const RepositoryList = () => {
  const [repositories, setRepositories] = useState();

  const fetchRepositories = async () => {
    // Replace the IP address part with your own IP address!
    const response = await fetch('http://192.168.1.33:5000/api/repositories');
    const json = await response.json();

    console.log(json);

    setRepositories(json);
  };

  useEffect(() => {
    fetchRepositories();
  }, []);

  // Get the nodes from the edges array
  const repositoryNodes = repositories
    ? repositories.edges.map(edge => edge.node)
    : [];

  return (
    <FlatList
      data={repositoryNodes}
      // Other props
    />
  );
};

export default RepositoryList;
We are using the React's useState hook to maintain the repository list state and the useEffect hook to call the fetchRepositories function when the RepositoryList component is mounted. We extract the actual repositories into the repositoryNodes variable and replace the previously used repositories variable in the FlatList component's data prop with it. Now you should be able to see actual server-provided data in the reviewed repositories list.
It is usually a good idea to log the server's response to be able to inspect it as we did in the fetchRepositories function. You should be able to see this log message in the Expo development tools if you navigate to your device's logs as we learned in the Debugging section. If you are using the Expo's mobile app for development and the network request is failing, make sure that the computer you are using to run the server and your phone are connected to the same Wi-Fi network. If that's not possible either use an emulator in the same computer as the server is running in or set up a tunnel to the localhost, for example, using Ngrok.
The current data fetching code in the RepositoryList component could do with some refactoring. For instance, the component is aware of the network request's details such as the end point's URL. In addition, the data fetching code has lots of reuse potential. Let's refactor the component's code by extract the data fetching code into its own hook. Create a directory hooks in the src directory and in that hooks directory create a file useRepositories.js with the following content:
import { useState, useEffect } from 'react';

const useRepositories = () => {
  const [repositories, setRepositories] = useState();
  const [loading, setLoading] = useState(false);

  const fetchRepositories = async () => {
    setLoading(true);

    // Replace the IP address part with your own IP address!
    const response = await fetch('http://192.168.1.33:5000/api/repositories');
    const json = await response.json();

    setLoading(false);
    setRepositories(json);
  };

  useEffect(() => {
    fetchRepositories();
  }, []);

  return { repositories, loading, refetch: fetchRepositories };
};

export default useRepositories;
Now that we have a clean abstraction for fetching the reviewed repositories, let's use the useRepositories hook in the RepositoryList component:
// ...
import useRepositories from '../hooks/useRepositories';
const RepositoryList = () => {
  const { repositories } = useRepositories();
  const repositoryNodes = repositories
    ? repositories.edges.map(edge => edge.node)
    : [];

  return (
    <FlatList
      data={repositoryNodes}
      // Other props
    />
  );
};

export default RepositoryList;
That's it, now the RepositoryList component is no longer aware of the way the repositories are acquired. Maybe in the future, we will acquire them through a GraphQL API instead of a REST API. We will see what happens.
GraphQL and Apollo client
In part 8 we learned about GraphQL and how to send GraphQL queries to an Apollo Server using the Apollo Client in React applications. The good news is that we can use the Apollo Client in a React Native application exactly as we would with a React web application.
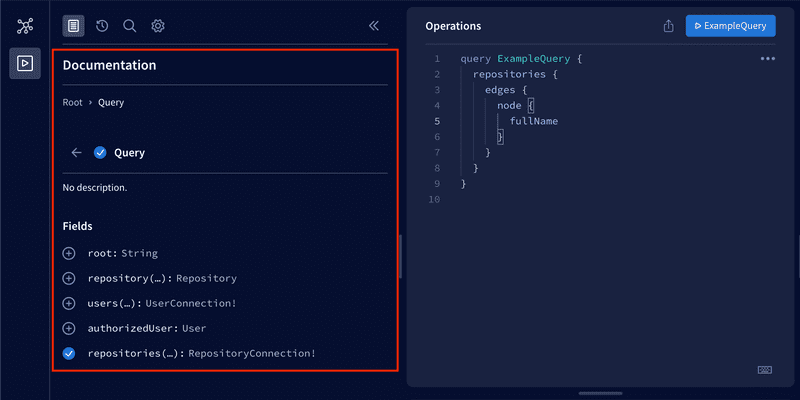
As mentioned earlier, the rate-repository-api server provides a GraphQL API which is implemented with Apollo Server. Once the server is running, you can access the Apollo Sandbox at http://localhost:4000. Apollo Sandbox is a tool for making GraphQL queries and inspecting the GraphQL APIs schema and documentation. If you need to send a query in your application always test it with the Apollo Sandbox first before implementing it in the code. It is much easier to debug possible problems in the query in the Apollo Sandbox than in the application. If you are uncertain what the available queries are or how to use them, you can see the documentation next to the operations editor:
In our React Native application, we will be using the same @apollo/client library as in part 8. Let's get started by installing the library along with the graphql library which is required as a peer dependency:
npm install @apollo/client graphqlBefore we can start using Apollo Client, we will need to slightly configure the Metro bundler so that it handles the .cjs file extensions used by the Apollo Client. First, let's install the @expo/metro-config package which has the default Metro configuration:
npm install @expo/metro-config@0.17.4Then, we can add the following configuration to a metro.config.js in the root directory of our project:
const { getDefaultConfig } = require('@expo/metro-config');

const defaultConfig = getDefaultConfig(__dirname);

defaultConfig.resolver.sourceExts.push('cjs');

module.exports = defaultConfig;
Restart the Expo development tools so that changes in the configuration are applied.
Now that the Metro configuration is in order, let's create a utility function for creating the Apollo Client with the required configuration. Create a utils directory in the src directory and in that utils directory create a file apolloClient.js. In that file configure the Apollo Client to connect to the Apollo Server:
import { ApolloClient, InMemoryCache } from '@apollo/client';


const createApolloClient = () => {
  return new ApolloClient({
    uri: 'http://192.168.1.100:4000/graphql',
    cache: new InMemoryCache(),
  });
};

export default createApolloClient;
The URL used to connect to the Apollo Server is otherwise the same as the one you used with the Fetch API except the port is 4000 and the path is /graphql. Lastly, we need to provide the Apollo Client using the ApolloProvider context. We will add it to the App component in the App.js file:
import { NativeRouter } from 'react-router-native';
import { ApolloProvider } from '@apollo/client/react';
import Main from './src/components/Main';
import createApolloClient from './src/utils/apolloClient';
const apolloClient = createApolloClient();
const App = () => {
  return (
    <NativeRouter>
      <ApolloProvider client={apolloClient}>        <Main />
      </ApolloProvider>    </NativeRouter>
  );
};

export default App;
Organizing GraphQL related code
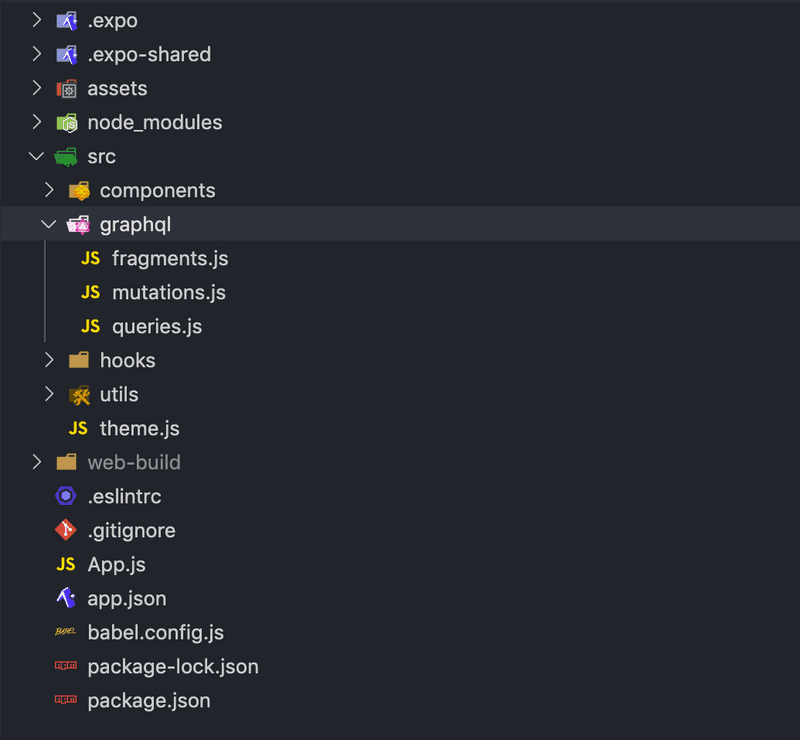
It is up to you how to organize the GraphQL related code in your application. However, for the sake of a reference structure, let's have a look at one quite simple and efficient way to organize the GraphQL related code. In this structure, we define queries, mutations, fragments, and possibly other entities in their own files. These files are located in the same directory. Here is an example of the structure you can use to get started:
You can import the gql template literal tag used to define GraphQL queries from @apollo/client library. If we follow the structure suggested above, we could have a queries.js file in the graphql directory for our application's GraphQL queries. Each of the queries can be stored in a variable and exported like this:
import { gql } from '@apollo/client';

export const GET_REPOSITORIES = gql`
  query {
    repositories {
      ${/* ... */}
    }
  }
`;

// other queries...
We can import these variables and use them with the useQuery hook like this:
import { useQuery } from '@apollo/client/react';

import { GET_REPOSITORIES } from '../graphql/queries';

const Component = () => {
  const { data, error, loading } = useQuery(GET_REPOSITORIES);
  // ...
};
The same goes for organizing mutations. The only difference is that we define them in a different file, mutations.js. It is recommended to use fragments in queries to avoid retyping the same fields over and over again.
Evolving the structure
Once our application grows larger there might be times when certain files grow too large to manage. For example, we have component A which renders the components B and C. All these components are defined in a file A.jsx in a components directory. We would like to extract components B and C into their own files B.jsx and C.jsx without major refactors. We have two options:
- Create files B.jsx and C.jsx in the components directory. This results in the following structure:
components/
  A.jsx
  B.jsx
  C.jsx
...- Create a directory A in the components directory and create files B.jsx and C.jsx there. To avoid breaking components that import the A.jsx file, move the A.jsx file to the A directory and rename it to index.jsx. This results in the following structure:
components/
  A/
    B.jsx
    C.jsx
    index.jsx
  ...
The first option is fairly decent, however, if components B and C are not reusable outside the component A, it is useless to bloat the components directory by adding them as separate files. The second option is quite modular and doesn't break any imports because importing a path such as ./A will match both A.jsx and A/index.jsx.
Environment variables
Every application will most likely run in more than one environment. Two obvious candidates for these environments are the development environment and the production environment. Out of these two, the development environment is the one we are running the application right now. Different environments usually have different dependencies, for example, the server we are developing locally might use a local database whereas the server that is deployed to the production environment uses the production database. To make the code environment independent we need to parameterize these dependencies. At the moment we are using one very environment dependant hardcoded value in our application: the URL of the server.
We have previously learned that we can provide running programs with environment variables. These variables can be defined in the command line or using environment configuration files such as .env files and third-party libraries such as Dotenv. Unfortunately, React Native doesn't have direct support for environment variables. However, we can access the Expo configuration defined in the app.json file at runtime from our JavaScript code. This configuration can be used to define and access environment dependant variables.
The configuration can be accessed by importing the Constants constant from the expo-constants module as we have done a few times before. Once imported, the Constants.expoConfig property will contain the configuration. Let's try this by logging Constants.expoConfig in the App component:
import { NativeRouter } from 'react-router-native';
import { ApolloProvider } from '@apollo/client/react';
import Constants from 'expo-constants';
import Main from './src/components/Main';
import createApolloClient from './src/utils/apolloClient';

const apolloClient = createApolloClient();

const App = () => {
  console.log(Constants.expoConfig);
  return (
    <NativeRouter>
      <ApolloProvider client={apolloClient}>
        <Main />
      </ApolloProvider>
    </NativeRouter>
  );
};

export default App;
You should now see the configuration in the logs.
The next step is to use the configuration to define environment dependant variables in our application. Let's get started by renaming the app.json file to app.config.js. Once the file is renamed, we can use JavaScript inside the configuration file. Change the file contents so that the previous object:
{
  "expo": {
    "name": "rate-repository-app",
    // rest of the configuration...
  }
}
Is turned into an export, which contains the contents of the expo property:
export default {
   name: 'rate-repository-app',
   // rest of the configuration...
};
Expo has reserved an extra property in the configuration for any application-specific configuration. To see how this works, let's add an env variable into our application's configuration. Note, that the older versions used (now deprecated) manifest instead of expoConfig.
export default {
   name: 'rate-repository-app',
   // rest of the configuration...
   extra: {     env: 'development'   },};
If you make changes in configuration, the restart may not be enough. You may need to start the application with cache cleared by command:
npx expo start --clearNow, restart Expo development tools to apply the changes and you should see that the value of Constants.expoConfig property has changed and now includes the extra property containing our application-specific configuration. Now the value of the env variable is accessible through the Constants.expoConfig.extra.env property.
Because using hard coded configuration is a bit silly, let's use an environment variable instead:
export default {
   name: 'rate-repository-app',
   // rest of the configuration...
   extra: {     env: process.env.ENV,   },};
As we have learned, we can set the value of an environment variable through the command line by defining the variable's name and value before the actual command. As an example, start Expo development tools and set the environment variable ENV as test like this:
ENV=test npm startIf you take a look at the logs, you should see that the Constants.expoConfig.extra.env property has changed.
We can also load environment variables from an .env file as we have learned in the previous parts. First, we need to install the Dotenv library:
npm install dotenvNext, add a .env file in the root directory of our project with the following content:
ENV=developmentFinally, import the library in the app.config.js file:
import 'dotenv/config';
export default {
   name: 'rate-repository-app',
   // rest of the configuration...
   extra: {
     env: process.env.ENV,
   },
};
You need to restart Expo development tools to apply the changes you have made to the .env file.
Note that it is never a good idea to put sensitive data into the application's configuration. The reason for this is that once a user has downloaded your application, they can, at least in theory, reverse engineer your application and figure out the sensitive data you have stored into the code.
Storing data in the user's device
There are times when we need to store some persisted pieces of data in the user's device. One such common scenario is storing the user's authentication token so that we can retrieve it even if the user closes and reopens our application. In web development, we have used the browser's localStorage object to achieve such functionality. React Native provides similar persistent storage, the AsyncStorage.
We can use the npx expo install command to install the version of the @react-native-async-storage/async-storage package that is suitable for our Expo SDK version:
npx expo install @react-native-async-storage/async-storageThe API of the AsyncStorage is in many ways same as the localStorage API. They are both key-value storages with similar methods. The biggest difference between the two is that, as the name implies, the operations of AsyncStorage are asynchronous.
Because AsyncStorage operates with string keys in a global namespace it is a good idea to create a simple abstraction for its operations. This abstraction can be implemented for example using a class. As an example, we could implement a shopping cart storage for storing the products user wants to buy:
import AsyncStorage from '@react-native-async-storage/async-storage';

class ShoppingCartStorage {
  constructor(namespace = 'shoppingCart') {
    this.namespace = namespace;
  }

  async getProducts() {
    const rawProducts = await AsyncStorage.getItem(
      `${this.namespace}:products`,
    );

    return rawProducts ? JSON.parse(rawProducts) : [];
  }

  async addProduct(productId) {
    const currentProducts = await this.getProducts();
    const newProducts = [...currentProducts, productId];

    await AsyncStorage.setItem(
      `${this.namespace}:products`,
      JSON.stringify(newProducts),
    );
  }

  async clearProducts() {
    await AsyncStorage.removeItem(`${this.namespace}:products`);
  }
}

const doShopping = async () => {
  const shoppingCartA = new ShoppingCartStorage('shoppingCartA');
  const shoppingCartB = new ShoppingCartStorage('shoppingCartB');

  await shoppingCartA.addProduct('chips');
  await shoppingCartA.addProduct('soda');

  await shoppingCartB.addProduct('milk');

  const productsA = await shoppingCartA.getProducts();
  const productsB = await shoppingCartB.getProducts();

  console.log(productsA, productsB);

  await shoppingCartA.clearProducts();
  await shoppingCartB.clearProducts();
};

doShopping();
Because AsyncStorage keys are global, it is usually a good idea to add a namespace for the keys. In this context, the namespace is just a prefix we provide for the storage abstraction's keys. Using the namespace prevents the storage's keys from colliding with other AsyncStorage keys. In this example, the namespace is defined as the constructor's argument and we are using the namespace:key format for the keys.
We can add an item to the storage using the AsyncStorage.setItem method. The first argument of the method is the item's key and the second argument its value. The value must be a string, so we need to serialize non-string values as we did with the JSON.stringify method. The AsyncStorage.getItem method can be used to get an item from the storage. The argument of the method is the item's key, of which value will be resolved. The AsyncStorage.removeItem method can be used to remove the item with the provided key from the storage.
NB: SecureStore is similar persisted storage as the AsyncStorage but it encrypts the stored data. This makes it more suitable for storing more sensitive data such as the user's credit card number.
Enhancing Apollo Client's requests
Now that we have implemented storage for storing the user's access token, it is time to start using it. Initialize the storage in the App component:
import { NativeRouter } from 'react-router-native';
import { ApolloProvider } from '@apollo/client/react';

import Main from './src/components/Main';
import createApolloClient from './src/utils/apolloClient';
import AuthStorage from './src/utils/authStorage';
const authStorage = new AuthStorage();const apolloClient = createApolloClient(authStorage);
const App = () => {
  return (
    <NativeRouter>
      <ApolloProvider client={apolloClient}>
        <Main />
      </ApolloProvider>
    </NativeRouter>
  );
};

export default App;
We also provided the storage instance for the createApolloClient function as an argument. This is because next, we will send the access token to Apollo Server in each request. The Apollo Server will expect that the access token is present in the Authorization header in the format Bearer <ACCESS_TOKEN>. We can enhance the Apollo Client's request by using the setContext function. Let's send the access token to the Apollo Server by modifying the createApolloClient function in the apolloClient.js file:
import { ApolloClient, InMemoryCache, createHttpLink } from '@apollo/client';
import Constants from 'expo-constants';
import { setContext } from '@apollo/client/link/context';
// You might need to change this depending on how you have configured the Apollo Server's URI
const { apolloUri } = Constants.expoConfig.extra;

const httpLink = createHttpLink({
  uri: apolloUri,
});

const createApolloClient = (authStorage) => {  const authLink = setContext(async (_, { headers }) => {    try {      const accessToken = await authStorage.getAccessToken();      return {        headers: {          ...headers,          authorization: accessToken ? `Bearer ${accessToken}` : '',        },      };    } catch (e) {      console.log(e);      return {        headers,      };    }  });  return new ApolloClient({    link: authLink.concat(httpLink),    cache: new InMemoryCache(),  });};
export default createApolloClient;
Using React Context for dependency injection
The last piece of the sign-in puzzle is to integrate the storage to the useSignIn hook. To achieve this the hook must be able to access token storage instance we have initialized in the App component. React Context is just the tool we need for the job. Create a directory contexts in the src directory. In that directory create a file AuthStorageContext.js with the following content:
import { createContext } from 'react';

const AuthStorageContext = createContext();

export default AuthStorageContext;
Now we can use the AuthStorageContext.Provider to provide the storage instance to the descendants of the context. Let's add it to the App component:
import { NativeRouter } from 'react-router-native';
import { ApolloProvider } from '@apollo/client/react';

import Main from './src/components/Main';
import createApolloClient from './src/utils/apolloClient';
import AuthStorage from './src/utils/authStorage';
import AuthStorageContext from './src/contexts/AuthStorageContext';
const authStorage = new AuthStorage();
const apolloClient = createApolloClient(authStorage);

const App = () => {
  return (
    <NativeRouter>
      <ApolloProvider client={apolloClient}>
        <AuthStorageContext.Provider value={authStorage}>          <Main />
        </AuthStorageContext.Provider>      </ApolloProvider>
    </NativeRouter>
  );
};

export default App;
Accessing the storage instance in the useSignIn hook is now possible using the React's useContext hook like this:
// ...
import { useContext } from 'react';
import AuthStorageContext from '../contexts/AuthStorageContext';
const useSignIn = () => {
  const authStorage = useContext(AuthStorageContext);  // ...
};
Note that accessing a context's value using the useContext hook only works if the useContext hook is used in a component that is a descendant of the Context.Provider component.
Accessing the AuthStorage instance with useContext(AuthStorageContext) is quite verbose and reveals the details of the implementation. Let's improve this by implementing a useAuthStorage hook in a useAuthStorage.js file in the hooks directory:
import { useContext } from 'react';
import AuthStorageContext from '../contexts/AuthStorageContext';

const useAuthStorage = () => {
  return useContext(AuthStorageContext);
};

export default useAuthStorage;
The hook's implementation is quite simple but it improves the readability and maintainability of the hooks and components using it. We can use the hook to refactor the useSignIn hook like this:
// ...
import useAuthStorage from '../hooks/useAuthStorage';
const useSignIn = () => {
  const authStorage = useAuthStorage();  // ...
};
The ability to provide data to component's descendants opens tons of use cases for React Context, as we already saw in the last chapter of part 6.
To learn more about these use cases, read Kent C. Dodds' enlightening article How to use React Context effectively to find out how to combine the useReducer hook with the context to implement state management. You might find a way to use this knowledge in the upcoming exercises.