a
Introduction to Containers
Software development includes the whole lifecycle from envisioning the software to programming and to releasing it to the end-users, and even maintaining it. This part will introduce containers, a modern tool utilized in the latter parts of the software lifecycle.
Containers encapsulate your application into a single package. This package will include the application and all of its dependencies. As a result, each container can run isolated from the other containers.
Containers prevent the application inside from accessing files and resources of the device. Developers can give the contained applications permission to access files and specify available resources. More accurately, containers are OS-level virtualization. The easiest-to-compare technology is a virtual machine (VM). VMs are used to run multiple operating systems on a single physical machine. They have to run the whole operating system, whereas a container runs the software using the host operating system. The resulting difference between VMs and containers is that there is hardly any overhead when running containers; they only need to run a single process.
As containers are relatively lightweight, at least compared to virtual machines, they can be quick to scale. And as they isolate the software running inside, it enables the software to run identically almost anywhere. As such, they are the go-to option in any cloud environment or application with more than a handful of users.
Cloud services like AWS, Google Cloud, and Microsoft Azure all support containers in multiple different forms. These include AWS Fargate and Google Cloud Run, both of which run containers as serverless - where the application container does not even need to be running if it is not used. You can also install container runtime on most machines and run containers there yourself - including your own machine.
So containers are used in cloud environment and even during development. What are the benefits of using containers? Here are two common scenarios:
Scenario 1: You are developing a new application that needs to run on the same machine as a legacy application. Both require installing different versions of Node.
You can probably use nvm, virtual machines, or dark magic to get them running at the same time. However, containers are an excellent solution as you can run both applications in their respective containers. They are isolated from each other and do not interfere.
Scenario 2: Your application runs on your machine. You need to move the application to a server.
It is not uncommon that the application just does not run on the server despite it works just fine on your machine. It may be due to some missing dependency or other differences in the environments. Here containers are an excellent solution since you can run the application in the same execution environment both on your machine and on the server. It is not perfect: different hardware can be an issue, but you can limit the differences between environments.
Sometimes you may hear about the "Works in my container" issue. The phrase describes a situation in which the application works fine in a container running on your machine but breaks when the container is started on a server. The phrase is a play on the infamous "Works on my machine" issue, which containers are often promised to solve. The situation also is most likely a usage error.
About this part
In this part, the focus of our attention will not be on the JavaScript code. Instead, we are interested in the configuration of the environment in which the software is executed. As a result, the exercises may not contain any coding, the applications are available to you through GitHub and your tasks will include configuring them. The exercises are to be submitted to a single GitHub repository which will include all of the source code and the configurations that you do during this part.
You will need basic knowledge of Node, Express, and React. Only the core parts, 1 through 5, are required to be completed before this part.
Submitting exercises and earning credits
Submit the exercises via the submissions system just like in the previous parts. Exercises in this part are submitted to its own course instance.
Completing this part on containers will get you 1 credit. Note that you need to do all the exercises for earning the credit or the certificate.
Once you have completed the exercises and want to get the credits, let us know through the exercise submission system that you have completed the course:
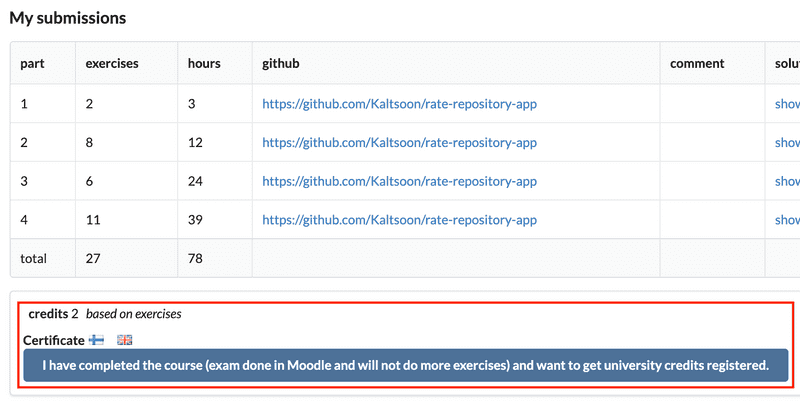
You can download the certificate for completing this part by clicking one of the flag icons. The flag icon corresponds to the language of the certificate.
Tools of the trade
The basic tools you are going to need vary between operating systems:
- WSL 2 terminal on Windows
- Terminal on Mac
- Command Line on a Linux
Installing everything required for this part
We will begin by installing the required software. The installation step will be one of the possible obstacles. As we are dealing with OS-level virtualization, the tools will require superuser access on the computer. They will have access to your operating systems kernel.
The material is built around Docker, a set of products that we will use for containerization and the management of containers. Unfortunately, if you can not install Docker you probably can not complete this part.
As the install instructions depend on your operating system, you will have to find the correct install instructions from the link below. Note that they may have multiple different options for your operating system.
Now that that headache is hopefully over, let's make sure that our versions match. Yours may have a bit higher numbers than here:
$ docker -v
Docker version 25.0.3, build 4debf41
Containers and images
There are two core concepts in this part: container and image. They are easy to confuse with one another.
A container is a runtime instance of an image.
Both of the following statements are true:
- Images include all of the code, dependencies and instructions on how to run the application
- Containers package software into standardized units
It is no wonder they are easily mixed up.
To help with the confusion, almost everyone uses the word container to describe both. But you can never actually build a container or download one since containers only exist during runtime. Images, on the other hand, are immutable files. As a result of the immutability, you can not edit an image after you have created one. However, you can use existing images to create a new image by adding new layers on top of the existing ones.
Cooking metaphor:
- Image is pre-cooked, frozen treat.
- Container is the delicious treat.
Docker is the most popular containerization technology and pioneered the standards most containerization technologies use today. In practice, Docker is a set of products that help us to manage images and containers. This set of products will enable us to leverage all of the benefits of containers. For example, the Docker engine will take care of turning the immutable files called images into containers.
For managing the Docker containers, there is also a tool called Docker Compose that allows one to orchestrate (control) multiple containers at the same time. In this part we shall use Docker Compose to set up a complex local development environment. In the final version of the development environment that we will set up, even installing Node in our machine will not be required anymore.
There are several concepts we need to go over. But we will skip those for now and learn about Docker first!
Let us start with the command docker container run that is used to run images within a container. The command structure is the following: container run IMAGE-NAME that we will tell Docker to create a container from an image. A particularly nice feature of the command is that it can run a container even if the image to run is not downloaded on our device yet.
Let us run the command
$ docker container run hello-worldThere will be a lot of output, but let's split it into multiple sections, which we can decipher together. The lines are numbered by me so that it is easier to follow the explanation. Your output will not have the numbers.
1. Unable to find image 'hello-world:latest' locally
2. latest: Pulling from library/hello-world
3. b8dfde127a29: Pull complete
4. Digest: sha256:5122f6204b6a3596e048758cabba3c46b1c937a46b5be6225b835d091b90e46c
5. Status: Downloaded newer image for hello-world:latest
Because the image hello-world was not found on our machine, the command first downloaded it from a free registry called Docker Hub. You can see the Docker Hub page of the image with your browser here: https://hub.docker.com/_/hello-world
The first part of the message states that we did not have the image "hello-world:latest" yet. This reveals a bit of detail about images themselves; image names consist of multiple parts, kind of like an URL. An image name is in the following format:
- registry/organisation/image:tag
In this case the 3 missing fields defaulted to:
- index.docker.io/library/hello-world:latest
The second row shows the organisation name, "library" where it will get the image. In the Docker Hub URL, the "library" is shortened to _.
The 3rd and 5th rows only show the status. But the 4th row may be interesting: each image has a unique digest based on the layers from which the image is built. In practice, each step or command that was used in building the image creates a unique layer. The digest is used by Docker to identify that an image is the same. This is done when you try to pull the same image again.
So the result of using the command was a pull and then output information about the image. After that, the status told us that a new version of hello-world:latest was indeed downloaded. You can try pulling the image with docker image pull hello-world and see what happens.
The following output was from the container itself. It also explains what happened when we ran docker container run hello-world.
Hello from Docker!
This message shows that your installation appears to be working correctly.

To generate this message, Docker took the following steps:
 1. The Docker client contacted the Docker daemon.
 2. The Docker daemon pulled the "hello-world" image from the Docker Hub.
    (amd64)
 3. The Docker daemon created a new container from that image which runs the
    executable that produces the output you are currently reading.
 4. The Docker daemon streamed that output to the Docker client, which sent it
    to your terminal.

To try something more ambitious, you can run an Ubuntu container with:
 $ docker container run -it ubuntu bash

Share images, automate workflows, and more with a free Docker ID:
 https://hub.docker.com/

For more examples and ideas, visit:
 https://docs.docker.com/get-started/
The output contains a few new things for us to learn. Docker daemon is a background service that makes sure the containers are running, and we use the Docker client to interact with the daemon. We now have interacted with the first image and created a container from the image. During the execution of that container, we received the output.
Ubuntu image
The command you just used to run the Ubuntu container, docker container run -it ubuntu bash, contains a few additions to the previously run hello-world. Let's see the --help to get a better understanding. I'll cut some of the output so we can focus on the relevant parts.
$ docker container run --help

Usage:  docker container run [OPTIONS] IMAGE [COMMAND] [ARG...]
Run a command in a new container

Options:
  ...
  -i, --interactive                    Keep STDIN open even if not attached
  -t, --tty                            Allocate a pseudo-TTY
  ...
The two options, or flags, -it make sure we can interact with the container. After the options, we defined that the image to run is ubuntu. Then we have the command bash to be executed inside the container when we start it.
You can try other commands that the Ubuntu image might be able to execute. As an example try docker container run --rm ubuntu ls. The ls command will list all of the files in the directory and --rm flag will remove the container after execution. Normally containers are not deleted automatically.
Let's continue with our first Ubuntu container with the index.js file inside of it. The container has stopped running since we exited it. We can list all of the containers with container ls -a, the -a (or --all) will list containers that have already been exited.
$ docker container ls -a
CONTAINER ID   IMAGE     COMMAND   CREATED          STATUS                            NAMES
b8548b9faec3   ubuntu    "bash"    3 minutes ago    Exited (0) 6 seconds ago          hopeful_clarke
Editor's note: the command docker container ls has also a shorter form docker ps, I prefer the shorter one.
We have two options when addressing a container. The identifier in the first column can be used to interact with the container almost always. Plus, most commands accept the container name as a more human-friendly method of working with them. The name of the container was automatically generated to be "hopeful_clarke" in my case.
The container has already exited, yet we can start it again with the start command that will accept the id or name of the container as a parameter: start CONTAINER-ID-OR-CONTAINER-NAME.
$ docker start hopeful_clarke
hopeful_clarke
The start command will start the same container we had previously. Unfortunately, we forgot to start it with the flag --interactive (that can also be written -i) so we can not interact with it.
The container is actually up and running as the command container ls -a shows, but we just can not communicate with it:
$ docker container ls -a
CONTAINER ID   IMAGE     COMMAND   CREATED          STATUS                            NAMES
b8548b9faec3   ubuntu    "bash"    7 minutes ago    Up (0) 15 seconds ago            hopeful_clarke
Note that we can also execute the command without the flag -a to see just those containers that are running:
$ docker container ls
CONTAINER ID   IMAGE     COMMAND   CREATED          STATUS             NAMES
8f5abc55242a   ubuntu    "bash"    8 minutes ago    Up 1 minutes       hopeful_clarke
Let's kill it with the kill CONTAINER-ID-OR-CONTAINER-NAME command and try again.
$ docker kill hopeful_clarke
hopeful_clarke
docker kill sends a signal SIGKILL to the process forcing it to exit, and that causes the container to stop. We can check it's status with container ls -a:
$ docker container ls -a
CONTAINER ID   IMAGE     COMMAND   CREATED             STATUS                     NAMES
b8548b9faec3   ubuntu     "bash"   26 minutes ago      Exited 2 seconds ago       hopeful_clarke
Now let us start the container again, but this time in interactive mode:
$ docker start -i hopeful_clarke
root@b8548b9faec3:/#
Let's edit the file index.js and add in some JavaScript code to execute. We are just missing the tools to edit the file. Nano will be a good text editor for now. The install instructions were found from the first result of Google. We will omit using sudo since we are already root.
root@b8548b9faec3:/# apt-get update
root@b8548b9faec3:/# apt-get -y install nano
root@b8548b9faec3:/# nano /usr/src/app/index.js
Now we have Nano installed and can start editing files!
Other Docker commands
Now that we have Node installed in the container, we can execute JavaScript in the container! Let's create a new image from the container. The command
commit CONTAINER-ID-OR-CONTAINER-NAME NEW-IMAGE-NAMEwill create a new image that includes the changes we have made. You can use container diff to check for the changes between the original image and container before doing so.
$ docker commit hopeful_clarke hello-node-worldYou can list your images with image ls:
$ docker image ls
REPOSITORY                                      TAG         IMAGE ID       CREATED         SIZE
hello-node-world                                latest      eef776183732   9 minutes ago   252MB
ubuntu                                          latest      1318b700e415   2 weeks ago     72.8MB
hello-world                                     latest      d1165f221234   5 months ago    13.3kB
You can now run the new image as follows:
docker run -it hello-node-world bash
root@4d1b322e1aff:/# node /usr/src/app/index.js
There are multiple ways to do the same. Let's try a better solution. We will clean the slate with container rm to remove the old container.
$ docker container ls -a
CONTAINER ID   IMAGE     COMMAND   CREATED          STATUS                  NAMES
b8548b9faec3   ubuntu    "bash"    31 minutes ago   Exited (0) 9 seconds ago               hopeful_clarke

$ docker container rm hopeful_clarke
hopeful_clarke
Create a file index.js to your current directory and write console.log('Hello, World') inside it. No need for containers yet.
Next, let's skip installing Node altogether. There are plenty of useful Docker images in Docker Hub ready for our use. Let's use the image https://hub.docker.com/_/node, which has Node already installed. We only need to pick a version.
By the way, the container run accepts --name flag that we can use to give a name for the container.
$ docker container run -it --name hello-node node:20 bashLet us create a directory for the code inside the container:
root@77d1023af893:/# mkdir /usr/src/appWhile we are inside the container on this terminal, open another terminal and use the container cp command to copy file from your own machine to the container.
$ docker container cp ./index.js hello-node:/usr/src/app/index.jsAnd now we can run node /usr/src/app/index.js in the container. We can commit this as another new image, but there is an even better solution. The next section will be all about building your images like a pro.