b
加入表与查询
Application structuring
到目前为止,我们已经在同一个文件中写了所有的代码。现在让我们把应用的结构设计得更好一些。让我们创建以下目录结构和文件。
index.js
util
  config.js
  db.js
models
  index.js
  note.js
controllers
notes.js这些文件的内容如下。文件util/config.js负责处理环境变量。
require('dotenv').config()

module.exports = {
  DATABASE_URL: process.env.DATABASE_URL,
  PORT: process.env.PORT || 3001,
}文件index.js的作用是配置和启动应用。
const express = require('express')
const app = express()

const { PORT } = require('./util/config')
const { connectToDatabase } = require('./util/db')

const notesRouter = require('./controllers/notes')

app.use(express.json())

app.use('/api/notes', notesRouter)

const start = async () => {
  await connectToDatabase()
  app.listen(PORT, () => {
    console.log(`Server running on port ${PORT}`)
  })
}

start()
启动应用与我们之前看到的略有不同,因为我们要确保在实际启动前成功建立数据库连接。
文件util/db.js包含初始化数据库的代码。
const Sequelize = require('sequelize')
const { DATABASE_URL } = require('./config')

const sequelize = new Sequelize(DATABASE_URL, {
  dialectOptions: {
    ssl: {
      require: true,
      rejectUnauthorized: false
    }
  },
});

const connectToDatabase = async () => {
  try {
    await sequelize.authenticate()
    console.log('connected to the database')
  } catch (err) {
    console.log('failed to connect to the database')
    return process.exit(1)
  }

  return null
}

module.exports = { connectToDatabase, sequelize }与要存储的表相对应的模型中的注释被保存在文件models/note.js中。
const { Model, DataTypes } = require('sequelize')

const { sequelize } = require('../util/db')

class Note extends Model {}

Note.init({
  id: {
    type: DataTypes.INTEGER,
    primaryKey: true,
    autoIncrement: true
  },
  content: {
    type: DataTypes.TEXT,
    allowNull: false
  },
  important: {
    type: DataTypes.BOOLEAN
  },
  date: {
    type: DataTypes.DATE
  }
}, {
  sequelize,
  underscored: true,
  timestamps: false,
  modelName: 'note'
})

module.exports = Note文件models/index.js在这一点上几乎是无用的,因为应用中只有一个模型。当我们开始向应用添加其他模型时,该文件将变得更加有用,因为它将消除在应用的其他部分导入定义单个模型的文件的需要。
const Note = require('./note')

Note.sync()

module.exports = {
  Note
}与笔记相关的路由处理可以在文件controllers/notes.js中找到。
const router = require('express').Router()

const { Note } = require('../models')

router.get('/', async (req, res) => {
  const notes = await Note.findAll()
  res.json(notes)
})

router.post('/', async (req, res) => {
  try {
    const note = await Note.create(req.body)
    res.json(note)
  } catch(error) {
    return res.status(400).json({ error })
  }
})

router.get('/:id', async (req, res) => {
  const note = await Note.findByPk(req.params.id)
  if (note) {
    res.json(note)
  } else {
    res.status(404).end()
  }
})

router.delete('/:id', async (req, res) => {
  const note = await Note.findByPk(req.params.id)
  if (note) {
    await note.destroy()
  }
  res.status(204).end()
})

router.put('/:id', async (req, res) => {
  const note = await Note.findByPk(req.params.id)
  if (note) {
    note.important = req.body.important
    await note.save()
    res.json(note)
  } else {
    res.status(404).end()
  }
})

module.exports = router
应用的结构现在很好。然而,我们注意到,处理单个笔记的路由处理程序包含了一些重复的代码,因为它们都是以搜索要处理的笔记的行开始的。
const note = await Note.findByPk(req.params.id)让我们把它重构为我们自己的中间件并在路由处理程序中实现它。
const noteFinder = async (req, res, next) => {
  req.note = await Note.findByPk(req.params.id)
  next()
}

router.get('/:id', noteFinder, async (req, res) => {
  if (req.note) {
    res.json(req.note)
  } else {
    res.status(404).end()
  }
})

router.delete('/:id', noteFinder, async (req, res) => {
  if (req.note) {
    await req.note.destroy()
  }
  res.status(204).end()
})

router.put('/:id', noteFinder, async (req, res) => {
  if (req.note) {
    req.note.important = req.body.important
    await req.note.save()
    res.json(req.note)
  } else {
    res.status(404).end()
  }
})路由处理程序现在接收三个参数,第一个是定义路由的字符串,第二个是我们之前定义的中间件noteFinder,它从数据库中检索笔记并把它放在req对象的note属性中。少量的复制粘贴被消除了,我们很满意!
该应用的当前代码全部在GitHub,分支part13-2。
User management
接下来,让我们为应用添加一个数据库表users,应用的用户将被存储在这里。此外,我们将添加创建用户和基于令牌的登录的功能,正如我们在第4章节中实现的那样。为了简单起见,我们将调整实现,使所有用户都有相同的密码secret。
在文件models/user.js中定义用户的模型是很简单的
const { Model, DataTypes } = require('sequelize')

const { sequelize } = require('../util/db')

class User extends Model {}

User.init({
  id: {
    type: DataTypes.INTEGER,
    primaryKey: true,
    autoIncrement: true
  },
  username: {
    type: DataTypes.STRING,
    unique: true,
    allowNull: false
  },
  name: {
    type: DataTypes.STRING,
    allowNull: false
  },
}, {
  sequelize,
  underscored: true,
  timestamps: false,
  modelName: 'user'
})

module.exports = User用户名字段被设置为唯一。用户名基本上可以作为表的主键使用。然而,我们决定将主键创建为一个独立的字段,其值为整数id。
文件models/index.js略有扩展。
const Note = require('./note')
const User = require('./user')
User.sync()
module.exports = {
Note, User}负责在controllers/users.js文件中创建新用户并显示所有用户的路由处理程序并不包含任何戏剧性的内容。
const router = require('express').Router()

const { User } = require('../models')

router.get('/', async (req, res) => {
  const users = await User.findAll()
  res.json(users)
})

router.post('/', async (req, res) => {
  try {
    const user = await User.create(req.body)
    res.json(user)
  } catch(error) {
    return res.status(400).json({ error })
  }
})

router.get('/:id', async (req, res) => {
  const user = await User.findByPk(req.params.id)
  if (user) {
    res.json(user)
  } else {
    res.status(404).end()
  }
})

module.exports = router处理登录的路由处理程序(文件controllers/login.js)如下。
const jwt = require('jsonwebtoken')
const router = require('express').Router()

const { SECRET } = require('../util/config')
const User = require('../models/user')

router.post('/', async (request, response) => {
  const body = request.body

  const user = await User.findOne({
    where: {
      username: body.username
    }
  })

  const passwordCorrect = body.password === 'secret'

  if (!(user && passwordCorrect)) {
    return response.status(401).json({
      error: 'invalid username or password'
    })
  }

  const userForToken = {
    username: user.username,
    id: user.id,
  }

  const token = jwt.sign(userForToken, SECRET)

  response
    .status(200)
    .send({ token, username: user.username, name: user.name })
})

module.exports = routerPOST请求将伴随着一个用户名和一个密码。首先,使用findOne方法的User模型从数据库中获取与用户名对应的对象。
const user = await User.findOne({
  where: {
    username: body.username
  }
})
从控制台,我们可以看到SQL语句与方法的调用相对应
SELECT "id", "username", "name"
FROM "users" AS "User"
WHERE "User". "username" = 'mluukkai';如果找到了用户并且密码正确(即所有用户的secret),在响应中会返回一个包含用户信息的jsonwebtoken。要做到这一点,我们要安装以下依赖关系
npm install jsonwebtoken文件index.js略有扩展
const notesRouter = require('./controllers/notes')
const usersRouter = require('./controllers/users')
const loginRouter = require('./controllers/login')

app.use(express.json())

app.use('/api/notes', notesRouter)
app.use('/api/users', usersRouter)
app.use('/api/login', loginRouter)该应用的当前代码全部在GitHub,分支part13-3。
Connection between the tables
用户现在可以被添加到应用,用户可以登录,但这本身这还不是一个非常有用的功能。我们想增加这样的功能:只有登录的用户才能添加注释,而且每个注释都与创建它的用户相关联。要做到这一点,我们需要在notes表中添加一个foreign key。
当使用Sequelize时,一个外键可以通过修改models/index.js文件来定义,如下所示
const Note = require('./note')
const User = require('./user')

User.hasMany(Note)Note.belongsTo(User)Note.sync({ alter: true })User.sync({ alter: true })
module.exports = {
  Note, User
}所以这就是我们如何定义在users和notes条目之间存在一个一对多的关系连接。我们还改变了sync调用的选项,以便数据库中的表与模型定义的变化相匹配。从控制台看,数据库模式如下。
postgres=# \d users
                                     Table "public.users"
  Column | Type | Collation | Nullable | Default
----------+------------------------+-----------+----------+-----------------------------------
 id | integer | not null | nextval('users_id_seq'::regclass)
 username | character varying(255) | | not null |
 name | character varying(255) | | not null |
Indexes:
    "users_pkey" PRIMARY KEY, btree (id)
Referenced by:
    TABLE "notes" CONSTRAINT "notes_user_id_fkey" FOREIGN KEY (user_id) REFERENCES users(id) ON UPDATE CASCADE ON DELETE SET NULL

postgres=# \d notes
                                      Table "public.notes"
  Column | Type | Collation | Nullable | Default
-----------+--------------------------+-----------+----------+-----------------------------------
 id | integer | not null | nextval('notes_id_seq'::regclass)
 content | text | | not null |
 important | boolean | | | |
 date | timestamp with time zone | | | |
 user_id | integer | | | |
Indexes:
    "notes_pkey" PRIMARY KEY, btree (id)
Foreign-key constraints:
"notes_user_id_fkey" FOREIGN KEY (user_id) REFERENCES users(id) ON UPDATE CASCADE ON DELETE SET NULL外键user_id已经在notes表中创建,它指向users表中的行。
现在让我们把每个插入的新笔记都与一个用户相关联。在我们做适当的实现之前(我们将笔记与登录用户的token联系起来),让我们用硬编码将笔记附在数据库中找到的第一个用户身上。
router.post('/', async (req, res) => {
  try {
    const user = await User.findOne()    const note = await Note.create({...req.body, userId: user.id})    res.json(note)
  } catch(error) {
    return res.status(400).json({ error })
  }
})注意现在在数据库级别的笔记中如何有一个user_id列。每个数据库行中的相应对象是通过Sequelize's的命名惯例来提及的,而不是源代码中输入的骆驼字母(userId)。
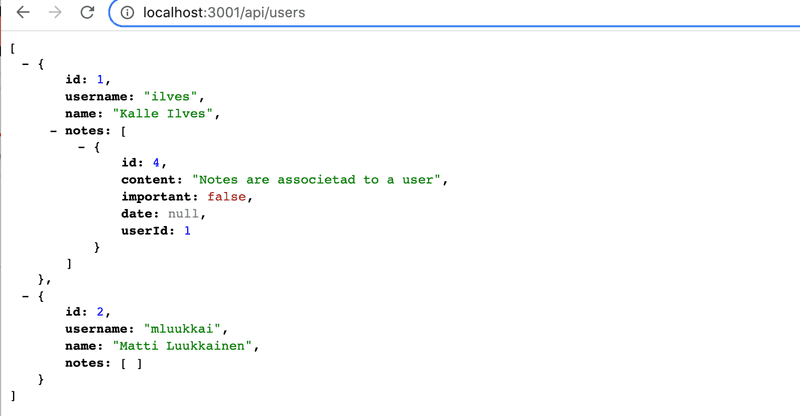
制作一个连接查询是非常容易的。让我们改变返回所有用户的路径,以便每个用户的注释也被显示出来。
router.get('/', async (req, res) => {
  const users = await User.findAll({    include: {      model: Note    }  })  res.json(users)
})所以连接查询是使用include选项作为查询参数完成的。
从查询产生的SQL语句在控制台中可以看到。
SELECT "User". "id", "User". "username", "User". "name", "Notes". "id" AS "Notes.id", "Notes". "content" AS "Notes.content", "Notes". "important" AS "Notes.important", "Notes". "date" AS "Notes.date", "Notes". "user_id" AS "Notes.UserId"
FROM "users" AS "User" LEFT OUTER JOIN "notes" AS "Notes" ON "User". "id" = "Notes". "user_id";
最终结果也如你所料
Proper insertion of notes
让我们改变笔记的插入,使其与第4章节中的工作相同,即只有当与创建相对应的请求伴随着来自登录的有效令牌时,笔记的创建才能成功。然后,该笔记被存储在由令牌识别的用户创建的笔记列表中。
const tokenExtractor = (req, res, next) => {  const authorization = req.get('authorization')  if (authorization && authorization.toLowerCase().startsWith('bearer ')) {    try {      req.decodedToken = jwt.verify(authorization.substring(7), SECRET)    } catch{      res.status(401).json({ error: 'token invalid' })    }  }  else {    res.status(401).json({ error: 'token missing' })  }  next()}
router.post('/', tokenExtractor, async (req, res) => {
  try {
    const user = await User.findByPk(req.decodedToken.id)    const note = await Note.create({...req.body, userId: user.id, date: new Date()})    res.json(note)
  } catch(error) {
    return res.status(400).json({ error })
  }
})令牌从请求头信息中获取,经过解码并由tokenExtractor中间件放入req对象。当创建一个注释时,也会给出一个date字段,表明它的创建时间。
Fine-tuning
我们的后端目前的工作方式与同一应用的第四章节版本几乎相同,除了错误处理。在我们对后端进行一些扩展之前,让我们稍微改变一下检索所有笔记和所有用户的路线。
我们将在每个笔记中添加关于添加它的用户的信息。
router.get('/', async (req, res) => {
  const notes = await Note.findAll({
    attributes: { exclude: ['userId'] },
    include: {
      model: User,
      attributes: ['name']
    }
  })
  res.json(notes)
})我们还限制了我们想要的字段的值。对于每个笔记,我们返回所有的字段,包括与该笔记相关的用户的名字,但不包括userId。
让我们对检索所有用户的路由做一个类似的改变,从与用户相关的笔记中删除不必要的字段userId。
router.get('/', async (req, res) => {
  const users = await User.findAll({
    include: {
      model: Note,
      attributes: { exclude: ['userId'] }    }
  })
  res.json(users)
})该应用的当前代码全部在GitHub,分支part13-4。
Attention to the definition of the models
最敏锐的人会注意到,尽管增加了user_id列,我们并没有对定义笔记的模型进行修改,但我们仍然可以在笔记对象中添加用户。
const user = await User.findByPk(req.decodedToken.id)
const note = await Note.create({ ...req.body, userId: user.id, date: new Date() })原因是我们在文件models/index.js中具体说明了用户和笔记之间存在一对多的联系。
const Note = require('./note')
const User = require('./user')

User.hasMany(Note)
Note.belongsTo(User)

// ...Sequelize将自动在Note模型上创建一个名为userId的属性,当被引用时,可以访问数据库的user_id列。
请记住,我们也可以使用build方法创建一个笔记,如下所示。
const user = await User.findByPk(req.decodedToken.id)

// create a note without saving it yet
const note = Note.build({ ...req.body, date: new Date() })
 // put the user id in the userId property of the created note
note.userId = user.id
// store the note object in the database
await note.save()这就是我们明确看到userId是笔记对象的一个属性。
我们可以按以下方式定义模型,以得到同样的结果。
Note.init({
  id: {
    type: DataTypes.INTEGER,
    primaryKey: true,
    autoIncrement: true
  },
  content: {
    type: DataTypes.TEXT,
    allowNull: false
  },
  important: {
    type: DataTypes.BOOLEAN
  },
  date: {
    type: DataTypes.DATE
  },
  userId: {    type: DataTypes.INTEGER,    allowNull: false,    references: { model: 'users', key: 'id' },  }}, {
  sequelize,
  underscored: true,
  timestamps: false,
  modelName: 'note'
})

module.exports = Note
像上面那样在模型的类层次上进行定义通常是不必要的
User.hasMany(Note)
Note.belongsTo(User)
相反,我们可以用这个方法来实现同样的效果。使用这两种方法中的一种是必要的,否则Sequelize不知道如何在代码级别上将表相互连接。
More queries
到目前为止,我们的应用在查询方面非常简单,查询要么使用findByPk方法根据主键搜索单行,要么使用findAll方法搜索表中的所有行。这些对于第5节中的应用的前端来说已经足够了,但是让我们扩展后端,这样我们也可以练习做稍微复杂的查询。
我们首先来实现只检索重要或不重要的笔记的可能性。让我们用查询参数 important来实现。
router.get('/', async (req, res) => {
  const notes = await Note.findAll({
    attributes: { exclude: ['userId'] },
    include: {
      model: user,
      attributes: ['name']
    },
    where: {      important: req.query.important === "true"    }  })
  res.json(notes)
})现在后端可以通过请求http://localhost:3001/api/notes?important=true 来检索重要的笔记,通过请求http://localhost:3001/api/notes?important=false 来检索非重要的笔记。
由Sequelize生成的SQL查询包含一个WHERE子句,过滤通常会被返回的记录。
SELECT "note". "id", "note". "content", "note". "important", "note". "date", "user". "id" AS "user.id", "user". "name" AS "user.name"
FROM "notes" AS "note" LEFT OUTER JOIN "users" AS "user" ON "note". "user_id" = "user". "id"
WHERE "note". "important" = true;不幸的是,如果请求对笔记是否重要不感兴趣,也就是说,如果请求是向http://localhost:3001/api/notes,那么这个实现将无法工作。更正可以通过几种方式进行。其中一种,但也许不是最好的方式,修正的方式如下。
const { Op } = require('sequelize')

router.get('/', async (req, res) => {
  let important = {    [Op.in]: [true, false]  }  if ( req.query.important ) {    important = req.query.important === "true"  }
  const notes = await Note.findAll({
    attributes: { exclude: ['userId'] },
    include: {
      model: user,
      attributes: ['name']
    },
    where: {
      important    }
  })
  res.json(notes)
})重要对象现在存储了查询条件。默认的查询条件是
where: {
  important: {
    [Op.in]: [true, false]
  }
}即important列可以是true或false,使用许多Sequelize操作符之一Op.in。如果指定了查询参数req.query.important,则查询会变成两种形式之一
where: {
  important: true
}
或
where: {
  important: false
}
取决于查询参数的值。
该功能可以进一步扩展,允许用户在检索笔记时指定一个必要的关键词,例如,对http://localhost:3001/api/notes?search=database 的请求将返回所有提到database的笔记,或者对http://localhost:3001/api/notes?search=javascript&important=true 的请求将返回所有标记为重要的笔记并提到javascript。实现方法如下
router.get('/', async (req, res) => {
  let important = {
    [Op.in]: [true, false]
  }

  if ( req.query.important ) {
    important = req.query.important === "true"
  }

  const notes = await Note.findAll({
    attributes: { exclude: ['userId'] },
    include: {
      model: user,
      attributes: ['name']
    },
    where: {
      important,
      content: {        [Op.substring]: req.query.search ? req.query.search : ''      }    }
  })

  res.json(notes)
})
Sequelize's Op.substring 使用SQL中的LIKE关键字生成我们想要的查询。例如,如果我们对http://localhost:3001/api/notes?search=database&important=true,我们会看到它生成的SQL查询与我们期望的完全一样。
SELECT "note". "id", "note". "content", "note". "important", "note". "date", "user". "id" AS "user.id", "user". "name" AS "user.name"
FROM "notes" AS "note" LEFT OUTER JOIN "users" AS "user" ON "note". "user_id" = "user". "id"
WHERE "note". "important" = true AND "note". "content" LIKE '%database%';
在我们的应用中仍然有一个美丽的缺陷,我们看到如果我们向 http://localhost:3001/api/notes 即我们想要所有的笔记,我们的实现将在查询中引起一个不必要的WHERE,这可能(取决于数据库引擎的实现)不必要地影响查询的效率。
SELECT "note". "id", "note". "content", "note". "important", "note". "date", "user". "id" AS "user.id", "user". "name" AS "user.name"
FROM "notes" AS "note" LEFT OUTER JOIN "users" AS "user" ON "note". "user_id" = "user". "id"
WHERE "note". "important" IN (true, false) AND "note". "content" LIKE '%%';
让我们优化代码,使WHERE条件只在必要时使用。
router.get('/', async (req, res) => {
  const where = {}

  if (req.query.important) {
    where.important = req.query.important === "true"
  }

  if (req.query.search) {
    where.content = {
      [Op.substring]: req.query.search
    }
  }

  const notes = await Note.findAll({
    attributes: { exclude: ['userId'] },
    include: {
      model: user,
      attributes: ['name']
    },
    where
  })

  res.json(notes)
})如果请求有搜索条件,例如:http://localhost:3001/api/notes?search=database&important=true 就会形成一个包含WHERE的查询
SELECT "note". "id", "note". "content", "note". "important", "note". "date", "user". "id" AS "user.id", "user". "name" AS "user.name"
FROM "notes" AS "note" LEFT OUTER JOIN "users" AS "user" ON "note". "user_id" = "user". "id"
WHERE "note". "important" = true AND "note". "content" LIKE '%database%';
如果请求没有搜索条件 http://localhost:3001/api/notes 那么查询就没有不必要的WHERE。
SELECT "note". "id", "note". "content", "note". "important", "note". "date", "user". "id" AS "user.id", "user". "name" AS "user.name"
FROM "notes" AS "note" LEFT OUTER JOIN "users" AS "user" ON "note". "user_id" = "user". "id";当前应用的代码全部在GitHub,分支part13-5。