b
Custom hooks
Hooks
React offers 15 different built-in hooks, of which the most popular ones are the useState and useEffect hooks that we have already been using extensively.
In part 5 we used the useImperativeHandle hook which allows components to provide their functions to other components. In part 6 we used useReducer and useContext to implement a Redux like state management.
Within the last couple of years, many React libraries have begun to offer hook-based APIs. In part 6 we used the useSelector and useDispatch hooks from the react-redux library to share our redux-store and dispatch function to our components.
The React Router's API we introduced in the previous part is also partially hook-based. Its hooks can be used to access URL parameters and the navigation object, which allows for manipulating the browser URL programmatically.
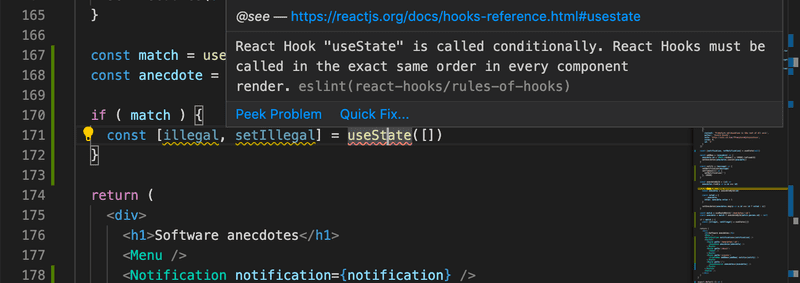
As mentioned in part 1, hooks are not normal functions, and when using these we have to adhere to certain rules or limitations. Let's recap the rules of using hooks, copied verbatim from the official React documentation:
Don’t call Hooks inside loops, conditions, or nested functions. Instead, always use Hooks at the top level of your React function.
You can only call Hooks while React is rendering a function component:
- Call them at the top level in the body of a function component.
- Call them at the top level in the body of a custom Hook.
There's an existing ESlint plugin that can be used to verify that the application uses hooks correctly:

Custom hooks
React offers the option to create custom hooks. According to React, the primary purpose of custom hooks is to facilitate the reuse of the logic used in components.
Building your own Hooks lets you extract component logic into reusable functions.
Custom hooks are regular JavaScript functions that can use any other hooks, as long as they adhere to the rules of hooks. Additionally, the name of custom hooks must start with the word use.
We implemented a counter application in part 1 that can have its value incremented, decremented, or reset. The code of the application is as follows:
import { useState } from 'react'
const App = () => {
  const [counter, setCounter] = useState(0)

  return (
    <div>
      <div>{counter}</div>
      <button onClick={() => setCounter(counter + 1)}>
        plus
      </button>
      <button onClick={() => setCounter(counter - 1)}>
        minus
      </button>
      <button onClick={() => setCounter(0)}>
        zero
      </button>
    </div>
  )
}
Let's extract the counter logic into a custom hook. The code for the hook is as follows:
const useCounter = () => {
  const [value, setValue] = useState(0)

  const increase = () => {
    setValue(value + 1)
  }

  const decrease = () => {
    setValue(value - 1)
  }

  const zero = () => {
    setValue(0)
  }

  return {
    value,
    increase,
    decrease,
    zero
  }
}
Our custom hook uses the useState hook internally to create its state. The hook returns an object, the properties of which include the value of the counter as well as functions for manipulating the value.
React components can use the hook as shown below:
const App = () => {
  const counter = useCounter()

  return (
    <div>
      <div>{counter.value}</div>
      <button onClick={counter.increase}>
        plus
      </button>
      <button onClick={counter.decrease}>
        minus
      </button>
      <button onClick={counter.zero}>
        zero
      </button>
    </div>
  )
}
By doing this we can extract the state of the App component and its manipulation entirely into the useCounter hook. Managing the counter state and logic is now the responsibility of the custom hook.
The same hook could be reused in the application that was keeping track of the number of clicks made to the left and right buttons:
const App = () => {
  const left = useCounter()
  const right = useCounter()

  return (
    <div>
      {left.value}
      <button onClick={left.increase}>
        left
      </button>
      <button onClick={right.increase}>
        right
      </button>
      {right.value}
    </div>
  )
}
The application creates two completely separate counters. The first one is assigned to the variable left and the other to the variable right.
Dealing with forms in React is somewhat tricky. The following application presents the user with a form that requires him to input their name, birthday, and height:
const App = () => {
  const [name, setName] = useState('')
  const [born, setBorn] = useState('')
  const [height, setHeight] = useState('')

  return (
    <div>
      <form>
        name:
        <input
          type='text'
          value={name}
          onChange={(event) => setName(event.target.value)}
        />
        <br/>
        birthdate:
        <input
          type='date'
          value={born}
          onChange={(event) => setBorn(event.target.value)}
        />
        <br />
        height:
        <input
          type='number'
          value={height}
          onChange={(event) => setHeight(event.target.value)}
        />
      </form>
      <div>
        {name} {born} {height}
      </div>
    </div>
  )
}
Every field of the form has its own state. To keep the state of the form synchronized with the data provided by the user, we have to register an appropriate onChange handler for each of the input elements.
Let's define our own custom useField hook that simplifies the state management of the form:
const useField = (type) => {
  const [value, setValue] = useState('')

  const onChange = (event) => {
    setValue(event.target.value)
  }

  return {
    type,
    value,
    onChange
  }
}
The hook function receives the type of the input field as a parameter. It returns all of the attributes required by the input: its type, value and the onChange handler.
The hook can be used in the following way:
const App = () => {
  const name = useField('text')
  // ...

  return (
    <div>
      <form>
        <input
          type={name.type}
          value={name.value}
          onChange={name.onChange}
        />
        // ...
      </form>
    </div>
  )
}
Spread attributes
We could simplify things a bit further. Since the name object has exactly all of the attributes that the input element expects to receive as props, we can pass the props to the element using the spread syntax in the following way:
<input {...name} /> As the example in the React documentation states, the following two ways of passing props to a component achieve the exact same result:
<Greeting firstName='Arto' lastName='Hellas' />

const person = {
  firstName: 'Arto',
  lastName: 'Hellas'
}

<Greeting {...person} />
The application gets simplified into the following format:
const App = () => {
  const name = useField('text')
  const born = useField('date')
  const height = useField('number')

  return (
    <div>
      <form>
        name:
        <input  {...name} />
        <br/>
        birthdate:
        <input {...born} />
        <br />
        height:
        <input {...height} />
      </form>
      <div>
        {name.value} {born.value} {height.value}
      </div>
    </div>
  )
}
Dealing with forms is greatly simplified when the unpleasant nitty-gritty details related to synchronizing the state of the form are encapsulated inside our custom hook.
Custom hooks are not only a tool for reusing code; they also provide a better way for dividing it into smaller modular parts.
More about hooks
The internet is starting to fill up with more and more helpful material related to hooks. The following sources are worth checking out:


