a
Introduction to React
We will now start getting familiar with probably the most important topic of this course, namely the React library. Let's start by making a simple React application as well as getting to know the core concepts of React.
The easiest way to get started by far is by using a tool called Vite.
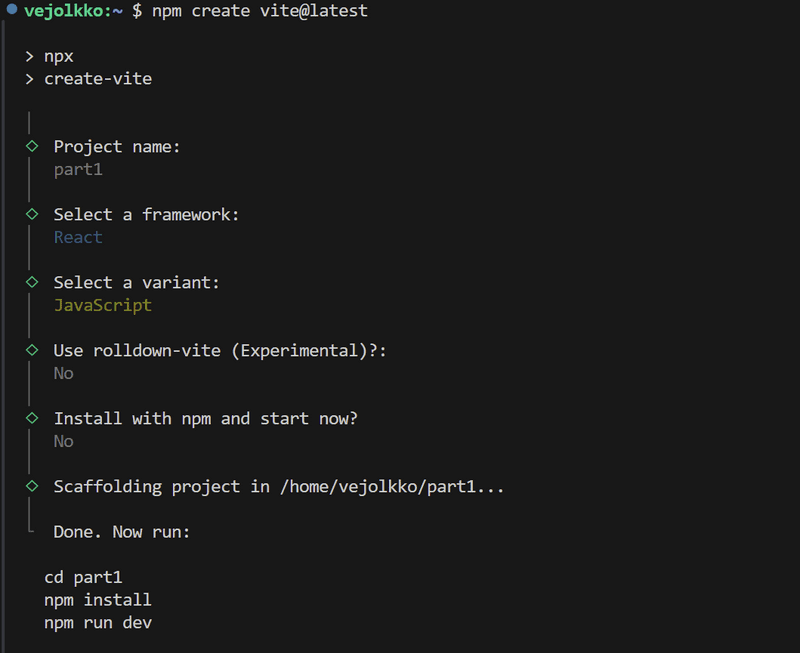
Let's create a new application using the create-vite tool:
npm create vite@latestLet's answer the questions presented by the tool as follows:

We have now created an application named part1. The tool could have also installed the required dependencies and started the application automatically if we had answered "Yes" to the question "Install with npm and start now?" However, we will perform these steps manually so we can see how they are done.
Next, let's move into the application's directory and install the required libraries:
cd part1
npm install
The application is started as follows:
npm run devThe console says that the application has started on localhost port 5173, i.e. the address http://localhost:5173/:

Vite starts the application by default on port 5173. If it is not free, Vite uses the next free port number.
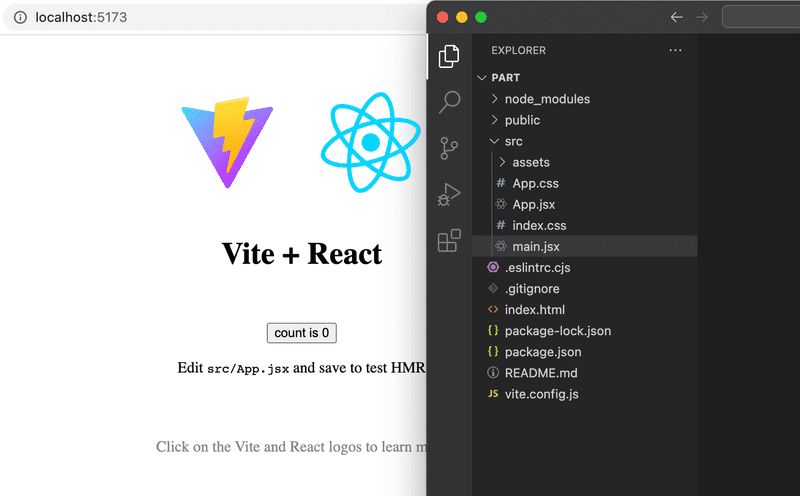
Open the browser and a text editor so that you can view the code as well as the webpage at the same time on the screen:

The code of the application resides in the src folder. Let's simplify the default code such that the contents of the file main.jsx looks like this:
import ReactDOM from 'react-dom/client'

import App from './App'

ReactDOM.createRoot(document.getElementById('root')).render(<App />)
and file App.jsx looks like this
const App = () => {
  return (
    <div>
      <p>Hello world</p>
    </div>
  )
}

export default App
The files App.css and index.css, and the directory assets may be deleted as they are not needed in our application right now.
Component
The file App.jsx now defines a React component with the name App. The command on the final line of file main.jsx
ReactDOM.createRoot(document.getElementById('root')).render(<App />)renders its contents into the div-element, defined in the file index.html, having the id value 'root'.
By default, the file index.html doesn't contain any HTML markup that is visible to us in the browser:
<!doctype html>
<html lang="en">
  <head>
    <meta charset="UTF-8" />
    <link rel="icon" type="image/svg+xml" href="/vite.svg" />
    <meta name="viewport" content="width=device-width, initial-scale=1.0" />
    <title>part1</title>
  </head>
  <body>
    <div id="root"></div>
    <script type="module" src="/src/main.jsx"></script>
  </body>
</html>
You can try adding there some HTML to the file. However, when using React, all content that needs to be rendered is usually defined as React components.
Let's take a closer look at the code defining the component:
const App = () => (
  <div>
    <p>Hello world</p>
  </div>
)
As you probably guessed, the component will be rendered as a div-tag, which wraps a p-tag containing the text Hello world.
Technically the component is defined as a JavaScript function. The following is a function (which does not receive any parameters):
() => (
  <div>
    <p>Hello world</p>
  </div>
)
The function is then assigned to a constant variable App:
const App = ...There are a few ways to define functions in JavaScript. Here we will use arrow functions, which are described in a newer version of JavaScript known as ECMAScript 6, also called ES6.
Because the function consists of only a single expression we have used a shorthand, which represents this piece of code:
const App = () => {
  return (
    <div>
      <p>Hello world</p>
    </div>
  )
}
In other words, the function returns the value of the expression.
The function defining the component may contain any kind of JavaScript code. Modify your component to be as follows:
const App = () => {
  console.log('Hello from component')
  return (
    <div>
      <p>Hello world</p>
    </div>
  )
}

export default App
and observe what happens in the browser console

The first rule of frontend web development:
keep the console open all the time
Let us repeat this together: I promise to keep the console open all the time during this course, and for the rest of my life when I'm doing web development.
It is also possible to render dynamic content inside of a component.
Modify the component as follows:
const App = () => {
  const now = new Date()
  const a = 10
  const b = 20
  console.log(now, a+b)

  return (
    <div>
      <p>Hello world, it is {now.toString()}</p>
      <p>
        {a} plus {b} is {a + b}
      </p>
    </div>
  )
}
Any JavaScript code within the curly braces is evaluated and the result of this evaluation is embedded into the defined place in the HTML produced by the component.
Note that you should not remove the line at the bottom of the component
export default AppThe export is not shown in most of the examples of the course material. Without the export the component and the whole app breaks down.
Did you remember your promise to keep the console open? What was printed out there?
JSX
It seems like React components are returning HTML markup. However, this is not the case. The layout of React components is mostly written using JSX. Although JSX looks like HTML, we are dealing with a way to write JavaScript. Under the hood, JSX returned by React components is compiled into JavaScript.
After compiling, our application looks like this:
const App = () => {
  const now = new Date()
  const a = 10
  const b = 20
  return React.createElement(
    'div',
    null,
    React.createElement(
      'p', null, 'Hello world, it is ', now.toString()
    ),
    React.createElement(
      'p', null, a, ' plus ', b, ' is ', a + b
    )
  )
}
The compilation is handled by Babel. Projects created with Vite are configured to compile automatically. We will learn more about this topic in part 7 of this course.
It is also possible to write React as "pure JavaScript" without using JSX. Although, nobody with a sound mind would do so.
In practice, JSX is much like HTML with the distinction that with JSX you can easily embed dynamic content by writing appropriate JavaScript within curly braces. The idea of JSX is quite similar to many templating languages, such as Thymeleaf used along with Java Spring, which are used on servers.
JSX is "XML-like", which means that every tag needs to be closed. For example, a newline is an empty element, which in HTML can be written as follows:
<br>but when writing JSX, the tag needs to be closed:
<br />Multiple components
Let's modify the file App.jsx as follows:
const Hello = () => {  return (    <div>      <p>Hello world</p>    </div>  )}
const App = () => {
  return (
    <div>
      <h1>Greetings</h1>
      <Hello />    </div>
  )
}
We have defined a new component Hello and used it inside the component App. Naturally, a component can be used multiple times:
const App = () => {
  return (
    <div>
      <h1>Greetings</h1>
      <Hello />
      <Hello />      <Hello />    </div>
  )
}NB: export at the bottom is left out in these examples, now and in the future. It is still needed for the code to work
Writing components with React is easy, and by combining components, an even more complex application can be kept fairly maintainable. Indeed, a core philosophy of React is composing applications from many specialized reusable components.
Another strong convention is the idea of a root component called App at the top of the component tree of the application. Nevertheless, as we will learn in part 6, there are situations where the component App is not exactly the root, but is wrapped within an appropriate utility component.
props: passing data to components
It is possible to pass data to components using so-called props.
Let's modify the component Hello as follows:
const Hello = (props) => {  return (
    <div>
      <p>Hello {props.name}</p>    </div>
  )
}
Now the function defining the component has a parameter props. As an argument, the parameter receives an object, which has fields corresponding to all the "props" the user of the component defines.
The props are defined as follows:
const App = () => {
  return (
    <div>
      <h1>Greetings</h1>
      <Hello name='George' />      <Hello name='Daisy' />    </div>
  )
}
There can be an arbitrary number of props and their values can be "hard-coded" strings or the results of JavaScript expressions. If the value of the prop is achieved using JavaScript it must be wrapped with curly braces.
Let's modify the code so that the component Hello uses two props:
const Hello = (props) => {
  console.log(props)  return (
    <div>
      <p>
        Hello {props.name}, you are {props.age} years old      </p>
    </div>
  )
}

const App = () => {
  const name = 'Peter'  const age = 10
  return (
    <div>
      <h1>Greetings</h1>
      <Hello name='Maya' age={26 + 10} />      <Hello name={name} age={age} />    </div>
  )
}
The props sent by the component App are the values of the variables, the result of the evaluation of the sum expression and a regular string.
Component Hello also logs the value of the object props to the console.
I really hope your console was open. If it was not, remember what you promised:
I promise to keep the console open all the time during this course, and for the rest of my life when I'm doing web development
Software development is hard. It gets even harder if one is not using all the possible available tools such as the web-console and debug printing with console.log. Professionals use both all the time and there is no single reason why a beginner should not adopt the use of these wonderful helper methods that will make their life so much easier.
Possible error message
If your project has React version 18 or earlier installed, you may receive the following error message at this point:

It's not an actual error, but a warning caused by the ESLint tool. You can silence the warning react/prop-types by adding to the file eslint.config.js the next line
export default [
  { ignores: ['dist'] },
  {
    files: ['**/*.{js,jsx}'],
    languageOptions: {
      ecmaVersion: 2020,
      globals: globals.browser,
      parserOptions: {
        ecmaVersion: 'latest',
        ecmaFeatures: { jsx: true },
        sourceType: 'module',
      },
    },
    settings: { react: { version: '18.3' } },
    plugins: {
      react,
      'react-hooks': reactHooks,
      'react-refresh': reactRefresh,
    },
    rules: {
      ...js.configs.recommended.rules,
      ...react.configs.recommended.rules,
      ...react.configs['jsx-runtime'].rules,
      ...reactHooks.configs.recommended.rules,
      'react/jsx-no-target-blank': 'off',
      'react-refresh/only-export-components': [
        'warn',
        { allowConstantExport: true },
      ],
      'react/prop-types': 0,    },
  },
]
We will get to know ESLint in more detail in part 3.
Some notes
React has been configured to generate quite clear error messages. Despite this, you should, at least in the beginning, advance in very small steps and make sure that every change works as desired.
The console should always be open. If the browser reports errors, it is not advisable to continue writing more code, hoping for miracles. You should instead try to understand the cause of the error and, for example, go back to the previous working state:

As we already mentioned, when programming with React, it is possible and worthwhile to write console.log() commands (which print to the console) within your code.
Also, keep in mind that First letter of React component names must be capitalized. If you try defining a component as follows:
const footer = () => {
  return (
    <div>
      greeting app created by <a href='https://github.com/mluukkai'>mluukkai</a>
    </div>
  )
}
and use it like this
const App = () => {
  return (
    <div>
      <h1>Greetings</h1>
      <Hello name='Maya' age={26 + 10} />
      <footer />    </div>
  )
}
the page is not going to display the content defined within the footer component, and instead React only creates an empty footer element, i.e. the built-in HTML element instead of the custom React element of the same name. If you change the first letter of the component name to a capital letter, then React creates a div-element defined in the Footer component, which is rendered on the page.
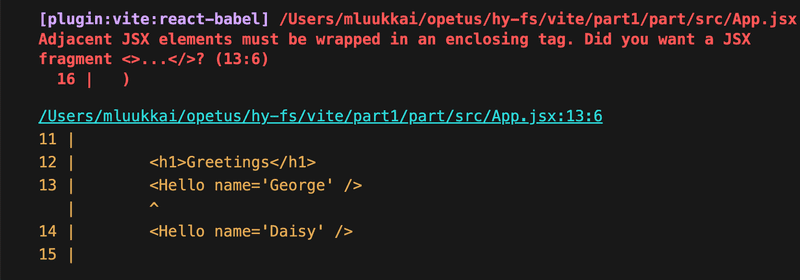
Note that the content of a React component (usually) needs to contain one root element. If we, for example, try to define the component App without the outermost div-element:
const App = () => {
  return (
    <h1>Greetings</h1>
    <Hello name='Maya' age={26 + 10} />
    <Footer />
  )
}
the result is an error message.

Using a root element is not the only working option. An array of components is also a valid solution:
const App = () => {
  return [
    <h1>Greetings</h1>,
    <Hello name='Maya' age={26 + 10} />,
    <Footer />
  ]
}
However, when defining the root component of the application this is not a particularly wise thing to do, and it makes the code look a bit ugly.
Because the root element is stipulated, we have "extra" div elements in the DOM tree. This can be avoided by using fragments, i.e. by wrapping the elements to be returned by the component with an empty element:
const App = () => {
  const name = 'Peter'
  const age = 10

  return (
    <>
      <h1>Greetings</h1>
      <Hello name='Maya' age={26 + 10} />
      <Hello name={name} age={age} />
      <Footer />
    </>
  )
}
It now compiles successfully, and the DOM generated by React no longer contains the extra div element.
Do not render objects
Consider an application that prints the names and ages of our friends on the screen:
const App = () => {
  const friends = [
    { name: 'Peter', age: 4 },
    { name: 'Maya', age: 10 },
  ]

  return (
    <div>
      <p>{friends[0]}</p>
      <p>{friends[1]}</p>
    </div>
  )
}

export default App
However, nothing appears on the screen. I've been trying to find a problem in the code for 15 minutes, but I can't figure out where the problem could be.
I finally remember the promise we made
I promise to keep the console open all the time during this course, and for the rest of my life when I'm doing web development
The console screams in red:

The core of the problem is Objects are not valid as a React child, i.e. the application tries to render objects and it fails again.
The code tries to render the information of one friend as follows
<p>{friends[0]}</p>and this causes a problem because the item to be rendered in the braces is an object.
{ name: 'Peter', age: 4 }In React, the individual things rendered in braces must be primitive values, such as numbers or strings.
The fix is as follows
const App = () => {
  const friends = [
    { name: 'Peter', age: 4 },
    { name: 'Maya', age: 10 },
  ]

  return (
    <div>
      <p>{friends[0].name} {friends[0].age}</p>
      <p>{friends[1].name} {friends[1].age}</p>
    </div>
  )
}

export default App
So now the friend's name is rendered separately inside the curly braces
{friends[0].name}and age
{friends[0].age}After correcting the error, you should clear the console error messages by pressing 🚫 and then reload the page content and make sure that no error messages are displayed.
A small additional note to the previous one. React also allows arrays to be rendered if the array contains values that are eligible for rendering (such as numbers or strings). So the following program would work, although the result might not be what we want:
const App = () => {
  const friends = [ 'Peter', 'Maya']

  return (
    <div>
      <p>{friends}</p>
    </div>
  )
}
In this part, it is not even worth trying to use the direct rendering of the tables, we will come back to it in the next part.