d
A more complex state, debugging React apps
Complex state
In our previous example, the application state was simple as it was comprised of a single integer. What if our application requires a more complex state?
In most cases, the easiest and best way to accomplish this is by using the useState function multiple times to create separate "pieces" of state.
In the following code we create two pieces of state for the application named left and right that both get the initial value of 0:
const App = () => {
  const [left, setLeft] = useState(0)
  const [right, setRight] = useState(0)

  return (
    <div>
      {left}
      <button onClick={() => setLeft(left + 1)}>
        left
      </button>
      <button onClick={() => setRight(right + 1)}>
        right
      </button>
      {right}
    </div>
  )
}
The component gets access to the functions setLeft and setRight that it can use to update the two pieces of state.
The component's state or a piece of its state can be of any type. We could implement the same functionality by saving the click count of both the left and right buttons into a single object:
{
  left: 0,
  right: 0
}
In this case, the application would look like this:
const App = () => {
  const [clicks, setClicks] = useState({
    left: 0, right: 0
  })

  const handleLeftClick = () => {
    const newClicks = {
      left: clicks.left + 1,
      right: clicks.right
    }
    setClicks(newClicks)
  }

  const handleRightClick = () => {
    const newClicks = {
      left: clicks.left,
      right: clicks.right + 1
    }
    setClicks(newClicks)
  }

  return (
    <div>
      {clicks.left}
      <button onClick={handleLeftClick}>left</button>
      <button onClick={handleRightClick}>right</button>
      {clicks.right}
    </div>
  )
}
Now the component only has a single piece of state and the event handlers have to take care of changing the entire application state.
The event handler looks a bit messy. When the left button is clicked, the following function is called:
const handleLeftClick = () => {
  const newClicks = {
    left: clicks.left + 1,
    right: clicks.right
  }
  setClicks(newClicks)
}
The following object is set as the new state of the application:
{
  left: clicks.left + 1,
  right: clicks.right
}
The new value of the left property is now the same as the value of left + 1 from the previous state, and the value of the right property is the same as the value of the right property from the previous state.
We can define the new state object a bit more neatly by using the object spread syntax that was added to the language specification in the summer of 2018:
const handleLeftClick = () => {
  const newClicks = {
    ...clicks,
    left: clicks.left + 1
  }
  setClicks(newClicks)
}

const handleRightClick = () => {
  const newClicks = {
    ...clicks,
    right: clicks.right + 1
  }
  setClicks(newClicks)
}
The syntax may seem a bit strange at first. In practice { ...clicks } creates a new object that has copies of all of the properties of the clicks object. When we specify a particular property - e.g. right in { ...clicks, right: 1 }, the value of the right property in the new object will be 1.
In the example above, this:
{ ...clicks, right: clicks.right + 1 }creates a copy of the clicks object where the value of the right property is increased by one.
Assigning the object to a variable in the event handlers is not necessary and we can simplify the functions to the following form:
const handleLeftClick = () =>
  setClicks({ ...clicks, left: clicks.left + 1 })

const handleRightClick = () =>
  setClicks({ ...clicks, right: clicks.right + 1 })
Some readers might be wondering why we didn't just update the state directly, like this:
const handleLeftClick = () => {
  clicks.left++
  setClicks(clicks)
}
The application appears to work. However, it is forbidden in React to mutate state directly, since it can result in unexpected side effects. Changing state has to always be done by setting the state to a new object. If properties from the previous state object are not changed, they need to simply be copied, which is done by copying those properties into a new object and setting that as the new state.
Storing all of the state in a single state object is a bad choice for this particular application; there's no apparent benefit and the resulting application is a lot more complex. In this case, storing the click counters into separate pieces of state is a far more suitable choice.
There are situations where it can be beneficial to store a piece of application state in a more complex data structure. The official React documentation contains some helpful guidance on the topic.
Handling arrays
Let's add a piece of state to our application containing an array allClicks that remembers every click that has occurred in the application.
const App = () => {
  const [left, setLeft] = useState(0)
  const [right, setRight] = useState(0)
  const [allClicks, setAll] = useState([])
  const handleLeftClick = () => {    setAll(allClicks.concat('L'))    setLeft(left + 1)  }
  const handleRightClick = () => {    setAll(allClicks.concat('R'))    setRight(right + 1)  }
  return (
    <div>
      {left}
      <button onClick={handleLeftClick}>left</button>
      <button onClick={handleRightClick}>right</button>
      {right}
      <p>{allClicks.join(' ')}</p>    </div>
  )
}
Every click is stored in a separate piece of state called allClicks that is initialized as an empty array:
const [allClicks, setAll] = useState([])When the left button is clicked, we add the letter L to the allClicks array:
const handleLeftClick = () => {
  setAll(allClicks.concat('L'))
  setLeft(left + 1)
}
The piece of state stored in allClicks is now set to be an array that contains all of the items of the previous state array plus the letter L. Adding the new item to the array is accomplished with the concat method, which does not mutate the existing array but rather returns a new copy of the array with the item added to it.
As mentioned previously, it's also possible in JavaScript to add items to an array with the push method. If we add the item by pushing it to the allClicks array and then updating the state, the application would still appear to work:
const handleLeftClick = () => {
  allClicks.push('L')
  setAll(allClicks)
  setLeft(left + 1)
}
However, don't do this. As mentioned previously, the state of React components, like allClicks, must not be mutated directly. Even if mutating state appears to work in some cases, it can lead to problems that are very hard to debug.
Let's take a closer look at how the clicking is rendered to the page:
const App = () => {
  // ...

  return (
    <div>
      {left}
      <button onClick={handleLeftClick}>left</button>
      <button onClick={handleRightClick}>right</button>
      {right}
      <p>{allClicks.join(' ')}</p>    </div>
  )
}
We call the join method on the allClicks array, that joins all the items into a single string, separated by the string passed as the function parameter, which in our case is an empty space.
Update of the state is asynchronous
Let's expand the application so that it keeps track of the total number of button presses in the state total, whose value is always updated when the buttons are pressed:
const App = () => {
  const [left, setLeft] = useState(0)
  const [right, setRight] = useState(0)
  const [allClicks, setAll] = useState([])
  const [total, setTotal] = useState(0)
  const handleLeftClick = () => {
    setAll(allClicks.concat('L'))
    setLeft(left + 1)
    setTotal(left + right)  }

  const handleRightClick = () => {
    setAll(allClicks.concat('R'))
    setRight(right + 1)
    setTotal(left + right)  }

  return (
    <div>
      {left}
      <button onClick={handleLeftClick}>left</button>
      <button onClick={handleRightClick}>right</button>
      {right}
      <p>{allClicks.join(' ')}</p>
      <p>total {total}</p>    </div>
  )
}
The solution does not quite work:

The total number of button presses is consistently one less than the actual amount of presses, for some reason.
Let us add couple of console.log statements to the event handler:
const App = () => {
  // ...
  const handleLeftClick = () => {
    setAll(allClicks.concat('L'))
    console.log('left before', left)    setLeft(left + 1)
    console.log('left after', left)    setTotal(left + right)
  }

  // ...
}
The console reveals the problem

Even though a new value was set for left by calling setLeft(left + 1), the old value persists despite the update. As a result, the attempt to count button presses produces a result that is too small:
setTotal(left + right) The reason for this is that a state update in React happens asynchronously, i.e. not immediately but "at some point" before the component is rendered again.
We can fix the app as follows:
const App = () => {
  // ...
  const handleLeftClick = () => {
    setAll(allClicks.concat('L'))
    const updatedLeft = left + 1
    setLeft(updatedLeft)
    setTotal(updatedLeft + right)
  }

  // ...
}
So now the number of button presses is definitely based on the correct number of left button presses.
We can also handle asynchronous updates for the right button:
const App = () => {
  // ...
  const handleRightClick = () => {
    setAll(allClicks.concat('R'));
    const updatedRight = right + 1;
    setRight(updatedRight);
    setTotal(left + updatedRight);
  };

  // ...
}
Conditional rendering
Let's modify our application so that the rendering of the clicking history is handled by a new History component:
const History = (props) => {  if (props.allClicks.length === 0) {    return (      <div>        the app is used by pressing the buttons      </div>    )  }  return (    <div>      button press history: {props.allClicks.join(' ')}    </div>  )}
const App = () => {
  // ...

  return (
    <div>
      {left}
      <button onClick={handleLeftClick}>left</button>
      <button onClick={handleRightClick}>right</button>
      {right}
      <History allClicks={allClicks} />    </div>
  )
}
Now the behavior of the component depends on whether or not any buttons have been clicked. If not, meaning that the allClicks array is empty, the component renders a div element with some instructions instead:
<div>the app is used by pressing the buttons</div>And in all other cases, the component renders the clicking history:
<div>
  button press history: {props.allClicks.join(' ')}
</div>
The History component renders completely different React elements depending on the state of the application. This is called conditional rendering.
React also offers many other ways of doing conditional rendering. We will take a closer look at this in part 2.
Let's make one last modification to our application by refactoring it to use the Button component that we defined earlier on:
const History = (props) => {
  if (props.allClicks.length === 0) {
    return (
      <div>
        the app is used by pressing the buttons
      </div>
    )
  }

  return (
    <div>
      button press history: {props.allClicks.join(' ')}
    </div>
  )
}

const Button = ({ onClick, text }) => <button onClick={onClick}>{text}</button>
const App = () => {
  const [left, setLeft] = useState(0)
  const [right, setRight] = useState(0)
  const [allClicks, setAll] = useState([])

  const handleLeftClick = () => {
    setAll(allClicks.concat('L'))
    setLeft(left + 1)
  }

  const handleRightClick = () => {
    setAll(allClicks.concat('R'))
    setRight(right + 1)
  }

  return (
    <div>
      {left}
      <Button onClick={handleLeftClick} text='left' />      <Button onClick={handleRightClick} text='right' />      {right}
      <History allClicks={allClicks} />
    </div>
  )
}
Old React
In this course, we use the state hook to add state to our React components, which is part of the newer versions of React and is available from version 16.8.0 onwards. Before the addition of hooks, there was no way to add state to functional components. Components that required state had to be defined as class components, using the JavaScript class syntax.
In this course, we have made the slightly radical decision to use hooks exclusively from day one, to ensure that we are learning the current and future variations of React. Even though functional components are the future of React, it is still important to learn the class syntax, as there are billions of lines of legacy React code that you might end up maintaining someday. The same applies to documentation and examples of React that you may stumble across on the internet.
We will learn more about React class components later on in the course.
Debugging React applications
A large part of a typical developer's time is spent on debugging and reading existing code. Every now and then we do get to write a line or two of new code, but a large part of our time is spent trying to figure out why something is broken or how something works. Good practices and tools for debugging are extremely important for this reason.
Lucky for us, React is an extremely developer-friendly library when it comes to debugging.
Before we move on, let us remind ourselves of one of the most important rules of web development.
The first rule of web development
Keep the browser's developer console open at all times.
The Console tab in particular should always be open, unless there is a specific reason to view another tab.
Keep both your code and the web page open together at the same time, all the time.
If and when your code fails to compile and your browser lights up like a Christmas tree:
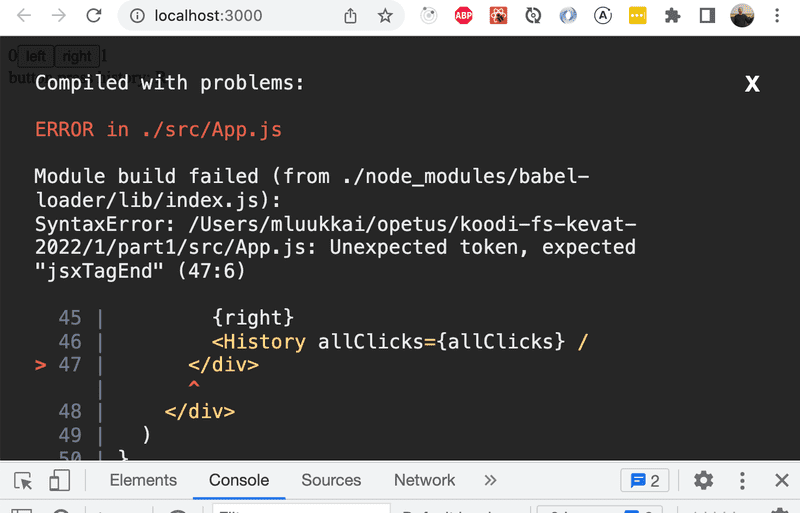
don't write more code but rather find and fix the problem immediately. There has yet to be a moment in the history of coding where code that fails to compile would miraculously start working after writing large amounts of additional code. I highly doubt that such an event will transpire during this course either.
Old-school, print-based debugging is always a good idea. If the component
const Button = ({ onClick, text }) => <button onClick={onClick}>{text}</button>is not working as intended, it's useful to start printing its variables out to the console. In order to do this effectively, we must transform our function into the less compact form and receive the entire props object without destructuring it immediately:
const Button = (props) => {
  console.log(props)  const { onClick, text } = props
  return (
    <button onClick={onClick}>
      {text}
    </button>
  )
}
This will immediately reveal if, for instance, one of the attributes has been misspelled when using the component.
NB When you use console.log for debugging, don't combine objects in a Java-like fashion by using the plus operator:
console.log('props value is ' + props)If you do that, you will end up with a rather uninformative log message:
props value is [object Object]Instead, separate the things you want to log to the console with a comma:
console.log('props value is', props)In this way, the separated items will all be available in the browser console for further inspection.
Logging output to the console is by no means the only way of debugging our applications. You can pause the execution of your application code in the Chrome developer console's debugger, by writing the command debugger anywhere in your code.
The execution will pause once it arrives at a point where the debugger command gets executed:

By going to the Console tab, it is easy to inspect the current state of variables:

Once the cause of the bug is discovered you can remove the debugger command and refresh the page.
The debugger also enables us to execute our code line by line with the controls found on the right-hand side of the Sources tab.
You can also access the debugger without the debugger command by adding breakpoints in the Sources tab. Inspecting the values of the component's variables can be done in the Scope-section:

It is highly recommended to add the React developer tools extension to Chrome. It adds a new Components tab to the developer tools. The new developer tools tab can be used to inspect the different React elements in the application, along with their state and props:
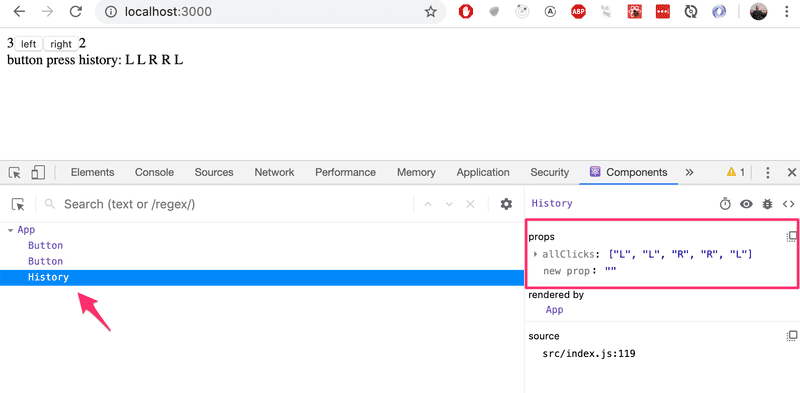
The App component's state is defined like so:
const [left, setLeft] = useState(0)
const [right, setRight] = useState(0)
const [allClicks, setAll] = useState([])
Dev tools show the state of hooks in the order of their definition:
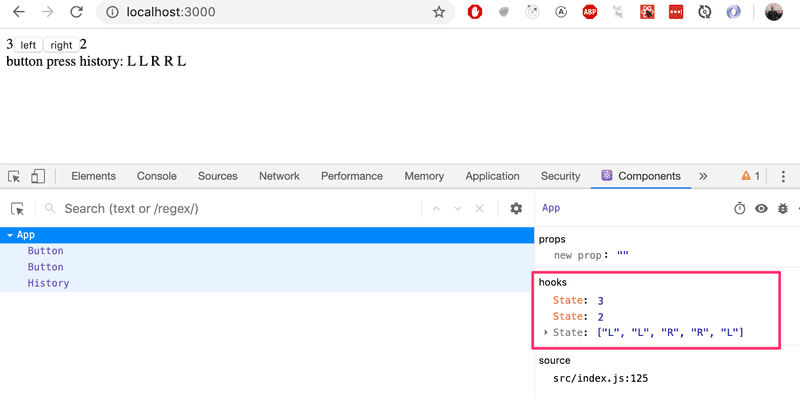
The first State contains the value of the left state, the next contains the value of the right state and the last contains the value of the allClicks state.
You can also learn about debugging JavaScript in Chrome, for example, with the Chrome DevTools guide video.
Rules of Hooks
There are a few limitations and rules that we have to follow to ensure that our application uses hooks-based state functions correctly.
The useState function (as well as the useEffect function introduced later on in the course) must not be called from inside of a loop, a conditional expression, or any place that is not a function defining a component. This must be done to ensure that the hooks are always called in the same order, and if this isn't the case the application will behave erratically.
To recap, hooks may only be called from the inside of a function body that defines a React component:
const App = () => {
  // these are ok
  const [age, setAge] = useState(0)
  const [name, setName] = useState('Juha Tauriainen')

  if ( age > 10 ) {
    // this does not work!
    const [foobar, setFoobar] = useState(null)
  }

  for ( let i = 0; i < age; i++ ) {
    // also this is not good
    const [rightWay, setRightWay] = useState(false)
  }

  const notGood = () => {
    // and this is also illegal
    const [x, setX] = useState(-1000)
  }

  return (
    //...
  )
}
Event Handling Revisited
Event handling has proven to be a difficult topic in previous iterations of this course.
For this reason, we will revisit the topic.
Let's assume that we're developing this simple application with the following component App:
const App = () => {
  const [value, setValue] = useState(10)

  return (
    <div>
      {value}
      <button>reset to zero</button>
    </div>
  )
}
We want the clicking of the button to reset the state stored in the value variable.
In order to make the button react to a click event, we have to add an event handler to it.
Event handlers must always be a function or a reference to a function. The button will not work if the event handler is set to a variable of any other type.
If we were to define the event handler as a string:
<button onClick="crap...">button</button>React would warn us about this in the console:
index.js:2178 Warning: Expected `onClick` listener to be a function, instead got a value of `string` type.
    in button (at index.js:20)
    in div (at index.js:18)
    in App (at index.js:27)
The following attempt would also not work:
<button onClick={value + 1}>button</button>We have attempted to set the event handler to value + 1 which simply returns the result of the operation. React will kindly warn us about this in the console:
index.js:2178 Warning: Expected `onClick` listener to be a function, instead got a value of `number` type.This attempt would not work either:
<button onClick={value = 0}>button</button>The event handler is not a function but a variable assignment, and React will once again issue a warning to the console. This attempt is also flawed in the sense that we must never mutate state directly in React.
What about the following:
<button onClick={console.log('clicked the button')}>
  button
</button>
The message gets printed to the console once when the component is rendered but nothing happens when we click the button. Why does this not work even when our event handler contains a function console.log?
The issue here is that our event handler is defined as a function call which means that the event handler is assigned the returned value from the function, which in the case of console.log is undefined.
The console.log function call gets executed when the component is rendered and for this reason, it gets printed once to the console.
The following attempt is flawed as well:
<button onClick={setValue(0)}>button</button>We have once again tried to set a function call as the event handler. This does not work. This particular attempt also causes another problem. When the component is rendered the function setValue(0) gets executed which in turn causes the component to be re-rendered. Re-rendering in turn calls setValue(0) again, resulting in an infinite recursion.
Executing a particular function call when the button is clicked can be accomplished like this:
<button onClick={() => console.log('clicked the button')}>
  button
</button>
Now the event handler is a function defined with the arrow function syntax () => console.log('clicked the button'). When the component gets rendered, no function gets called and only the reference to the arrow function is set to the event handler. Calling the function happens only once the button is clicked.
We can implement resetting the state in our application with this same technique:
<button onClick={() => setValue(0)}>button</button>The event handler is now the function () => setValue(0).
Defining event handlers directly in the attribute of the button is not necessarily the best possible idea.
You will often see event handlers defined in a separate place. In the following version of our application we define a function that then gets assigned to the handleClick variable in the body of the component function:
const App = () => {
  const [value, setValue] = useState(10)

  const handleClick = () =>
    console.log('clicked the button')

  return (
    <div>
      {value}
      <button onClick={handleClick}>button</button>
    </div>
  )
}
The handleClick variable is now assigned to a reference to the function. The reference is passed to the button as the onClick attribute:
<button onClick={handleClick}>button</button>Naturally, our event handler function can be composed of multiple commands. In these cases we use the longer curly brace syntax for arrow functions:
const App = () => {
  const [value, setValue] = useState(10)

  const handleClick = () => {    console.log('clicked the button')    setValue(0)  }
  return (
    <div>
      {value}
      <button onClick={handleClick}>button</button>
    </div>
  )
}
A function that returns a function
Another way to define an event handler is to use a function that returns a function.
You probably won't need to use functions that return functions in any of the exercises in this course. If the topic seems particularly confusing, you may skip over this section for now and return to it later.
Let's make the following changes to our code:
const App = () => {
  const [value, setValue] = useState(10)

  const hello = () => {    const handler = () => console.log('hello world')    return handler  }
  return (
    <div>
      {value}
      <button onClick={hello()}>button</button>
    </div>
  )
}
The code functions correctly even though it looks complicated.
The event handler is now set to a function call:
<button onClick={hello()}>button</button>Earlier on we stated that an event handler may not be a call to a function and that it has to be a function or a reference to a function. Why then does a function call work in this case?
When the component is rendered, the following function gets executed:
const hello = () => {
  const handler = () => console.log('hello world')

  return handler
}
The return value of the function is another function that is assigned to the handler variable.
When React renders the line:
<button onClick={hello()}>button</button>It assigns the return value of hello() to the onClick attribute. Essentially the line gets transformed into:
<button onClick={() => console.log('hello world')}>
  button
</button>
Since the hello function returns a function, the event handler is now a function.
What's the point of this concept?
Let's change the code a tiny bit:
const App = () => {
  const [value, setValue] = useState(10)

  const hello = (who) => {    const handler = () => {      console.log('hello', who)    }    return handler  }
  return (
    <div>
      {value}
      <button onClick={hello('world')}>button</button>      <button onClick={hello('react')}>button</button>      <button onClick={hello('function')}>button</button>    </div>
  )
}
Now the application has three buttons with event handlers defined by the hello function that accepts a parameter.
The first button is defined as
<button onClick={hello('world')}>button</button>The event handler is created by executing the function call hello('world'). The function call returns the function:
() => {
  console.log('hello', 'world')
}
The second button is defined as:
<button onClick={hello('react')}>button</button>The function call hello('react') that creates the event handler returns:
() => {
  console.log('hello', 'react')
}
Both buttons get their individualized event handlers.
Functions returning functions can be utilized in defining generic functionality that can be customized with parameters. The hello function that creates the event handlers can be thought of as a factory that produces customized event handlers meant for greeting users.
Our current definition is slightly verbose:
const hello = (who) => {
  const handler = () => {
    console.log('hello', who)
  }

  return handler
}
Let's eliminate the helper variables and directly return the created function:
const hello = (who) => {
  return () => {
    console.log('hello', who)
  }
}
Since our hello function is composed of a single return command, we can omit the curly braces and use the more compact syntax for arrow functions:
const hello = (who) =>
  () => {
    console.log('hello', who)
  }
Lastly, let's write all of the arrows on the same line:
const hello = (who) => () => {
  console.log('hello', who)
}
We can use the same trick to define event handlers that set the state of the component to a given value. Let's make the following changes to our code:
const App = () => {
  const [value, setValue] = useState(10)

  const setToValue = (newValue) => () => {    console.log('value now', newValue)  // print the new value to console    setValue(newValue)  }
  return (
    <div>
      {value}
      <button onClick={setToValue(1000)}>thousand</button>      <button onClick={setToValue(0)}>reset</button>      <button onClick={setToValue(value + 1)}>increment</button>    </div>
  )
}
When the component is rendered, the thousand button is created:
<button onClick={setToValue(1000)}>thousand</button>The event handler is set to the return value of setToValue(1000) which is the following function:
() => {
  console.log('value now', 1000)
  setValue(1000)
}
The increase button is declared as follows:
<button onClick={setToValue(value + 1)}>increment</button>The event handler is created by the function call setToValue(value + 1) which receives as its parameter the current value of the state variable value increased by one. If the value of value was 10, then the created event handler would be the function:
() => {
  console.log('value now', 11)
  setValue(11)
}
Using functions that return functions is not required to achieve this functionality. Let's return the setToValue function which is responsible for updating state into a normal function:
const App = () => {
  const [value, setValue] = useState(10)

  const setToValue = (newValue) => {
    console.log('value now', newValue)
    setValue(newValue)
  }

  return (
    <div>
      {value}
      <button onClick={() => setToValue(1000)}>
        thousand
      </button>
      <button onClick={() => setToValue(0)}>
        reset
      </button>
      <button onClick={() => setToValue(value + 1)}>
        increment
      </button>
    </div>
  )
}
We can now define the event handler as a function that calls the setToValue function with an appropriate parameter. The event handler for resetting the application state would be:
<button onClick={() => setToValue(0)}>reset</button>Choosing between the two presented ways of defining your event handlers is mostly a matter of taste.
Passing Event Handlers to Child Components
Let's extract the button into its own component:
const Button = (props) => (
  <button onClick={props.onClick}>
    {props.text}
  </button>
)
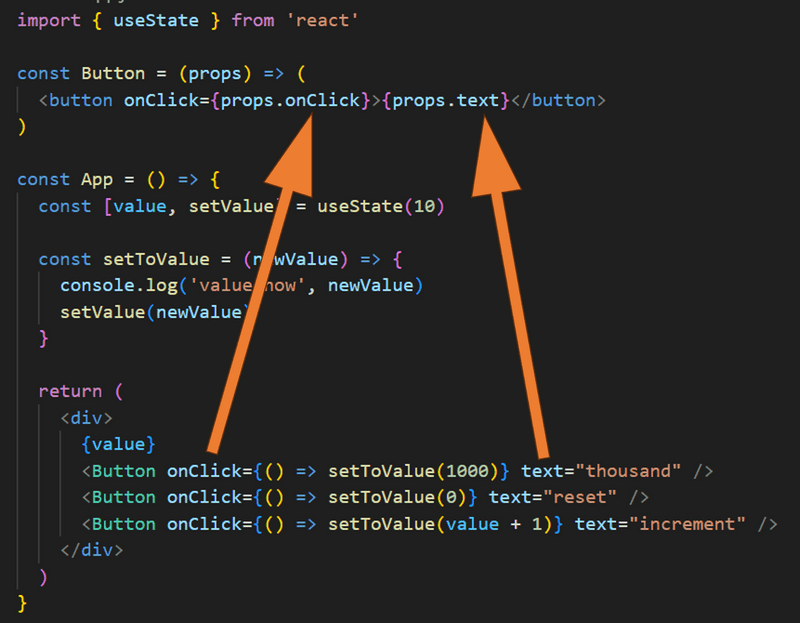
The component gets the event handler function from the onClick prop, and the text of the button from the text prop. Lets use the new component:
const App = (props) => {
  // ...
  return (
    <div>
      {value}
      <Button onClick={() => setToValue(1000)} text="thousand" />      <Button onClick={() => setToValue(0)} text="reset" />      <Button onClick={() => setToValue(value + 1)} text="increment" />    </div>
  )
}
Using the Button component is simple, although we have to make sure that we use the correct attribute names when passing props to the component.
Do Not Define Components Within Components
Let's start displaying the value of the application in its Display component.
We will change the application by defining a new component inside of the App component.
// This is the right place to define a component
const Button = (props) => (
  <button onClick={props.onClick}>
    {props.text}
  </button>
)

const App = () => {
  const [value, setValue] = useState(10)

  const setToValue = newValue => {
    console.log('value now', newValue)
    setValue(newValue)
  }

  // Do not define components inside another component
  const Display = props => <div>{props.value}</div>
  return (
    <div>
      <Display value={value} />      <Button onClick={() => setToValue(1000)} text="thousand" />
      <Button onClick={() => setToValue(0)} text="reset" />
      <Button onClick={() => setToValue(value + 1)} text="increment" />
    </div>
  )
}
The application still appears to work, but don't implement components like this! Never define components inside of other components. The method provides no benefits and leads to many unpleasant problems. The biggest problems are because React treats a component defined inside of another component as a new component in every render. This makes it impossible for React to optimize the component.
Let's instead move the Display component function to its correct place, which is outside of the App component function:
const Display = props => <div>{props.value}</div>

const Button = (props) => (
  <button onClick={props.onClick}>
    {props.text}
  </button>
)

const App = () => {
  const [value, setValue] = useState(10)

  const setToValue = newValue => {
    console.log('value now', newValue)
    setValue(newValue)
  }

  return (
    <div>
      <Display value={value} />
      <Button onClick={() => setToValue(1000)} text="thousand" />
      <Button onClick={() => setToValue(0)} text="reset" />
      <Button onClick={() => setToValue(value + 1)} text="increment" />
    </div>
  )
}
Useful Reading
The internet is full of React-related material. However, we use the new style of React for which a large majority of the material found online is outdated.
You may find the following links useful:
- The official React documentation is worth checking out at some point, although most of it will become relevant only later on in the course. Also, everything related to class-based components is irrelevant to us;
- Some courses on Egghead.io like Start learning React are of high quality, and the recently updated Beginner's Guide to React is also relatively good; both courses introduce concepts that will also be introduced later on in this course. NB The first one uses class components but the latter uses the new functional ones.
Web programmers oath
Programming is hard, that is why I will use all the possible means to make it easier
- I will have my browser developer console open all the time
- I progress with small steps
- I will write lots of console.log statements to make sure I understand how the code behaves and to help pinpointing problems
- If my code does not work, I will not write more code. Instead I will start deleting the code until it works or just return to a state when everything was still working
- When I ask for help in the course Discord channel or elsewhere I formulate my questions properly, see here how to ask for help
Utilization of Large language models
Large language models such as ChatGPT, Claude and GitHub Copilot have proven to be very useful in software development.
Personally, I mainly use Copilot, which integrates seamlessly with VS Code thanks to the plugin.
Copilot is useful in a wide variety of scenarios. Copilot can be asked to generate code for an open file by describing the desired functionality in text:
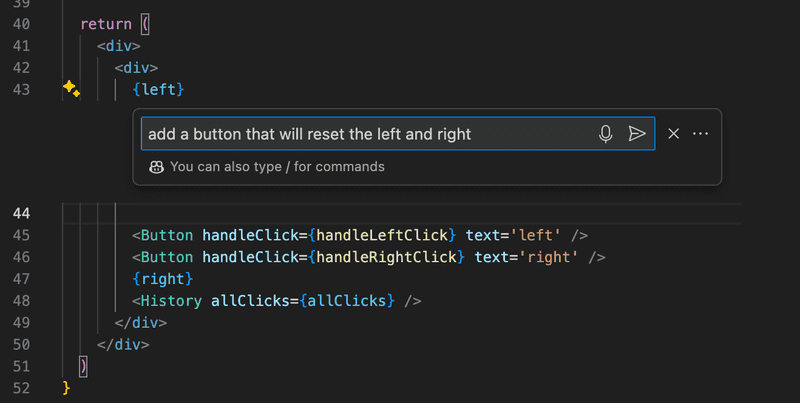
If the code looks good, Copilot adds it to the file:

In the case of our example, Copilot only created a button, the event handler handleResetClick is undefined.
An event handler may also be generated. By writing the first line of the function, Copilot offers the functionality to be generated:
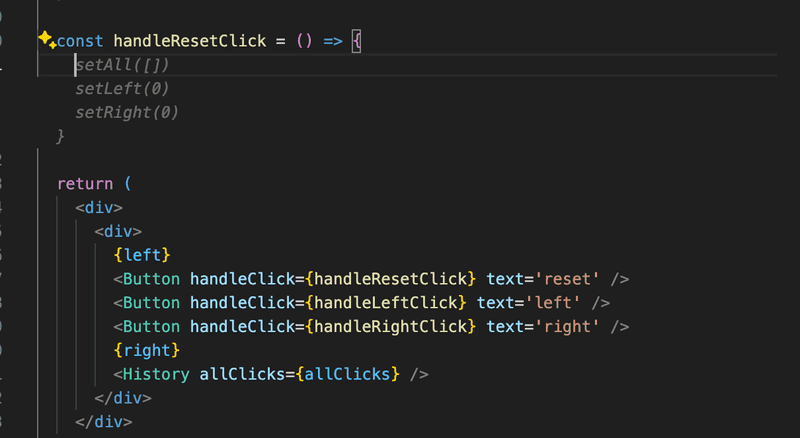
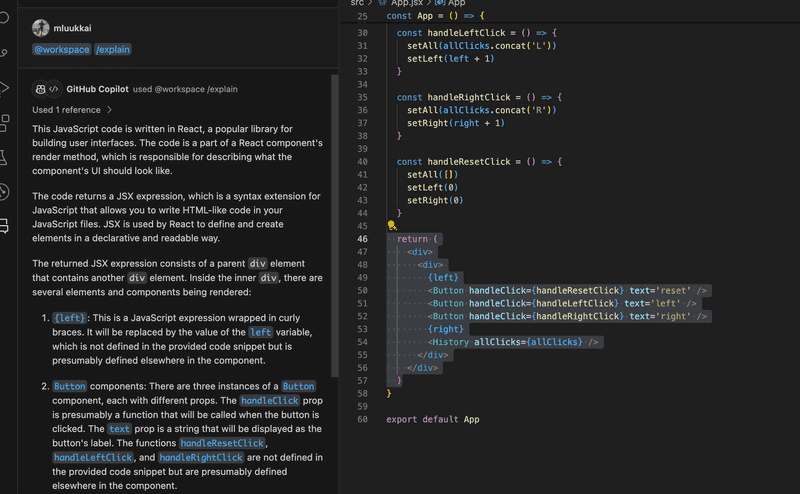
In Copilot's chat window, it is possible to ask for an explanation of the function of the painted code area:
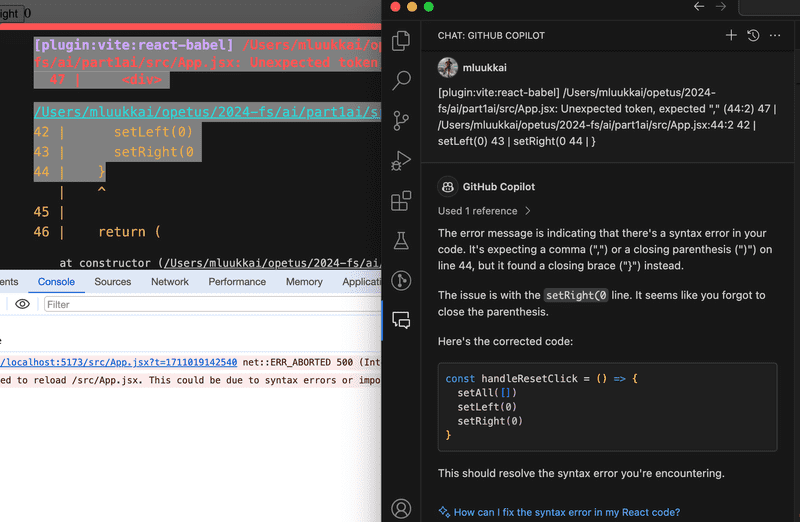
Copilot is also useful in error situations, by copying the error message into Copilot's chat, you will get an explanation of the problem and a suggested fix:
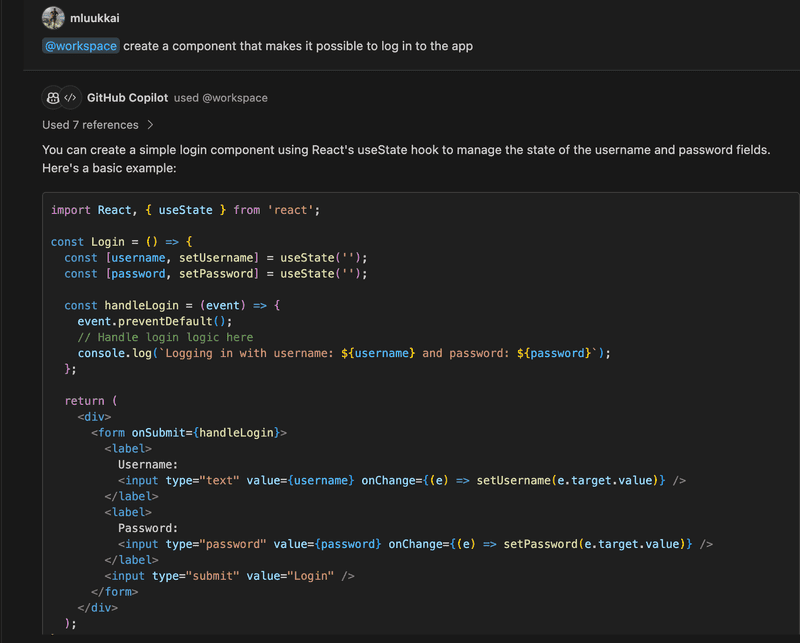
Copilot's chat also enables the creation of larger set of functionality
The degree of usefulness of the hints provided by Copilot and other language models varies. Perhaps the biggest problem with language models is hallucination, they sometimes generate completely convincing-looking answers, which, however, are completely wrong. When programming, of course, the hallucinated code is often caught quickly if the code does not work. More problematic situations are those where the code generated by the language model seems to work, but it contains more difficult to detect bugs or e.g. security vulnerabilities.
Another problem in applying language models to software development is that it is difficult for language models to "understand" larger projects, and e.g. to generate functionality that would require changes to several files. Language models are also currently unable to generalize code, i.e. if the code has, for example, existing functions or components that the language model could use with minor changes for the requested functionality, the language model will not bend to this. The result of this can be that the code base deteriorates, as the language models generate a lot of repetition in the code, see more e.g. here.
When using language models, the responsibility always stays with the programmer.
The rapid development of language models puts the student of programming in a challenging position: is it worth and is it even necessary to learn programming in a detailed level, when you can get almost everything ready-made from language models?
At this point, it is worth remembering the old wisdom of Brian Kerningham, co-author of The C Programming Language:

In other words, since debugging is twice as difficult as programming, it is not worth programming such code that you can only barely understand. How can debugging be even possible in a situation where programming is outsourced to a language model and the software developer does not understand the debugged code at all?
So far, the development of language models and artificial intelligence is still at the stage where they are not self-sufficient, and the most difficult problems are left for humans to solve. Because of this, even novice software developers must learn to program really well just in case. It may be that, despite the development of language models, even more in-depth knowledge is needed. Artificial intelligence does the easy things, but a human is needed to sort out the most complicated messes caused by AI. GitHub Copilot is a very well-named product, it's Copilot, a second pilot who helps the main pilot in an aircraft. The programmer is still the main pilot, the captain, and bears the ultimate responsibility.
It may be in your own interest that you turn off Copilot by default when you do this course and rely on it only in a real emergency.

