e
Fragments 与 subscriptions
我们已经接近这部分的尾声了。让我们最后再看看GraphQL的一些细节。
Fragments
在GraphQL中,多个查询返回类似的结果是很常见的。例如,对一个人的详细资料的查询
query {
  findPerson(name: "Pekka Mikkola") {
    name
    phone
    address{
      street
      city
    }
  }
}
和所有的人的查询
query {
  allPersons {
    name
    phone
    address{
      street
      city
    }
  }
}
都会返回人。当选择要返回的字段时,两个查询必须定义完全相同的字段。
这种情况可以通过使用fragments来简化。让我们声明一个片段来选择一个人的所有字段。
fragment PersonDetails on Person {
  name
  phone
  address {
    street
    city
  }
}
有了这个片段,我们可以用紧凑的形式进行查询。
query {
  allPersons {
    ...PersonDetails  }
}

query {
  findPerson(name: "Pekka Mikkola") {
    ...PersonDetails  }
}片段不是定义在GraphQL模式中,而是在客户端中。当客户端使用这些片段进行查询时,这些片段必须被声明。
原则上,我们可以像这样在每个查询中声明片段。
export const FIND_PERSON = gql`
  query findPersonByName($nameToSearch: String!) {
    findPerson(name: $nameToSearch) {
      ...PersonDetails
    }
  }

  fragment PersonDetails on Person {
    name
    phone
    address {
      street
      city
    }
  }
`
然而,最好是一次性声明片段并将其保存在一个变量中。
const PERSON_DETAILS = gql`
  fragment PersonDetails on Person {
    id
    name
    phone
    address {
      street
      city
    }
  }
`这样声明后,该片段可以用美元符号和大括号放置到任何查询或改变中。
export const FIND_PERSON = gql`
  query findPersonByName($nameToSearch: String!) {
    findPerson(name: $nameToSearch) {
      ...PersonDetails
    }
  }
  ${PERSON_DETAILS}
`
Subscriptions
除了查询和改变类型之外,GraphQL还提供了第三种操作类型。subscriptions。通过订阅,客户可以订阅关于服务器中变化的更新。
订阅与我们到目前为止在本课程中看到的任何东西都有根本的不同。到目前为止,浏览器和服务器之间的所有交互都是由于浏览器中的React应用向服务器发出HTTP请求。GraphQL查询和改变也是这样做的。
有了订阅,情况就相反了。在一个应用进行了订阅后,它开始监听服务器。
当服务器上发生变化时,它会向所有的订阅者发送一个通知。
从技术上讲,HTTP协议并不适合于从服务器到浏览器的通信。因此,Apollo使用WebSockets进行服务器用户的通信。
Refactoring the backend
自从3.0版本以来,Apollo服务器没有提供对订阅的支持,所以我们需要做一些改变来设置它。让我们也清理一下应用的结构。
让我们从提取模式定义到文件开始 schema.js
const { gql } = require('apollo-server')

const typeDefs = gql`
  type User {
    username: String!
    friends: [Person!]!
    id: ID!
  }

  type Token {
    value: String!
  }

  type Address {
    street: String!
    city: String!
  }

  type Person {
    name: String!
    phone: String
    address: Address!
    id: ID!
  }

  enum YesNo {
    YES
    NO
  }

  type Query {
    personCount: Int!
    allPersons(phone: YesNo): [Person!]!
    findPerson(name: String!): Person
    me: User
  }

  type Mutation {
    addPerson(
      name: String!
      phone: String
      street: String!
      city: String!
    ): Person
    editNumber(name: String!, phone: String!): Person
    createUser(username: String!): User
    login(username: String!, password: String!): Token
    addAsFriend(name: String!): User
  }
`
module.exports = typeDefs解析器的定义被移到文件resolvers.js中。
const { UserInputError, AuthenticationError } = require('apollo-server')
const jwt = require('jsonwebtoken')
const Person = require('./models/person')
const User = require('./models/user')

const JWT_SECRET = 'NEED_HERE_A_SECRET_KEY'

const resolvers = {
  Query: {
    personCount: async () => Person.collection.countDocuments(),
    allPersons: async (root, args) => {
      if (!args.phone) {
        return Person.find({})
      }

      return Person.find({ phone: { $exists: args.phone === 'YES' } })
    },
    findPerson: async (root, args) => Person.findOne({ name: args.name }),
    me: (root, args, context) => {
      return context.currentUser
    },
  },
  Person: {
    address: (root) => {
      return {
        street: root.street,
        city: root.city,
      }
    },
  },
  Mutation: {
    addPerson: async (root, args, context) => {
      const currentUser = context.currentUser

      if (!currentUser) {
        throw new AuthenticationError('not authenticated')
      }

      const person = new Person({ ...args })
      try {
        await person.save()
        currentUser.friends = currentUser.friends.concat(person)
        await currentUser.save()
      } catch (error) {
        throw new UserInputError(error.message, {
          invalidArgs: args,
        })
      }

      return person
    },
    editNumber: async (root, args) => {
      const person = await Person.findOne({ name: args.name })
      person.phone = args.phone

      try {
        await person.save()
      } catch (error) {
        throw new UserInputError(error.message, {
          invalidArgs: args,
        })
      }
      return person.save()
    },
    createUser: async (root, args) => {
      const user = new User({ username: args.username })

      return user.save().catch((error) => {
        throw new UserInputError(error.message, {
          invalidArgs: args,
        })
      })
    },
    login: async (root, args) => {
      const user = await User.findOne({ username: args.username })

      if (!user || args.password !== 'secret') {
        throw new UserInputError('wrong credentials')
      }

      const userForToken = {
        username: user.username,
        id: user._id,
      }

      return { value: jwt.sign(userForToken, JWT_SECRET) }
    },
    addAsFriend: async (root, args, { currentUser }) => {
      const nonFriendAlready = (person) =>
        !currentUser.friends.map(f => f._id.toString()).includes(person._id.toString())

      if (!currentUser) {
        throw new AuthenticationError('not authenticated')
      }

      const person = await Person.findOne({ name: args.name })
      if (nonFriendAlready(person)) {
        currentUser.friends = currentUser.friends.concat(person)
      }

      await currentUser.save()

      return currentUser
    },
  },
}

module.exports = resolvers接下来我们将用Apollo Server Express替换Apollo服务器。下面的库被安装
npm install apollo-server-express apollo-server-core express @graphql-tools/schema并且文件index.js改变为。
const { ApolloServer } = require('apollo-server-express')
const { ApolloServerPluginDrainHttpServer } = require('apollo-server-core')
const { makeExecutableSchema } = require('@graphql-tools/schema')
const express = require('express')
const http = require('http')

const jwt = require('jsonwebtoken')

const JWT_SECRET = 'NEED_HERE_A_SECRET_KEY'

const mongoose = require('mongoose')

const User = require('./models/user')

const typeDefs = require('./schema')
const resolvers = require('./resolvers')

const MONGODB_URI =
  'MONGODB_URI'

console.log('connecting to', MONGODB_URI)

mongoose
  .connect(MONGODB_URI)
  .then(() => {
    console.log('connected to MongoDB')
  })
  .catch((error) => {
    console.log('error connection to MongoDB:', error.message)
  })

// setup is now within a function
const start = async () => {
  const app = express()
  const httpServer = http.createServer(app)

  const schema = makeExecutableSchema({ typeDefs, resolvers })

  const server = new ApolloServer({
    schema,
    context: async ({ req }) => {
      const auth = req ? req.headers.authorization : null
      if (auth && auth.toLowerCase().startsWith('bearer ')) {
        const decodedToken = jwt.verify(auth.substring(7), JWT_SECRET)
        const currentUser = await User.findById(decodedToken.id).populate(
          'friends'
        )
        return { currentUser }
      }
    },
    plugins: [ApolloServerPluginDrainHttpServer({ httpServer })],
  })

  await server.start()

  server.applyMiddleware({
    app,
    path: '/',
  })

  const PORT = 4000

  httpServer.listen(PORT, () =>
    console.log(`Server is now running on http://localhost:${PORT}`)
  )
}

// call the function that does the setup and starts the server
start()后端代码可以在GitHub找到,分支part8-6。
Subscriptions on the server
让我们实现订阅,以订阅关于新增人员的通知。
模式是这样变化的。
type Subscription {
  personAdded: Person!
}
所以当一个新的人被添加时,它的所有细节都会被发送给所有的订阅者。
首先,我们要安装两个包,用于在GraphQL中添加订阅。
npm install subscriptions-transport-ws graphql-subscriptions文件index.js被改为
const { execute, subscribe } = require('graphql')const { SubscriptionServer } = require('subscriptions-transport-ws')
// ...

const start = async () => {
  const app = express()
  const httpServer = http.createServer(app)

  const schema = makeExecutableSchema({ typeDefs, resolvers })

  const subscriptionServer = SubscriptionServer.create(    {      schema,      execute,      subscribe,    },    {      server: httpServer,      path: '',    }  )
  const server = new ApolloServer({
    schema,
    context: async ({ req }) => {
      const auth = req ? req.headers.authorization : null
      if (auth && auth.toLowerCase().startsWith('bearer ')) {
        const decodedToken = jwt.verify(auth.substring(7), JWT_SECRET)
        const currentUser = await User.findById(decodedToken.id).populate(
          'friends'
        )
        return { currentUser }
      }
    },
    plugins: [
      ApolloServerPluginDrainHttpServer({ httpServer }),
      {        async serverWillStart() {          return {            async drainServer() {              subscriptionServer.close()            },          }        },      },    ],
  })

  await server.start()

  server.applyMiddleware({
    app,
    path: '/',
  })

  const PORT = 4000

  httpServer.listen(PORT, () =>
    console.log(`Server is now running on http://localhost:${PORT}`)
  )
}

start()订阅personAdded需要一个解析器。addPerson的解析器也要修改,以便向订阅者发送通知。
需要的修改如下。
const { PubSub } = require('graphql-subscriptions')const pubsub = new PubSub()
  Mutation: {
    addPerson: async (root, args, context) => {
      const person = new Person({ ...args })
      const currentUser = context.currentUser

      if (!currentUser) {
        throw new AuthenticationError("not authenticated")
      }

      try {
        await person.save()
        currentUser.friends = currentUser.friends.concat(person)
        await currentUser.save()
      } catch (error) {
        throw new UserInputError(error.message, {
          invalidArgs: args,
        })
      }

      pubsub.publish('PERSON_ADDED', { personAdded: person })
      return person
    },
  },
Subscription: { personAdded: { subscribe: () => pubsub.asyncIterableIterator(['PERSON_ADDED']) }, },通过订阅,通信是利用对象PubSub的发布-订阅原则进行的。添加一个新的人发布一个关于该操作的通知给所有使用PubSub's方法publish的订阅者。
personAdded订阅解析器通过返回一个合适的迭代器对象来注册所有的订阅者。
可以这样用Apollo Explorer来测试订阅。
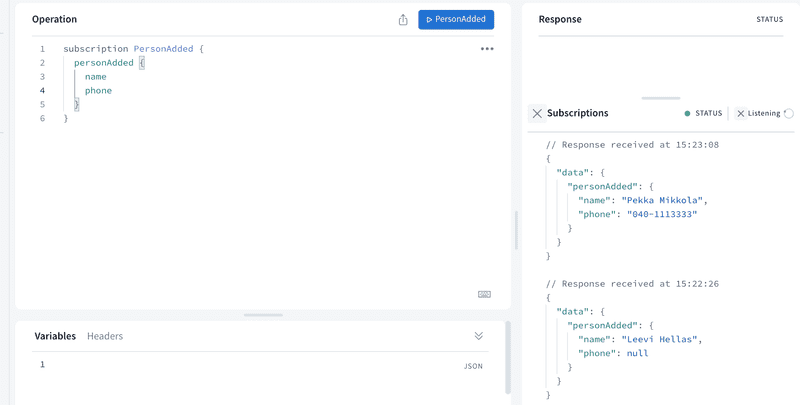
当蓝色按钮PersonAdded被按下时,资源管理器开始等待一个新的人被添加。一旦添加,添加的人的信息就会出现在资源管理器的右侧。
后端代码可以在GitHub找到,分支part8-7。
Subscriptions on the client
为了在我们的React应用中使用订阅,我们必须做一些改变,特别是在其配置上。
index.js中的配置必须这样修改。
import {
  ApolloClient, InMemoryCache, createHttpLink,
  split} from '@apollo/client'
import { ApolloProvider } from '@apollo/client/react'
import { setContext } from 'apollo-link-context'

import { getMainDefinition } from '@apollo/client/utilities'import { WebSocketLink } from '@apollo/client/link/ws'
const authLink = setContext((_, { headers }) => {
  const token = localStorage.getItem('phonenumbers-user-token')
  return {
    headers: {
      ...headers,
      authorization: token ? `bearer ${token}` : null,
    }
  }
})

const httpLink = new HttpLink({
  uri: 'http://localhost:4000',
})

const wsLink = new WebSocketLink({  uri: `ws://localhost:4000/graphql`,  options: {    reconnect: true  }})
const splitLink = split(  ({ query }) => {    const definition = getMainDefinition(query)    return (      definition.kind === 'OperationDefinition' &&      definition.operation === 'subscription'    );  },  wsLink,  authLink.concat(httpLink),)
const client = new ApolloClient({
  cache: new InMemoryCache(),
  link: splitLink})

ReactDOM.render(
  <ApolloProvider client={client}>
    <App />
  </ApolloProvider>,
  document.getElementById('root')
)
为了让它工作,我们必须安装一些依赖项。
npm install @apollo/client subscriptions-transport-ws新的配置是由于应用必须有一个HTTP连接,以及一个与GraphQL服务器的WebSocket连接。
const wsLink = new WebSocketLink({
  uri: `ws://localhost:4000/graphql`,
  options: { reconnect: true }
})

const httpLink = createHttpLink({
  uri: 'http://localhost:4000',
})订阅是使用useSubscription挂钩函数完成的。
让我们这样修改代码。
export const PERSON_ADDED = gql`  subscription {    personAdded {      ...PersonDetails    }  }  ${PERSON_DETAILS}`
import {
  useQuery, useMutation, useSubscription, useApolloClient} from '@apollo/client/react'

const App = () => {
  // ...

  useSubscription(PERSON_ADDED, {
    onData: ({ data }) => {
      console.log(data)
    }
  })

  // ...
}
当一个新的人被添加到电话簿中,无论在哪里完成,新的人的详细信息都会被打印到客户端的控制台。
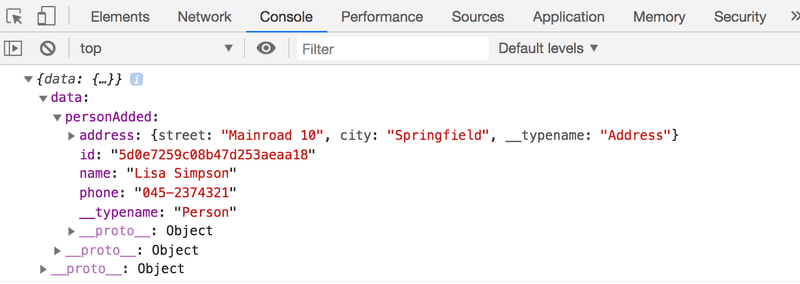
当一个新的人被添加时,服务器向客户端发送一个通知,在onData属性中定义的回调函数被调用,并给出新的人的细节作为参数。
让我们扩展我们的解决方案,当收到一个新的人的详细资料时,这个人被添加到Apollo缓存中,所以它被立即渲染到屏幕上。
const App = () => {
  // ...

  useSubscription(PERSON_ADDED, {
    onData: ({ data }) => {
      const addedPerson = data.data.personAdded
      notify(`${addedPerson.name} added`)

      client.cache.updateQuery({ query: ALL_PERSONS }, ({ allPersons }) => {        return {          allPersons: allPersons.concat(addedPerson),        }      })    }
  })

  // ...
}我们的解决方案有一个小问题:一个人被添加到缓存中,也被渲染了两次,因为组件PersonForm也在将其添加到缓存中。
现在让我们通过确保一个人不会被添加到缓存中两次来解决这个问题。
// function that takes care of manipulating cacheexport const updateCache = (cache, query, addedPerson) => {  const uniqByName = (a) => {    let seen = new Set()    return a.filter((item) => {      let k = item.name      return seen.has(k) ? false : seen.add(k)    })  }  cache.updateQuery(query, ({ allPersons }) => {    return {      allPersons: uniqByName(allPersons.concat(addedPerson)),    }  })}
const App = () => {
  const result = useQuery(ALL_PERSONS)
  const [errorMessage, setErrorMessage] = useState(null)
  const [token, setToken] = useState(null)
  const client = useApolloClient()

  useSubscription(PERSON_ADDED, {
    onData: ({ data, client }) => {
      const addedPerson = data.data.personAdded
      notify(`${addedPerson.name} added`)
      updateCache(client.cache, { query: ALL_PERSONS }, addedPerson)    },
  })

  // ...
}函数updateCache也可用于PersonForm的缓存更新。
import { updateCache } from '../App'
const PersonForm = ({ setError }) => {
  // ...

  const [createPerson] = useMutation(CREATE_PERSON, {
    onError: (error) => {
      setError(error.graphQLErrors[0].message)
    },
    update: (cache, response) => {
      updateCache(cache, { query: ALL_PERSONS }, response.data.addPerson)    },
  })

  // ..
}客户端的最终代码可以在GitHub上找到,分支part8-9。
n+1 problem
首先,你需要在你的后端项目目录中通过mongoose启用一个调试选项,添加一行代码,如下所示。
mongoose.connect(MONGODB_URI)
  .then(() => {
    console.log('connected to MongoDB')
  })
  .catch((error) => {
    console.log('error connection to MongoDB:', error.message)
  })

mongoose.set('debug', true);让我们在后端添加一些东西。让我们修改模式,使Person类型有一个friendOf字段,它告诉人们这个人在谁的朋友名单上。
type Person {
  name: String!
  phone: String
  address: Address!
  friendOf: [User!]!
  id: ID!
}
该应用应该支持以下查询。
query {
  findPerson(name: "Leevi Hellas") {
    friendOf {
      username
    }
  }
}因为friendOf不是数据库中Person对象的字段,我们必须为它创建一个解析器,它可以解决这个问题。让我们首先创建一个返回空列表的解析器。
Person: {
  address: (root) => {
    return {
      street: root.street,
      city: root.city
    }
  },
friendOf: (root) => { // return list of users return [ ] }},参数root是正在创建朋友列表的人的对象,所以我们从所有的User对象中搜索那些在朋友列表中有root._id的对象。
  Person: {
    // ...
    friendOf: async (root) => {
      const friends = await User.find({
        friends: {
          $in: [root._id]
        }
      })

      return friends
    }
  },
现在应用工作了。
我们可以立即进行更复杂的查询。例如,有可能找到所有用户的朋友。
query {
  allPersons {
    name
    friendOf {
      username
    }
  }
}
然而,我们的解决方案有一个问题:它对数据库的查询量过大。如果我们把每一个查询记录到数据库,就像这样,例如。
Query: {
  allPersons: (root, args) => {
    console.log('Person.find')    if (!args.phone) {      return Person.find({})    }    return Person.find({ phone: { $exists: args.phone === 'YES' } })  }

// ..

},

// ..

friendOf: async (root) => {
  const friends = await User.find({ friends: { $in: [root._id] } })  console.log("User.find")  return friends
},并且考虑到我们有5个人被保存,并且我们查询allPersons,没有phone作为参数,我们看到一个荒谬的查询量,如下。
Person.find
User.find
User.find
User.find
User.find
User.find
所以尽管我们主要对所有的人做一个查询,但每个人都会在他们的解析器中引起一个更多的查询。
这是著名的n+1问题的一种表现,它在不同的背景下时常出现,有时会在开发者不知不觉中悄悄出现。
n+1问题的正确解决方案取决于情况。通常,它需要使用某种连接查询,而不是多个单独的查询。
在我们的情况下,最简单的解决方案是在每个Person对象上保存他们的朋友列表。
const schema = new mongoose.Schema({
  name: {
    type: String,
    required: true,
    minlength: 5
  },
  phone: {
    type: String,
    minlength: 5
  },
  street: {
    type: String,
    required: true,
    minlength: 5
  },
  city: {
    type: String,
    required: true,
    minlength: 5
  },
  friendOf: [    {      type: mongoose.Schema.Types.ObjectId,      ref: 'User'    }  ],})
然后我们可以做一个 "连接查询",或者在我们获取Person对象的时候填充friendOf字段。
Query: {
  allPersons: (root, args) => {
    console.log('Person.find')
    if (!args.phone) {
      return Person.find({}).populate('friendOf')    }

    return Person.find({ phone: { $exists: args.phone === 'YES' } })
      .populate('friendOf')  },
  // ...
}改变之后,我们就不需要为friendOf字段单独的解析器了。
如果我们只获取姓名和电话号码,allPersons查询不会导致n+1的问题。
query {
  allPersons {
    name
    phone
  }
}如果我们修改allPersons做一个连接查询,因为它有时会引起一个n+1的问题,当我们不需要相关人员的信息时,它就会变得更重。通过使用解析器函数的第四参数,我们可以进一步优化查询。第四个参数可以用来检查查询本身,所以我们可以只在预测有n+1个问题威胁的情况下进行连接查询。然而,在我们确定值得这样做之前,我们不应该跳到这个级别的优化。
程序员们浪费了大量的时间来考虑或担心他们程序中非关键部分的速度,而当考虑到调试和维护时,这些对效率的尝试实际上有很大的负面影响。我们应该忘记小的效率,比如说大约97%的时间。过早的优化是万恶之源。。
Facebook's DataLoader 库为n+1问题以及其他问题提供了一个很好的解决方案。更多关于在Apollo服务器上使用DataLoader的信息这里和这里。
Epilogue
我们在这部分创建的应用的结构并不理想:我们做了一些清理工作,但仍需要做很多事情。在互联网上可以找到更好的GraphQL应用结构的例子。例如,对于服务器
GraphQL已经是一个相当古老的技术,从2012年开始被Facebook使用,所以我们可以看到它已经是 "经过战斗考验的"。自从Facebook在2015年发布GraphQL以来,它慢慢得到了越来越多的关注,并可能在不久的将来威胁到REST的统治地位。REST的死亡也已经被预测。即使这还不会发生,GraphQL也绝对值得学习。
Exercises 8.23.-8.26.
8.23: Subscriptions - server
为订阅bookAdded做一个后端实现,它将所有新书的细节返回给它的订阅者。
8.24: Subscriptions - client, part 1
在客户端开始使用订阅,并订阅bookAdded。当新书被添加时,通知用户。任何方法都可以。例如,你可以使用window.alert函数。
8.25: Subscriptions - client, part 2
当服务器通知新书时,保持应用的视图更新。你可以通过在两个浏览器标签中打开应用,在一个标签中添加新书来测试你的实现。添加新书应该更新两个标签的视图。
8.26: n+1
用任何你喜欢的方法解决下面查询的n+1问题。
query {
  allAuthors {
    name
    bookCount
  }
}
Submitting exercises and getting the credits
这一部分的练习是通过提交系统提交的,就像前几部分一样,但与前几部分不同,提交到不同的 "课程实例"。请记住,你必须完成至少22道练习才能通过这一部分!
一旦你完成了练习并想获得学分,请通过练习提交系统告诉我们你已经完成了课程。
注意 "在Moodle中完成考试 "的说明是指全栈开放课程的考试,在你从这部分获得学分之前必须完成。
注意你需要注册相应的课程部分以获得注册的学分,更多信息见这里。
你可以通过点击其中一个旗帜图标下载完成这部分的证书。旗帜图标与证书的语言相对应。