e
到目前为止,我们在react-redux的hook-api的帮助下使用我们的redux-store。
实际上这意味着使用useSelector和useDispatch函数。
为了完成这一部分,我们将研究另一种更古老、更复杂的使用redux的方式,即 react-redux 提供的 connect 函数。
In new applications you should absolutely use the hook-api, but knowing how to use connect is useful when maintaining older projects using redux.
Using the connect-function to share the redux store to components
让我们修改Notes组件,使其不再使用hook-api(useDispatch 和 useSelector 函数)而是使用 connect 函数。
我们必须修改该组件的以下部分。
import { useDispatch, useSelector } from 'react-redux'import { toggleImportanceOf } from '../reducers/noteReducer'

const Notes = () => {
  const dispatch = useDispatch()  const notes = useSelector(({filter, notes}) => {    if ( filter === 'ALL' ) {      return notes    }    return filter === 'IMPORTANT'      ? notes.filter(note => note.important)      : notes.filter(note => !note.important)  })
  return(
    <ul>
      {notes.map(note =>
        <Note
          key={note.id}
          note={note}
          handleClick={() =>
            dispatch(toggleImportanceOf(note.id))          }
        />
      )}
    </ul>
  )
}

export default Notes
connect 函数可以用来转换 "常规 "的React组件,这样Redux商店的状态就可以 "映射 "到组件的props中。
让我们首先使用connect函数将我们的Notes组件转换成connected component。
import { connect } from 'react-redux'import { toggleImportanceOf } from '../reducers/noteReducer'

const Notes = () => {
  // ...
}

const ConnectedNotes = connect()(Notes)export default ConnectedNotes该模块导出了连接组件,其工作原理与之前的普通组件完全相同。
该组件需要Redux商店中的笔记列表和过滤器的值。connect函数接受一个所谓的mapStateToProps函数作为其第一个参数。该函数可用于定义连接组件的prop,这些prop是基于Redux商店的状态。
如果我们定义。
const Notes = (props) => {  const dispatch = useDispatch()

  const notesToShow = () => {    if ( props.filter === 'ALL' ) {      return props.notes    }    return props.filter  === 'IMPORTANT'      ? props.notes.filter(note => note.important)      : props.notes.filter(note => !note.important)  }
  return(
    <ul>
      {notesToShow().map(note =>        <Note
          key={note.id}
          note={note}
          handleClick={() =>
            dispatch(toggleImportanceOf(note.id))
          }
        />
      )}
    </ul>
  )
}

const mapStateToProps = (state) => {
  return {
    notes: state.notes,
    filter: state.filter,
  }
}

const ConnectedNotes = connect(mapStateToProps)(Notes)
export default ConnectedNotesNotes组件可以直接访问商店的状态,例如,通过包含笔记列表的props.notes。 类似地,props.filter引用过滤器的值。
使用connect和我们定义的mapStateToProps函数所产生的情况可以这样可视化。
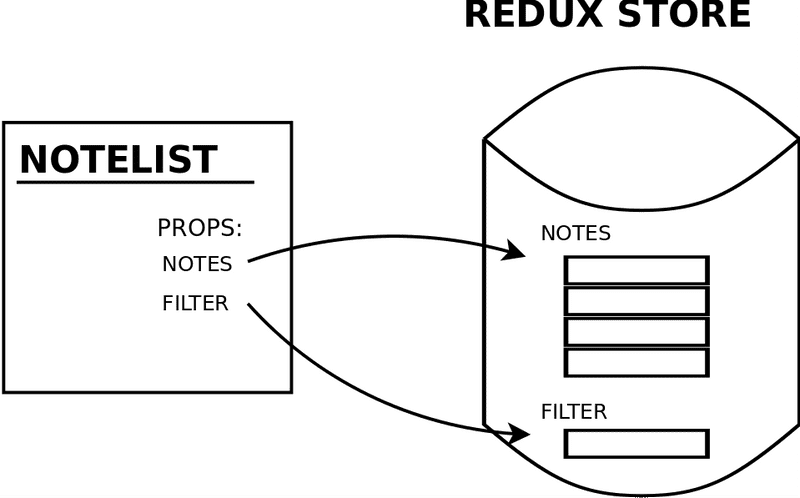
Notes组件可以通过props.notes和props.filter"直接访问 "Redux商店的状态。
NoteList组件实际上不需要关于哪个过滤器被选中的信息,所以我们可以将过滤逻辑移到其他地方。
我们只需要在notesprop中给它正确的过滤的笔记。
const Notes = (props) => {
  const dispatch = useDispatch()

  return(
    <ul>
      {props.notes.map(note =>
        <Note
          key={note.id}
          note={note}
          handleClick={() =>
            dispatch(toggleImportanceOf(note.id))
          }
        />
      )}
    </ul>
  )
}

const mapStateToProps = (state) => {  if ( state.filter === 'ALL' ) {    return {      notes: state.notes    }  }  return {    notes: (state.filter  === 'IMPORTANT'      ? state.notes.filter(note => note.important)      : state.notes.filter(note => !note.important)    )  }}
const ConnectedNotes = connect(mapStateToProps)(Notes)
export default ConnectedNotes
mapDispatchToProps
现在我们已经摆脱了useSelector,但是Notes仍然使用useDispatch钩子和返回它的dispatch函数。
const Notes = (props) => {
  const dispatch = useDispatch()
  return(
    <ul>
      {props.notes.map(note =>
        <Note
          key={note.id}
          note={note}
          handleClick={() =>
            dispatch(toggleImportanceOf(note.id))          }
        />
      )}
    </ul>
  )
}connect函数的第二个参数可用于定义mapDispatchToProps,这是一组action creator函数,作为props传递给连接的组件。让我们对我们现有的连接操作做如下修改。
const mapStateToProps = (state) => {
  return {
    notes: state.notes,
    filter: state.filter,
  }
}

const mapDispatchToProps = {  toggleImportanceOf,}
const ConnectedNotes = connect(
  mapStateToProps,
  mapDispatchToProps)(Notes)

export default ConnectedNotes现在,组件可以直接调度由toggleImportanceOf动作创建者定义的动作,通过其props调用该函数。
const Notes = (props) => {
  return(
    <ul>
      {props.notes.map(note =>
        <Note
          key={note.id}
          note={note}
          handleClick={() => props.toggleImportanceOf(note.id)}
        />
      )}
    </ul>
  )
}
这意味着,不再像这样调度动作了。
dispatch(toggleImportanceOf(note.id))当使用connect时,我们可以简单地这样做。
props.toggleImportanceOf(note.id)没有必要单独调用dispatch函数,因为connect已经将toggleImportanceOf动作创建者修改为包含调度的形式。
你可能需要一些时间来理解mapDispatchToProps的工作原理,尤其是当我们看了一个使用它的替代方法。
使用connect所产生的情况可以被可视化为这样。
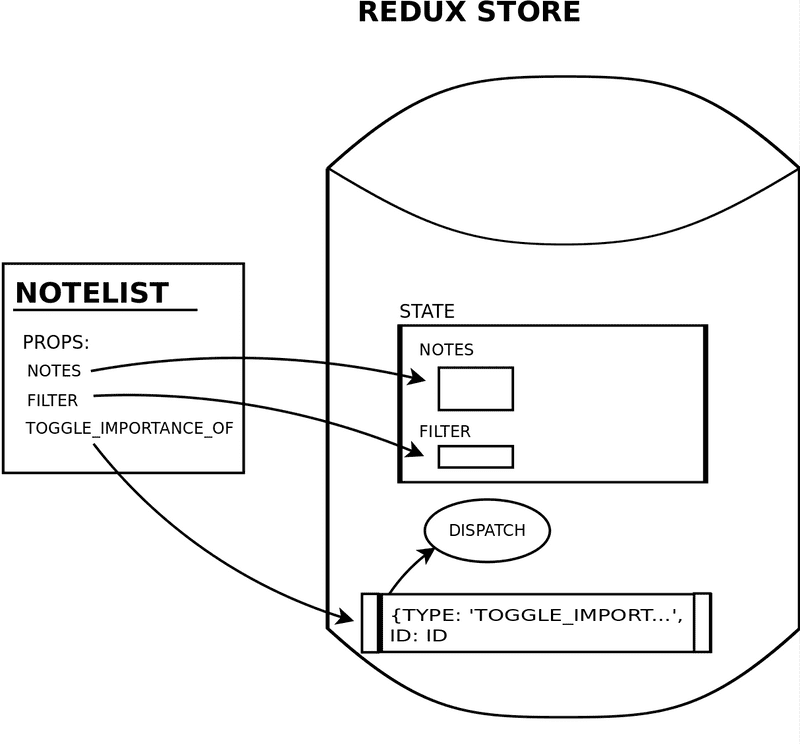
除了通过props.notes和props.filter访问商店的状态外,该组件还引用了一个函数,该函数可用于通过其toggleImportanceOfprop调度notes/toggleImportanceOf型动作。
新重构的Notes组件的代码如下所示:
import { connect } from 'react-redux'
import { toggleImportanceOf } from '../reducers/noteReducer'

const Notes = (props) => {
  return(
    <ul>
      {props.notes.map(note =>
        <Note
          key={note.id}
          note={note}
          handleClick={() => props.toggleImportanceOf(note.id)}
        />
      )}
    </ul>
  )
}

const mapStateToProps = (state) => {
  if ( state.filter === 'ALL' ) {
    return {
      notes: state.notes
    }
  }

  return {
    notes: (state.filter  === 'IMPORTANT'
    ? state.notes.filter(note => note.important)
    : state.notes.filter(note => !note.important)
    )
  }
}

const mapDispatchToProps = {
  toggleImportanceOf
}

export default connect(
  mapStateToProps,
  mapDispatchToProps
)(Notes)让我们也使用connect来创建新的笔记。
import { connect } from 'react-redux'
import { createNote } from '../reducers/noteReducer'

const NewNote = (props) => {
  const addNote = (event) => {
    event.preventDefault()
    const content = event.target.note.value
    event.target.note.value = ''
    props.createNote(content)  }

  return (
    <form onSubmit={addNote}>
      <input name="note" />
      <button type="submit">add</button>
    </form>
  )
}

export default connect( null, { createNote })(NewNote)由于该组件不需要访问商店的状态,我们可以简单地传递null作为connect的第一个参数。
你可以在这个Github仓库的part6-5分支中找到我们当前应用的全部代码。
Referencing action creators passed as props
让我们注意一下NewNote组件中一个有趣的细节。
import { connect } from 'react-redux'
import { createNote } from '../reducers/noteReducer'
const NewNote = (props) => {

  const addNote = (event) => {
    event.preventDefault()
    const content = event.target.note.value
    event.target.note.value = ''
    props.createNote(content)  }

  return (
    <form onSubmit={addNote}>
      <input name="note" />
      <button type="submit">add</button>
    </form>
  )
}

export default connect(
  null,
{ createNote })(NewNote)初次接触连接的开发者可能会发现,组件中的createNote动作创建者有两个版本,这令人费解。
该函数必须通过组件的props被引用为props.createNote,因为这是包含connect添加的自动调度的那个版本。
由于动作创建者的导入方式。
import { createNote } from './../reducers/noteReducer'也可以通过调用createNote直接引用动作创建者。你不应该这样做,因为这是未经修改的动作创建者的版本,不包含添加的自动调度。
如果我们从代码中把这些函数打印到控制台(我们还没有看这个有用的调试技巧)。
const NewNote = (props) => {
  console.log(createNote)
  console.log(props.createNote)

  const addNote = (event) => {
    event.preventDefault()
    const content = event.target.note.value
    event.target.note.value = ''
    props.createNote(content)
  }

  // ...
}
我们可以看到这两个函数之间的区别。
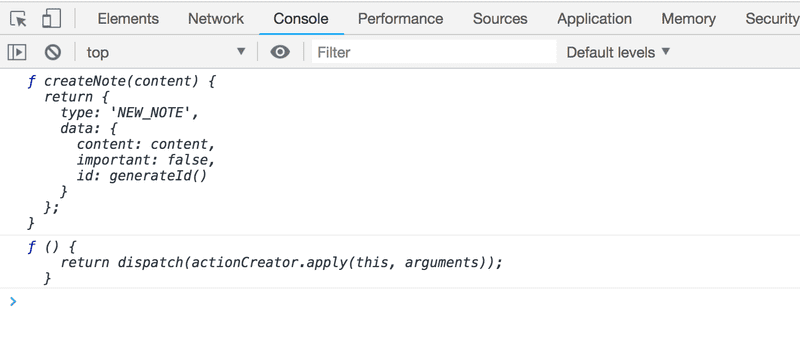
第一个函数是一个普通的动作创建者,而第二个函数则包含了由connect添加的对存储的额外调度。
Connect是一个非常有用的工具,尽管由于它的抽象程度,一开始可能看起来很困难。
Alternative way of using mapDispatchToProps
我们以如下方式定义了用于从连接的NewNote组件中调度动作的函数。
const NewNote = () => {
  // ...
}

export default connect(
  null,
  { createNote }
)(NewNote) 上面的连接表达式使该组件能够通过props.createNote("a new note")命令来调度创建新笔记的动作。
mapDispatchToProps中传递的函数必须是action creators,也就是返回Redux动作的函数。
值得注意的是,mapDispatchToProps参数是一个JavaScript对象,正如其定义。
{
  createNote
}
这只是定义对象字面的速记。
{
  createNote: createNote
}这是一个具有单一的createNote属性的对象,其值为createNote函数。
另外,我们可以把下面的函数定义作为第二个参数传递给 connect。
const NewNote = (props) => {
  // ...
}

const mapDispatchToProps = dispatch => {  return {    createNote: value => {      dispatch(createNote(value))    },  }}
export default connect(
  null,
  mapDispatchToProps
)(NewNote)在这个替代定义中,mapDispatchToProps是一个函数,connect将把dispatch-函数作为其参数传递给它,从而调用该函数。该函数的返回值是一个定义了一组函数的对象,这些函数被作为prop传递给连接的组件。我们的例子定义了作为createNoteprop传递的函数。
value => {
  dispatch(createNote(value))
}它简单地分配了用createNote动作创建器创建的动作。
然后组件通过它的prop调用props.createNote来引用这个函数。
const NewNote = (props) => {
  const addNote = (event) => {
    event.preventDefault()
    const content = event.target.note.value
    event.target.note.value = ''
    props.createNote(content)
  }

  return (
    <form onSubmit={addNote}>
      <input name="note" />
      <button type="submit">add</button>
    </form>
  )
}这个概念相当复杂,通过文字来描述它是有难度的。在大多数情况下,使用mapDispatchToProps的较简单形式就足够了。然而,在某些情况下,更复杂的定义是必要的,例如,如果dispatched actions需要引用组件的prop。
Redux的创造者Dan Abramov创造了一个精彩的教程,叫做Redux入门,你可以在Egghead.io上找到。我向大家强烈推荐这个教程。最后四个视频讨论了connect方法,特别是使用它的更 "复杂 "的方式。
Presentational/Container revisited
重构后的Notes组件几乎完全专注于渲染笔记,而且相当接近于所谓的展示性组件。根据Dan Abramov提供的描述,演示组件。
-
关注事物的外观。
-
里面可能同时包含展示组件和容器组件,并且通常有一些DOM标记和它们自己的样式。
-
通常允许通过props.children进行包含。
-
对应用的其他部分没有依赖性,例如Redux动作或商店。
-
不指定数据是如何被加载或改变的。
-
完全通过props接收数据和回调。
-
很少有自己的状态(如果有,也是UI状态而不是数据)。
- 除非它们需要状态、生命周期钩子或性能优化,否则就被写成功能组件。
用connect函数创建的connected组件。
const mapStateToProps = (state) => {
  if ( state.filter === 'ALL' ) {
    return {
      notes: state.notes
    }
  }

  return {
    notes: (state.filter  === 'IMPORTANT'
    ? state.notes.filter(note => note.important)
    : state.notes.filter(note => !note.important)
    )
  }
}

const mapDispatchToProps = {
  toggleImportanceOf,
}

export default connect(
  mapStateToProps,
  mapDispatchToProps
)(Notes)符合container组件的描述。根据Dan Abramov提供的描述,容器组件。
-
关注事物的工作方式。
-
里面可能同时包含展示性组件和容器组件,但除了一些包裹性的div,通常没有任何自己的DOM标记,也没有任何样式。
-
为展示性或其他容器组件提供数据和行为。
-
调用Redux动作,并将其作为回调提供给渲染组件。
-
通常是有状态的,因为它们往往作为数据源。
- 通常使用高阶组件生成,如来自React Redux的connect,而不是手工编写。
将应用分为展示性组件和容器组件是一种被认为是有益的React应用结构的方式。这种划分可能是一个好的设计选择,也可能不是,这取决于环境。
Abramov将以下好处归于这种划分。
-
更好地分离关注点。通过这样写组件,你可以更好地理解你的应用和你的用户界面。
-
更好的重用性。你可以在完全不同的状态源中使用相同的表现型组件,并将这些组件变成可以进一步重用的独立容器组件。
- 渲染式组件本质上是你的应用的 "调色板"。你可以把它们放在一个页面上,让设计者调整它们的所有变化,而不触及应用的逻辑。你可以在该页面上运行屏幕截图回归测试。
阿布拉莫夫提到了术语高阶组件。Notes组件是一个普通组件的例子,而React-Redux提供的connect方法是一个高阶组件的例子。从本质上讲,高阶组件是一个接受 "常规 "组件作为其参数的函数,然后返回一个新的 "常规 "组件作为其返回值。
高阶组件,或称HOC,是一种定义可以应用于组件的通用功能的方式。这是一个来自函数式编程的概念,与面向对象编程中的继承非常相似。
HOCs实际上是高阶函数 (HOF)概念的概括。HOFs是接受函数作为参数或返回函数的函数。实际上,我们在整个课程中一直在使用HOF,例如,所有用于处理数组的方法,如map、filter和find都是HOF。
在React hook-api发布后,HOCs变得越来越不流行了。几乎所有曾经基于HOCs的库现在都被修改为使用钩子。大多数时候,基于钩子的api比基于HOC的api要简单得多,redux也是如此。
Redux and the component state
在这个课程中,我们已经走了很长的路,最后,我们已经走到了 "正确的方式 "使用React的地步,这意味着React只专注于生成视图,应用状态完全与React组件分离,并传递给Redux、其动作和其还原器。
那么useState-hook呢,它为组件提供了它们自己的状态?如果一个应用使用Redux或其他外部状态管理解决方案,它是否有任何作用?如果应用有更复杂的表单,使用useState函数提供的状态来实现它们的本地状态可能是有益的。当然,人们可以让Redux管理表单的状态,然而,如果表单的状态只在填写表单时才相关(例如用于验证),那么将状态的管理留给负责表单的组件可能是明智的。
我们应该总是使用redux吗?也许不是。redux的开发者Dan Abramov在他的文章You Might Not Need Redux中讨论了这个问题。
现在可以通过使用React context-api和useReducer-hook来实现类似redux的状态管理,而无需redux。
第9章节。