d
端到端测试:Playwright
到目前为止,我们已经使用集成测试在 API 层面上测试了整个后端,并使用单元测试测试了一些前端组件。
接下来我们将探讨一种使用端到端(E2E)测试来测试系统整体的方法。
我们可以使用浏览器和测试库对 Web 应用进行 E2E 测试。有多种测试库可用,一个例子是 Selenium,它几乎可以与任何浏览器一起使用。另一个浏览器选项是所谓的无头浏览器,这是一种没有图形用户界面的浏览器。例如,Chrome 可以在无头模式下使用。
E2E 测试可能是最有用的测试类别,因为它们通过与真实用户使用相同的界面来测试系统。
它们也有一些缺点。配置 E2E 测试比单元或集成测试更具挑战性。并且它们往往较慢,对于大型系统,执行时间可能是几分钟甚至几小时。这对开发是不利的,因为在编码的过程中,能够尽可能频繁地运行测试是有益的,这可以防范代码回归。
E2E 测试还可能不稳定。有些测试可能前一次通过了,但后一次失败了,即使代码根本没有改变。
目前,最容易用于 E2E 测试的两个库或许就是 Cypress 和 Playwright。
从 npmtrends.com 的统计数据来看,Playwright 在 2024 年的下载量已经超过了 Cypress,并且其受欢迎的程度仍在持续增长:
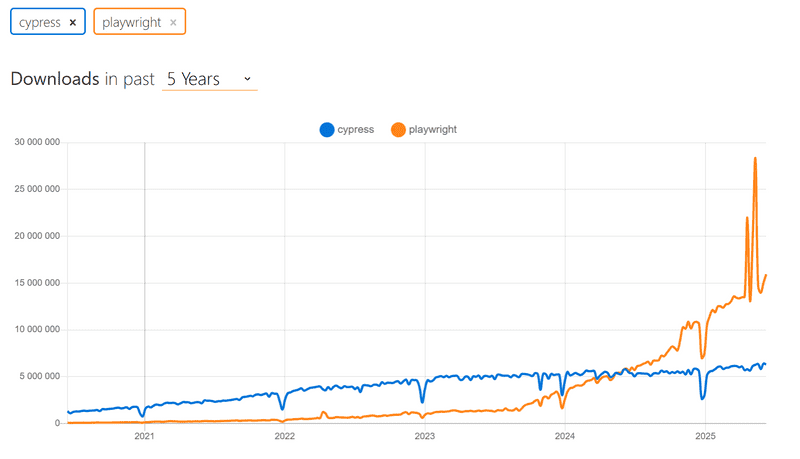
这门课程多年来一直使用 Cypress。现在 Playwright 成为了一个新的选项。你可以选择用 Cypress 或 Playwright 完成 E2E 测试部分。这两个库的运行原理非常相似,所以你的选择并不重要。然而,Playwright 目前是课程首选的 E2E 测试库。
如果你的选择是 Playwright,请继续。如果你最终使用 Cypress,请点这里。
Playwright
Playwright 是 E2E 测试领域的新来者,它在 2023 年底开始迅速流行起来。Playwright 在易用性方面与 Cypress 大致相当。这两个库在工作方式上略有不同。Cypress 与大多数适合 E2E 测试的库相比,有着根本性的不同,因为 Cypress 测试完全在浏览器中运行。而 Playwright 的测试则是在 Node 进程中执行,该进程通过编程接口与浏览器连接。
很难说哪个库更好。Playwright 的一个优势是它的浏览器支持;Playwright 支持 Chrome、Firefox 以及基于 Webkit 的浏览器如 Safari。目前,Cypress 也支持所有这些浏览器,尽管 Webkit 的支持是实验性的,并且不支持 Cypress 的所有功能。在撰写本文时(2024年3月1日),我个人偏好稍微倾向于 Playwright。
现在让我们来探索 Playwright。
Initializing tests
与后端测试和在 React 前端进行的单元测试不同,端到端测试不需要位于代码所在的同一 npm 项目中。让我们使用 npm init 命令为端到端测试创建一个完全独立的项目。然后在新的项目目录中运行以下命令来安装 Playwright:
npm init playwright@latest安装脚本会询问几个问题,按如下方式回答:
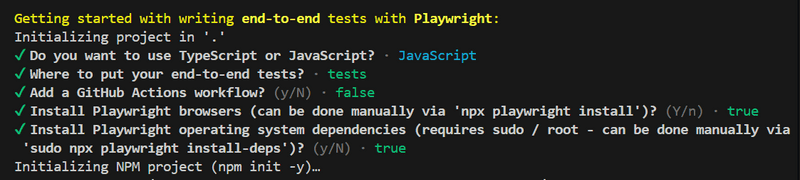
请注意,在安装 Playwright 时,您的操作系统可能不支持 Playwright 提供的所有浏览器,您可能会看到如下错误消息:
Webkit 18.0 (playwright build v2070) downloaded to /home/user/.cache/ms-playwright/webkit-2070
Playwright Host validation warning:
╔══════════════════════════════════════════════════════╗
║ Host system is missing dependencies to run browsers. ║
║ Missing libraries:                                   ║
║     libicudata.so.66                                 ║
║     libicui18n.so.66                                 ║
║     libicuuc.so.66                                   ║
║     libjpeg.so.8                                     ║
║     libwebp.so.6                                     ║
║     libpcre.so.3                                     ║
║     libffi.so.7                                      ║
╚══════════════════════════════════════════════════════╝
如果是这种情况,你可以在你的 package.json 中使用 --project= 指定要测试的特定浏览器:
"test": "playwright test --project=chromium --project=firefox",或者从你的 playwright.config.js 文件中删除任何有问题的浏览器的条目:
  projects: [
    // ...
    //{
    //  name: 'webkit',
    //  use: { ...devices['Desktop Safari'] },
    //},
    // ...
  ]
让我们在 package.json 中定义一个 npm 脚本用于运行测试和测试报告:
{
  // ...
  "scripts": {
    "test": "playwright test",
    "test:report": "playwright show-report"
  },
  // ...
}
在安装过程中,以下内容将打印到控制台:
And check out the following files:
  - ./tests/example.spec.js - Example end-to-end test
  - ./tests-examples/demo-todo-app.spec.js - Demo Todo App end-to-end tests
  - ./playwright.config.js - Playwright Test configuration
也就是说,这是安装创建的项目中几个示例测试的位置。
让我们运行测试:
$ npm test

> notes-e2e@1.0.0 test
> playwright test


Running 6 tests using 5 workers
  6 passed (3.9s)

To open last HTML report run:

  npx playwright show-report
测试通过。更详细的测试报告可以通过输出的建议命令或我们刚刚定义的 npm 脚本打开:
npm run test:report测试也可以使用以下命令通过图形界面运行:
npm run test -- --uitests/example.spec.js 中的示例测试看起来是这样的:
// @ts-check
import { test, expect } from '@playwright/test';

test('has title', async ({ page }) => {
  await page.goto('https://playwright.dev/');
  // Expect a title "to contain" a substring.
  await expect(page).toHaveTitle(/Playwright/);
});

test('get started link', async ({ page }) => {
  await page.goto('https://playwright.dev/');

  // Click the get started link.
  await page.getByRole('link', { name: 'Get started' }).click();

  // Expects page to have a heading with the name of Installation.
  await expect(page.getByRole('heading', { name: 'Installation' })).toBeVisible();
});
测试函数的第一行说明这些测试正在测试 https://playwright.dev/ 页面。
Testing our own code
现在让我们移除示例测试,开始测试我们自己的应用程序。
Playwright 测试假设在执行测试时系统正在运行。与后端集成测试等例子不同,Playwright 测试在测试过程中不会启动被测试的系统。
让我们为后端创建一个 npm 脚本,这将使其能够在测试模式下启动,即使 NODE_ENV 的值为 test。
{
  // ...
  "scripts": {
    "start": "cross-env NODE_ENV=production node index.js",
    "dev": "cross-env NODE_ENV=development node --watch index.js",
    "test": "cross-env NODE_ENV=test node --test",
    "lint": "eslint .",
    // ...
    "start:test": "cross-env NODE_ENV=test node --watch index.js"  },
  // ...
}
让我们启动前端和后端,并为应用程序创建第一个测试文件 tests/note_app.spec.js :
const { test, expect } = require('@playwright/test')

test('front page can be opened', async ({ page }) => {
  await page.goto('http://localhost:5173')

  const locator = page.getByText('Notes')
  await expect(locator).toBeVisible()
  await expect(page.getByText('Note app, Department of Computer Science, University of Helsinki 2024')).toBeVisible()
})
首先,测试使用 page.goto 方法打开应用程序。之后,它使用 page.getByText 方法获取与包含文本 Notes 的元素对应的定位器。
toBeVisible 方法确保与定位器对应的元素在页面上可见。
第二次检查没有使用辅助变量。
测试失败了,因为测试中混入了一个旧年份。Playwright 在浏览器中打开了测试报告,很明显 Playwright 实际上是用三种不同的浏览器进行了测试:Chrome、Firefox 和 Webkit,即 Safari 使用的浏览器引擎:
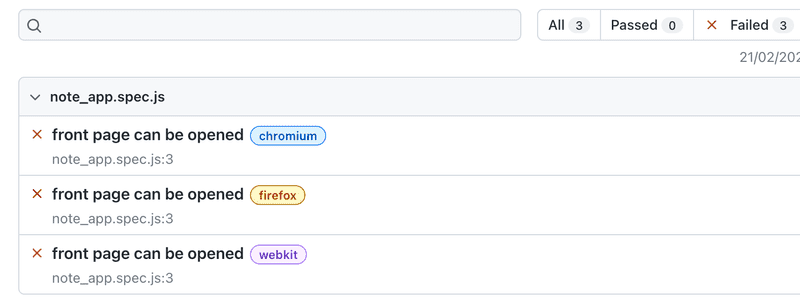
通过点击其中一个浏览器的报告,我们可以看到一个更详细的错误信息:

从宏观角度来看,测试使用所有三种常用浏览器引擎当然是非常好的,但这会很慢,在开发测试时,最好主要只用一种浏览器进行。您可以通过命令行参数定义要使用的浏览器引擎:
npm test -- --project chromium现在让我们修正测试中的年份,并在测试中添加一个 describe 块:
const { test, describe, expect } = require('@playwright/test')

describe('Note app', () => {  test('front page can be opened', async ({ page }) => {
    await page.goto('http://localhost:5173')

    const locator = page.getByText('Notes')
    await expect(locator).toBeVisible()
    await expect(page.getByText('Note app, Department of Computer Science, University of Helsinki 2025')).toBeVisible()
  })
})
在继续之前,让我们再分析一次测试。我们注意到,当测试通过时,执行速度相当快,但如果测试未通过,执行速度会慢很多。这是因为 Playwright 的策略是等待搜索的元素直到它们渲染并准备好执行。如果找不到元素,会抛出 TimeoutError 并导致测试失败。Playwright 默认等待元素的时间取决于测试中使用的函数,通常是 5 秒或 30 秒。
在开发测试时,将等待时间减少到几秒钟可能更明智。根据文档,这可以通过按以下方式修改 playwright.config.js 文件来实现:
export default defineConfig({
  // ...
  timeout: 3000,  fullyParallel: false,  workers: 1,  // ...
})我们还对文件进行了另外两项更改,并指定所有测试应逐个执行。在默认配置下,执行是并行进行的,而由于我们的测试使用数据库,并行执行会导致问题。
Writing on the form
让我们编写一个新的测试,尝试登录应用程序。假设数据库中存储了一个用户,用户名为 mluukkai,密码为 salainen。
让我们从打开登录表单开始。
describe('Note app', () => {
  // ...

  test('user can log in', async ({ page }) => {
    await page.goto('http://localhost:5173')

    await page.getByRole('button', { name: 'login' }).click()
  })
})
测试首先使用方法 page.getByRole 根据其文本获取按钮。该方法返回与 Button 元素对应的 定位器。然后通过定位器的方法 click 进行按钮点击。
在开发测试时,你可以使用 Playwright 的 UI 模式,即用户界面版本。让我们按照以下方式以 UI 模式开始测试:
npm test -- --ui我们现在看到测试找到了按钮
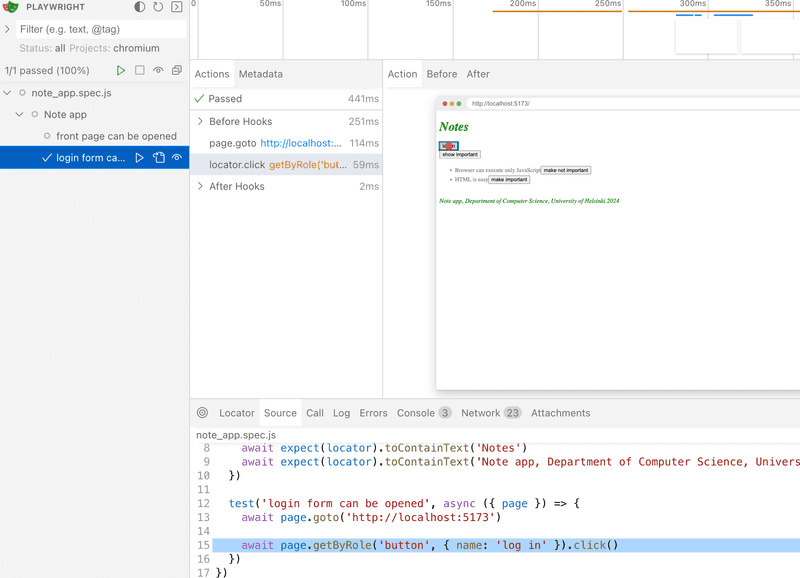
点击后,表单将出现
当表单打开时,测试应查找文本字段,并在其中输入用户名和密码。让我们首先尝试使用方法 page.getByRole。
describe('Note app', () => {
  // ...

  test('user can log in', async ({ page }) => {
    await page.goto('http://localhost:5173')

    await page.getByRole('button', { name: 'login' }).click()
    await page.getByRole('textbox').fill('mluukkai')  })
})
这导致了一个错误:
Error: locator.fill: Error: strict mode violation: getByRole('textbox') resolved to 2 elements:
  1) <input value=""/> aka locator('div').filter({ hasText: /^username$/ }).getByRole('textbox')
2) <input value="" type="password"/> aka locator('input[type="password"]')现在的问题是,getByRole 找到了两个文本字段,调用 fill 方法会失败,因为它假设只找到了一个文本字段。解决这个问题的一种方案是用 first 和 last 这两个方法:
describe('Note app', () => {
  // ...

  test('user can log in', async ({ page }) => {
    await page.goto('http://localhost:5173')

    await page.getByRole('button', { name: 'login' }).click()
    await page.getByRole('textbox').first().fill('mluukkai')    await page.getByRole('textbox').last().fill('salainen')    await page.getByRole('button', { name: 'login' }).click()      await expect(page.getByText('Matti Luukkainen logged in')).toBeVisible()  })
})
在文本字段中输入后,测试会点击 login 按钮,并检查应用程序是否在屏幕上渲染了已登录用户的信息。
如果有超过两个文本字段,使用 first 和 last 方法就不够了。一种可能是使用 all 方法,它将找到的定位器转换成一个可以索引的数组:
describe('Note app', () => {
  // ...
  test('user can log in', async ({ page }) => {
    await page.goto('http://localhost:5173')

    await page.getByRole('button', { name: 'login' }).click()
    const textboxes = await page.getByRole('textbox').all()    await textboxes[0].fill('mluukkai')    await textboxes[1].fill('salainen')
    await page.getByRole('button', { name: 'login' }).click()

    await expect(page.getByText('Matti Luukkainen logged in')).toBeVisible()
  })
})
这个和上一个版本的测试工作都可以运行。然而,它们都存在问题,因为如果注册表单被更改,测试可能会失效,因为它们依赖于表单字段在页面上按特定顺序排列。
如果元素在测试中难以定位,你可以为其分配一个单独的 test-id 属性,并使用 getByTestId 方法在测试中查找该元素。
现在让我们利用登录表单的现有元素。登录表单的输入字段已被分配了唯一的 labels:
// ...
<form onSubmit={handleSubmit}>
  <div>
    <label>      username      <input
        type="text"
        value={username}
        onChange={handleUsernameChange}
      />
    </label>  </div>
  <div>
    <label>      password      <input
        type="password"
        value={password}
        onChange={handlePasswordChange}
      />
    </label>  </div>
  <button type="submit">login</button>
</form>
// ...
输入字段可以并且应该使用 getByLabel 方法通过 labels 在测试中定位:
describe('Note app', () => {
  // ...

  test('user can log in', async ({ page }) => {
    await page.goto('http://localhost:5173')

    await page.getByRole('button', { name: 'login' }).click()
    await page.getByLabel('username').fill('mluukkai')    await page.getByLabel('password').fill('salainen')
    await page.getByRole('button', { name: 'login' }).click()

    await expect(page.getByText('Matti Luukkainen logged in')).toBeVisible()
  })
})
在定位元素时,最好利用界面中用户可见的内容,因为这样可以最好地模拟用户在导航应用时实际找到所需输入字段的方式。
请注意,在此阶段通过测试需要后端测试数据库中存在一个用户,用户名为 mluukkai,密码为 salainen。如有需要,请创建用户!
Test Initialization
由于两个测试都从打开页面 http://localhost:5173 开始,建议在 beforeEach 块中隔离每个测试执行之前的公共部分:
const { test, describe, expect, beforeEach } = require('@playwright/test')

describe('Note app', () => {
  beforeEach(async ({ page }) => {    await page.goto('http://localhost:5173')  })
  test('front page can be opened', async ({ page }) => {
    const locator = page.getByText('Notes')
    await expect(locator).toBeVisible()
    await expect(page.getByText('Note app, Department of Computer Science, University of Helsinki 2025')).toBeVisible()
  })

  test('user can log in', async ({ page }) => {
    await page.getByRole('button', { name: 'login' }).click()
    await page.getByLabel('username').fill('mluukkai')
    await page.getByLabel('password').fill('salainen')
    await page.getByRole('button', { name: 'login' }).click()
    await expect(page.getByText('Matti Luukkainen logged in')).toBeVisible()
  })
})
Testing note creation
接下来,让我们创建一个测试,该测试向应用程序添加一个新的笔记:
const { test, describe, expect, beforeEach } = require('@playwright/test')

describe('Note app', () => {
  // ...

  describe('when logged in', () => {
    beforeEach(async ({ page }) => {
      await page.getByRole('button', { name: 'login' }).click()
      await page.getByLabel('username').fill('mluukkai')
      await page.getByLabel('password').fill('salainen')
      await page.getByRole('button', { name: 'login' }).click()
    })

    test('a new note can be created', async ({ page }) => {
      await page.getByRole('button', { name: 'new note' }).click()
      await page.getByRole('textbox').fill('a note created by playwright')
      await page.getByRole('button', { name: 'save' }).click()
      await expect(page.getByText('a note created by playwright')).toBeVisible()
    })
  })
})
测试定义在其自己的 describe 块中。创建笔记需要用户登录,这由 beforeEach 块处理。
该测试相信在创建新笔记时页面上只有一个输入字段,因此它按以下方式搜索:
page.getByRole('textbox')如果有更多字段,测试就会失败。由于这个原因,最好给表单输入添加一个 test-id,并基于这个 id 在测试中查找它。
注意:测试只会在第一次通过。其原因是它的期望
await expect(page.getByText('a note created by playwright')).toBeVisible()当同一个笔记在应用程序中创建多次时会导致问题。这个问题将在下一章解决。
测试的结构看起来是这样的:
const { test, describe, expect, beforeEach } = require('@playwright/test')

describe('Note app', () => {
  // ....

  test('user can log in', async ({ page }) => {
    await page.getByRole('button', { name: 'login' }).click()
    await page.getByLabel('username').fill('mluukkai')
    await page.getByLabel('password').fill('salainen')
    await page.getByRole('button', { name: 'login' }).click()
    await expect(page.getByText('Matti Luukkainen logged in')).toBeVisible()
  })

  describe('when logged in', () => {
    beforeEach(async ({ page }) => {
      await page.getByRole('button', { name: 'login' }).click()
      await page.getByLabel('username').fill('mluukkai')
      await page.getByLabel('password').fill('salainen')
      await page.getByRole('button', { name: 'login' }).click()
    })

    test('a new note can be created', async ({ page }) => {
      await page.getByRole('button', { name: 'new note' }).click()
      await page.getByRole('textbox').fill('a note created by playwright')
      await page.getByRole('button', { name: 'save' }).click()
      await expect(page.getByText('a note created by playwright')).toBeVisible()
    })
  })
})
由于我们已禁止测试并行运行,Playwright 会按照测试代码中出现的顺序执行测试。也就是说,首先执行用户登录的测试,用户登录应用程序的操作会先完成。接着执行创建新笔记的测试,该测试也会在 beforeEach 块中执行登录操作。为什么还要这么做呢?用户不是已经在之前的测试中登录了吗?不,因为每个测试的执行都是从浏览器的“零状态”开始的,之前测试对浏览器状态所做的所有更改都会被重置。
Controlling the state of the database
如果测试需要能够修改服务器的数据库,情况将立即变得复杂起来。理想情况下,服务器的数据库在每次运行测试时都应该是相同的,这样我们的测试才能可靠且容易地重复。
与单元测试和集成测试一样,对于 E2E 测试,在运行测试之前最好清空数据库,并可能要对其进行格式化。E2E 测试的挑战在于它们无法访问数据库。
解决方案是为后端测试创建 API 端点。我们可以使用这些端点来清空数据库。让我们在 controllers 文件夹中的 testing.js 文件里创建一个新的路由用于测试
const router = require('express').Router()
const Note = require('../models/note')
const User = require('../models/user')

router.post('/reset', async (request, response) => {
  await Note.deleteMany({})
  await User.deleteMany({})

  response.status(204).end()
})

module.exports = router并且仅在应用程序以测试模式运行时才将其添加到后端:
// ...

app.use('/api/login', loginRouter)
app.use('/api/users', usersRouter)
app.use('/api/notes', notesRouter)

if (process.env.NODE_ENV === 'test') {  const testingRouter = require('./controllers/testing')  app.use('/api/testing', testingRouter)}
app.use(middleware.unknownEndpoint)
app.use(middleware.errorHandler)

module.exports = app
修改后,对 /api/testing/reset 端点的 HTTP POST 请求会清空数据库。通过使用此命令启动后端以确保其在测试模式下运行(该命令之前已在 package.json 文件中配置):
npm run start:test修改后的后端代码可以在 GitHub 的 part5-1 分支上找到。
接下来,我们将修改 beforeEach 块,使其在运行测试前清空服务器的数据库。
目前无法通过前端 UI 添加新用户,因此我们用 beforeEach 块从后端添加一个新用户。
describe('Note app', () => {
  beforeEach(async ({ page, request }) => {
    await request.post('http://localhost:3001/api/testing/reset')
    await request.post('http://localhost:3001/api/users', {
      data: {
        name: 'Matti Luukkainen',
        username: 'mluukkai',
        password: 'salainen'
      }
    })

    await page.goto('http://localhost:5173')
  })

  test('front page can be opened',  () => {
    // ...
  })

  test('user can login', () => {
    // ...
  })

  describe('when logged in', () => {
    // ...
  })
})
在初始化的过程中,测试使用参数 request 的方法 post 向后端发送 HTTP 请求。
与之前不同,现在后端测试总是从相同的状态开始,即数据库中有一个用户且没有笔记。
让我们做一个测试,检查笔记的重要性是否可以更改。
进行这个测试有几种不同的方法。
在下文中,我们首先查找一个笔记并点击其带有文本 make not important 的按钮。之后,我们检查该笔记是否包含带有 make important 的按钮。
describe('Note app', () => {
  // ...

  describe('when logged in', () => {
    // ...

    describe('and a note exists', () => {      beforeEach(async ({ page }) => {        await page.getByRole('button', { name: 'new note' }).click()        await page.getByRole('textbox').fill('another note by playwright')        await page.getByRole('button', { name: 'save' }).click()      })      test('importance can be changed', async ({ page }) => {        await page.getByRole('button', { name: 'make not important' }).click()        await expect(page.getByText('make important')).toBeVisible()      })    })
  })
})
第一个命令首先搜索包含文本 another note by playwright 的组件,并在其中找到按钮 make not important 并点击它。
第二个命令确保该按钮的文本已更改为 make important。
测试代码当前位于 GitHub 的分支 part5-1 上。
Test for failed login
现在我们来做一个测试,确保如果密码错误,登录尝试会失败。
测试的第一个版本看起来是这样的:
describe('Note app', () => {
  // ...

  test('login fails with wrong password', async ({ page }) => {
    await page.getByRole('button', { name: 'login' }).click()
    await page.getByLabel('username').fill('mluukkai')
    await page.getByLabel('password').fill('wrong')
    await page.getByRole('button', { name: 'login' }).click()

    await expect(page.getByText('wrong credentials')).toBeVisible()
  })

  // ...
})
该测试通过方法 page.getByText 验证应用程序是否打印错误消息。
应用程序将错误消息渲染到 CSS 类为 error 的元素中:
const Notification = ({ message }) => {
  if (message === null) {
    return null
  }

  return (
    <div className="error">      {message}
    </div>
  )
}
我们可以优化测试,以确保错误消息正好打印在正确位置,即 CSS 类为 error 的元素中:
test('login fails with wrong password', async ({ page }) => {
  // ...

  const errorDiv = page.locator('.error')  await expect(errorDiv).toContainText('wrong credentials')
})
因此,测试使用 page.locator 方法查找 CSS 类为 error 的组件,并将其存储在变量中。可以通过期望 toContainText 来验证与组件关联的文本的正确性。请注意,CSS 类选择器以点开头,因此 error 的类选择器是 .error。
可以使用 toHaveCSS 匹配器来测试应用程序的 CSS 样式。例如,我们可以确保错误消息的颜色是红色,并且它周围有边框:
test('login fails with wrong password', async ({ page }) => {
  // ...

  const errorDiv = page.locator('.error')
  await expect(errorDiv).toContainText('wrong credentials')
  await expect(errorDiv).toHaveCSS('border-style', 'solid')  await expect(errorDiv).toHaveCSS('color', 'rgb(255, 0, 0)')})
给 Playwright 的颜色必须定义为 rgb 代码。
让我们完成测试,以便它也能确保应用程序不会渲染描述成功登录的文本 Matti Luukkainen logged in:
test('login fails with wrong password', async ({ page }) =>{
  await page.getByRole('button', { name: 'login' }).click()
  await page.getByLabel('username').fill('mluukkai')
  await page.getByLabel('password').fill('wrong')
  await page.getByRole('button', { name: 'login' }).click()

  const errorDiv = page.locator('.error')
  await expect(errorDiv).toContainText('wrong credentials')
  await expect(errorDiv).toHaveCSS('border-style', 'solid')
  await expect(errorDiv).toHaveCSS('color', 'rgb(255, 0, 0)')

  await expect(page.getByText('Matti Luukkainen logged in')).not.toBeVisible()})
Running tests one by one
默认情况下,Playwright 总是运行所有测试,并且随着测试数量的增加,运行时间会变得很长。在开发新测试或调试有问题的测试时,可以用 test.only 而不是 test 来定义测试,这样 Playwright 将只运行该测试:
describe(() => {
  // this is the only test executed!
  test.only('login fails with wrong password', async ({ page }) => {    // ...
  })

  // this test is skipped...
  test('user can login with correct credentials', async ({ page }) => {
    // ...
  })

  // ...
})当该测试一切妥当后,only 可以并且应该被删除。
运行单个测试的另一个选项是使用命令行参数:
npm test -- -g "login fails with wrong password"Helper functions for tests
我们的应用测试现在看起来是这样的:
const { test, describe, expect, beforeEach } = require('@playwright/test')

describe('Note app', () => {
  // ...

  test('user can login with correct credentials', async ({ page }) => {
    await page.getByRole('button', { name: 'login' }).click()
    await page.getByLabel('username').fill('mluukkai')
    await page.getByLabel('password').fill('salainen')
    await page.getByRole('button', { name: 'login' }).click()
    await expect(page.getByText('Matti Luukkainen logged in')).toBeVisible()
  })

  test('login fails with wrong password', async ({ page }) =>{
    // ...
  })

  describe('when logged in', () => {
    beforeEach(async ({ page, request }) => {
      await page.getByRole('button', { name: 'login' }).click()
      await page.getByLabel('username').fill('mluukkai')
      await page.getByLabel('password').fill('salainen')
      await page.getByRole('button', { name: 'login' }).click()
    })

    test('a new note can be created', async ({ page }) => {
      // ...
    })

    // ...
  })
})
首先测试登录功能。之后,另一个 describe 块包含一组假设用户已登录的测试,登录在用于初始化的 beforeEach 块中完成。
如前所述,每个测试都从初始状态开始执行(此时数据库被清空并创建一个用户),因此即使代码中定义的测试出现在另一个测试之后,它也不会从之前测试留下的状态开始!
测试中还应尽量避免重复代码。让我们将处理登录的代码作为辅助函数隔离出来,例如放到文件 tests/helper.js 中:
const loginWith = async (page, username, password)  => {
  await page.getByRole('button', { name: 'login' }).click()
  await page.getByLabel('username').fill(username)
  await page.getByLabel('password').fill(password)
  await page.getByRole('button', { name: 'login' }).click()
}

export { loginWith }
测试将变得更简单和清晰:
const { test, describe, expect, beforeEach } = require('@playwright/test')
const { loginWith } = require('./helper')
describe('Note app', () => {
  // ...

  test('user can log in', async ({ page }) => {
    await loginWith(page, 'mluukkai', 'salainen')    await expect(page.getByText('Matti Luukkainen logged in')).toBeVisible()
  })

  test('login fails with wrong password', async ({ page }) => {
    await loginWith(page, 'mluukkai', 'wrong')
    const errorDiv = page.locator('.error')
    // ...
  })

  describe('when logged in', () => {
    beforeEach(async ({ page }) => {
      await loginWith(page, 'mluukkai', 'salainen')    })

    // ...
  })
})
Playwright 还提供了一个解决方案,即在测试前执行一次登录,然后每个测试都从应用程序已经登录的状态开始。为了让我们能够使用这种方法,应用程序的测试数据初始化应该与现在稍有不同。在当前的解决方案中,每次测试前都会重置数据库,因此测试前只登录一次的是不可能的。为了使用 Playwright 提供的测试前登录,用户应该在测试前只初始化一次。我们为了简化起见,坚持当前的解决方案。
相应的重复代码实际上也适用于创建新笔记。为此,有一个测试使用表单创建笔记。而在更改笔记重要性的测试的 beforeEach 初始化块中,也使用表单创建笔记:
describe('Note app', function() {
  // ...

  describe('when logged in', () => {
    test('a new note can be created', async ({ page }) => {
      await page.getByRole('button', { name: 'new note' }).click()
      await page.getByRole('textbox').fill('a note created by playwright')
      await page.getByRole('button', { name: 'save' }).click()
      await expect(page.getByText('a note created by playwright')).toBeVisible()
    })

    describe('and a note exists', () => {
      beforeEach(async ({ page }) => {
        await page.getByRole('button', { name: 'new note' }).click()
        await page.getByRole('textbox').fill('another note by playwright')
        await page.getByRole('button', { name: 'save' }).click()
      })

      test('it can be made important', async ({ page }) => {
        // ...
      })
    })
  })
})
创建笔记的功能也被隔离到它的辅助函数中。文件 tests/helper.js 扩展如下:
const loginWith = async (page, username, password)  => {
  await page.getByRole('button', { name: 'login' }).click()
  await page.getByLabel('username').fill(username)
  await page.getByLabel('password').fill(password)
  await page.getByRole('button', { name: 'login' }).click()
}

const createNote = async (page, content) => {  await page.getByRole('button', { name: 'new note' }).click()  await page.getByRole('textbox').fill(content)  await page.getByRole('button', { name: 'save' }).click()}
export { loginWith, createNote }
测试被简化如下:
const { test, describe, expect, beforeEach } = require('@playwright/test')
const { createNote, loginWith } = require('./helper')
describe('Note app', () => {
  // ...

  describe('when logged in', () => {
    beforeEach(async ({ page }) => {
      await loginWith(page, 'mluukkai', 'salainen')
    })

    test('a new note can be created', async ({ page }) => {
      await createNote(page, 'a note created by playwright')      await expect(page.getByText('a note created by playwright')).toBeVisible()
    })

    describe('and a note exists', () => {
      beforeEach(async ({ page }) => {
        await createNote(page, 'another note by playwright')      })

      test('importance can be changed', async ({ page }) => {
        await page.getByRole('button', { name: 'make not important' }).click()
        await expect(page.getByText('make important')).toBeVisible()
      })
    })
  })
})
我们的测试中还有一个烦人的特性。前端地址 http://localhost:5173 和后端地址 http://localhost:3001 都是硬编码在测试中的。其中,后端的地址实际上是无用的,因为在前端的 Vite 配置中定义了一个代理,该代理会将前端发送到地址 http://localhost:5173/api 的所有请求转发到后端地址:
export default defineConfig({
  server: {
    proxy: {
      '/api': {
        target: 'http://localhost:3001',
        changeOrigin: true,
      },
    }
  },
  // ...
})
因此,我们可以把测试中的所有 http://localhost:3001/api/... 替换为 http://localhost:5173/api/...
We can now define the baseUrl for the application in the tests configuration file playwright.config.js: 现在我们可以在测试配置文件 playwright.config.js 中定义应用程序的 baseUrl:
export default defineConfig({
  // ...
  use: {
    baseURL: 'http://localhost:5173',
    // ...
  },
  // ...
})
所有在测试中使用应用程序 url 的命令,例如
await page.goto('http://localhost:5173')
await page.post('http://localhost:5173/api/testing/reset')
现在都可以转换为:
await page.goto('/')
await page.post('/api/testing/reset')
测试的当前代码在 GitHub 上,分支为 part5-2。
Note importance change revisited
让我们看看之前做的测试,它验证了可以更改笔记的重要性。
让我们更改测试的初始化块,使其创建两个笔记而不是一个:
describe('when logged in', () => {
  // ...
  describe('and several notes exists', () => {    beforeEach(async ({ page }) => {
      await createNote(page, 'first note')      await createNote(page, 'second note')    })

    test('one of those can be made nonimportant', async ({ page }) => {
      const otherNoteElement = page.getByText('first note')

      await otherNoteElement
        .getByRole('button', { name: 'make not important' }).click()
      await expect(otherNoteElement.getByText('make important')).toBeVisible()
    })
  })
})
测试首先使用 page.getByText 方法搜索与第一个创建的笔记对应的元素,并将其存储在一个变量中。之后,在元素内部搜索带有文本 make not important 的按钮并点击该按钮。最后,测试验证按钮的文本是否已更改为 make important。
测试也可以不使用辅助变量来编写:
test('one of those can be made nonimportant', async ({ page }) => {
  page.getByText('first note')
    .getByRole('button', { name: 'make not important' }).click()

  await expect(page.getByText('first note').getByText('make important'))
    .toBeVisible()
})
让我们修改 Note 组件,使笔记的文本渲染在 span 元素内部
const Note = ({ note, toggleImportance }) => {
  const label = note.important
    ? 'make not important' : 'make important'

  return (
    <li className='note'>
      <span>{note.content}</span>      <button onClick={toggleImportance}>{label}</button>
    </li>
  )
}
测试会失败!问题的原因是命令 page.getByText('first note') 现在返回的是一个仅包含文本的 span 元素,而按钮位于其外部。
解决这个问题的方法如下:
test('one of those can be made nonimportant', async ({ page }) => {
  const otherNoteText = page.getByText('first note')  const otherNoteElement = otherNoteText.locator('..')
  await otherNoteElement.getByRole('button', { name: 'make not important' }).click()
  await expect(otherNoteElement.getByText('make important')).toBeVisible()
})
现在第一行代码查找包含第一个创建的笔记的文本的 span 元素。在第二行中,使用函数 locator,并将 .. 作为参数传入,这会获取元素的父元素。locator 函数非常灵活,我们利用了它不仅接受 CSS 选择器,还接受 XPath 选择器作为参数的特性。用 CSS 可以表达相同的功能,但在此情况下,XPath 提供了一种最简单的方式来查找元素的父元素。
当然,这个测试也可以只用一个辅助变量来编写:
test('one of those can be made nonimportant', async ({ page }) => {
  const secondNoteElement = page.getByText('second note').locator('..')
  await secondNoteElement.getByRole('button', { name: 'make not important' }).click()
  await expect(secondNoteElement.getByText('make important')).toBeVisible()
})
让我们修改测试,以便创建三个笔记,并更改第二个创建的笔记的重要性:
describe('when logged in', () => {
  beforeEach(async ({ page }) => {
    await loginWith(page, 'mluukkai', 'salainen')
  })

  test('a new note can be created', async ({ page }) => {
    await createNote(page, 'a note created by playwright', true)
    await expect(page.getByText('a note created by playwright')).toBeVisible()
  })

  describe('and several notes exists', () => {
    beforeEach(async ({ page }) => {
      await createNote(page, 'first note')
      await createNote(page, 'second note')
      await createNote(page, 'third note')    })

    test('one of those can be made nonimportant', async ({ page }) => {
      const otherNoteText = page.getByText('second note')      const otherNoteElement = otherNoteText.locator('..')

      await otherNoteElement.getByRole('button', { name: 'make not important' }).click()
      await expect(otherNoteElement.getByText('make important')).toBeVisible()
    })
  })
})
不知为何,测试开始变得不可靠,有时通过,有时不通过。是时候撸起袖子,学习如何调试测试了。
Test development and debugging
如果测试未通过,并且你怀疑问题出在测试而非代码上,你应该以调试模式运行测试。
以下命令以调试模式运行有问题的测试:
npm test -- -g'one of those can be made nonimportant' --debugPlaywright-inspector 会逐步显示测试进度。点击顶部的箭头-点按钮可让测试进入下一步。通过定位器找到的元素以及与浏览器的交互都在浏览器中可视化显示:
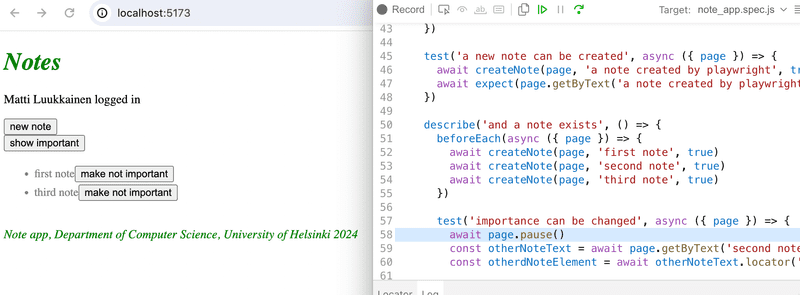
默认情况下,调试会逐条地执行测试命令。如果测试比较复杂,逐条调试到感兴趣的部分可能会非常费劲。可以通过使用命令 await page.pause() 来避免这种情况:
describe('Note app', () => {
  beforeEach(async ({ page, request }) => {
    // ...
  })

  describe('when logged in', () => {
    beforeEach(async ({ page }) => {
      // ...
    })

    describe('and several notes exists', () => {
      beforeEach(async ({ page }) => {
        await createNote(page, 'first note')
        await createNote(page, 'second note')
        await createNote(page, 'third note')
      })

      test('one of those can be made nonimportant', async ({ page }) => {
        await page.pause()        const otherNoteText = page.getByText('second note')
        const otherNoteElement = otherNoteText.locator('..')

        await otherNoteElement.getByRole('button', { name: 'make not important' }).click()
        await expect(otherNoteElement.getByText('make important')).toBeVisible()
      })
    })
  })
})
现在,你可以通过按下检查器中的绿色箭头符号,一步跳转到 page.pause()。
当我们运行测试并跳转到 page.pause() 命令时,我们发现了一个有趣的事实:
浏览器似乎没有渲染在 beforeEach 块中创建的所有笔记。问题出在哪里?
问题的原因是,当测试创建一个笔记时,它会在服务器响应之前就开始创建下一个笔记,而新添加的笔记被渲染在屏幕上。这反过来可能导致一些笔记丢失(在图片中,这发生在创建第二个笔记时),因为当服务器响应时,浏览器会根据插入操作开始时的笔记状态重新渲染。
这个问题可以通过“减慢”插入操作来解决,在插入操作后使用 waitFor 以等待插入的笔记被渲染:
const createNote = async (page, content) => {
await page.getByRole('button', { name: 'new note' }).click()
await page.getByRole('textbox').fill(content)
await page.getByRole('button', { name: 'save' }).click()
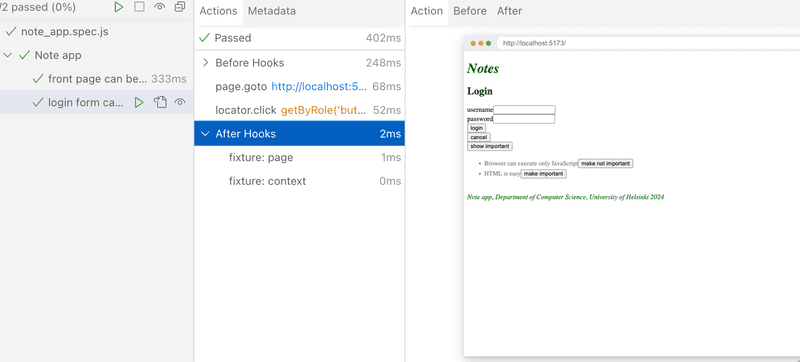
await page.getByText(content).waitFor()}在 UI 模式下运行测试可能很有用,它可以替代或者配合调试模式。如前所述,测试用以下命令在 UI 模式下启动:
npm run test -- --ui使用 Playwright 的跟踪查看器几乎与 UI 模式相同。其想法是保存测试的“视觉跟踪”,在测试完成后如有必要可以查看。通过以下方式运行测试可以保存跟踪:
npm run test -- --trace on如果需要,可以使用这个命令查看跟踪
npx playwright show-report或者使用我们定义的 npm 脚本 npm run test:report
跟踪看起来几乎和 UI 模式下运行测试一样。
UI 模式和跟踪查看器还提供了定位器的辅助搜索功能。这是通过点击下栏左侧的双圆圈,然后点击所需的用户界面元素来完成的。Playwright 显示元素定位器:
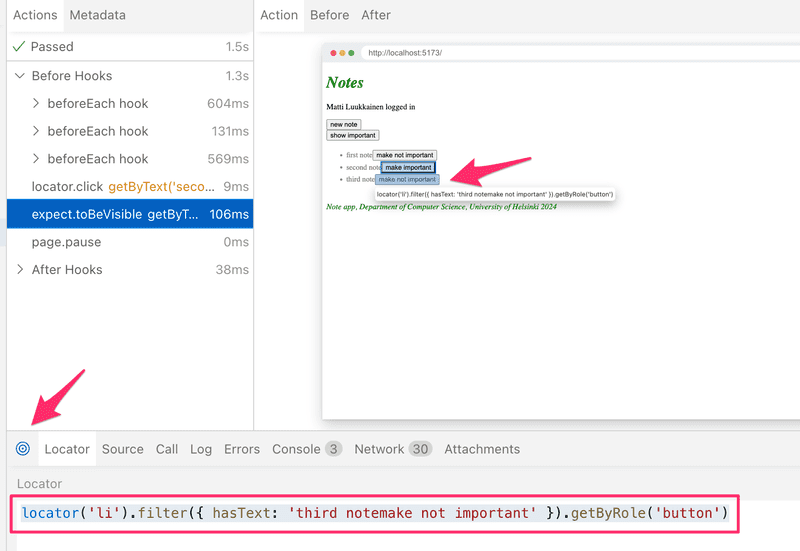
Playwright 建议以下作为第三个笔记的定位器
page.locator('li').filter({ hasText: 'third note' }).getByRole('button')方法 page.locator 被调用,参数为 li,即我们在页面上搜索所有 li 元素,总共有三个。之后,使用 locator.filter 方法,我们缩小范围到包含文本 third note 的 li 元素,并使用 locator.getByRole 方法获取其内部的按钮元素。
Playwright 生成的定位器与我们的测试中使用的定位器略有不同,后者是
page.getByText('first note').locator('..').getByRole('button', { name: 'make not important' })哪个定位器更好可能是一个主观的问题。
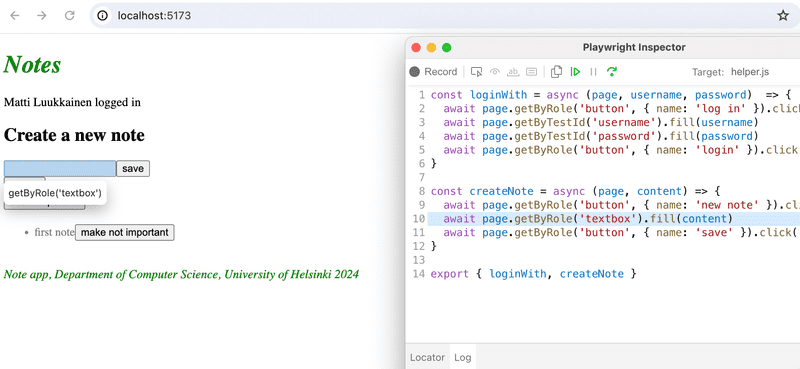
Playwright 还包含一个测试生成器,可以通过用户界面“录制”测试。测试生成器使用以下命令启动:
npx playwright codegen http://localhost:5173/当 Record 模式开启时,测试生成器会在 Playwright 检查器中“录制”用户的交互,可以把这些定位器和操作复制到测试中:

除了命令行,Playwright 还可以通过 VS Code 插件使用。该插件提供许多便捷功能,例如在调试测试时使用断点。
为了避免问题并增加理解,浏览 Playwright 的高质量文档绝对值得。最重要的部分列在下表:
详细内容可以在 API 描述中找到,特别有用的是测试里对应于应用程序浏览器窗口的 Page 类,以及在测试中用于搜索元素的 Locator 类。
测试的最终版本完整地托管在 GitHub 上,分支为 part5-3。
前端代码的最终版本完整地托管在 GitHub 上,分支为 part5-9。