b
表单
让我们继续扩展我们的应用,允许用户添加新的笔记。你可以在这里找到我们当前应用的代码。
在组件状态中保存笔记
为了让我们的页面在添加新的笔记时得到更新,最好将笔记存储在App组件的状态中。让我们导入useState函数,用它来定义一个状态片段,并将其初始化为props传递的初始笔记数组。
import { useState } from 'react'import Note from './components/Note'

const App = (props) => {  const [notes, setNotes] = useState(props.notes)
  return (
    <div>
      <h1>Notes</h1>
      <ul>
        {notes.map(note =>
          <Note key={note.id} note={note} />
        )}
      </ul>
    </div>
  )
}
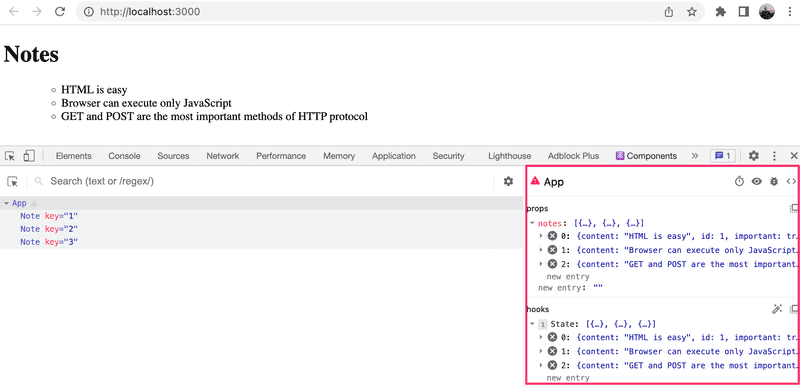
export default App组件使用useState函数来将存储在notes中的状态片段初始化为props传递的笔记数组:
const App = (props) => {
  const [notes, setNotes] = useState(props.notes)

  // ...
}
我们还可以用React开发者工具看到事实确实如此:
如果我们想从一个空的笔记列表开始,我们会把初始值设置为一个空的数组,这样props就用不到了,于是我们可以从函数定义中省略props参数:
const App = () => {
  const [notes, setNotes] = useState([])

  // ...
}
让我们先继续使用props中传递的初始值。
接下来,让我们在组件中添加一个HTML表单,用来添加新的笔记。
const App = (props) => {
  const [notes, setNotes] = useState(props.notes)

  const addNote = (event) => {    event.preventDefault()    console.log('button clicked', event.target)  }
  return (
    <div>
      <h1>Notes</h1>
      <ul>
        {notes.map(note =>
          <Note key={note.id} note={note} />
        )}
      </ul>
      <form onSubmit={addNote}>        <input />        <button type="submit">save</button>      </form>    </div>
  )
}我们将addNote函数作为事件处理函数添加到表单元素中,当点击提交按钮时,就会提交表单,同时调用该函数。
我们使用在第1章节中讨论的方法来定义我们的事件处理函数:
const addNote = (event) => {
  event.preventDefault()
  console.log('button clicked', event.target)
}event参数是触发调用事件处理函数的事件。
事件处理函数立即调用event.preventDefault()方法,防止提交表单的默认动作。默认动作会导致页面重新加载,以及其他一些事情。
存储在event.target中的事件目标被记录到控制台。
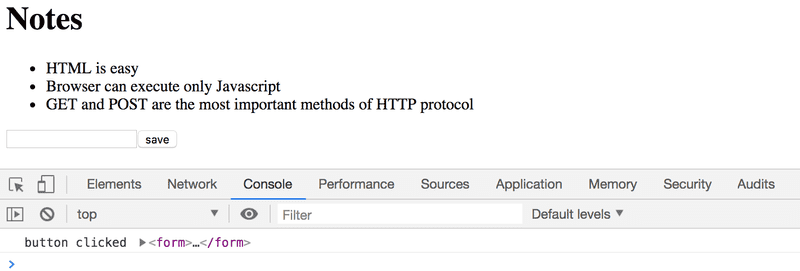
本例中的目标是我们在组件中定义的表单。
那么我们如何访问表单的input元素中包含的数据呢?
受控组件
可以通过很多方法;我们要看的第一个方法是通过使用所谓的受控组件。
让我们添加一个用来存储用户提交输入的新状态片段,叫做newNote,然后让我们把它设为input元素的value属性:
const App = (props) => {
  const [notes, setNotes] = useState(props.notes)
  const [newNote, setNewNote] = useState(    'a new note...'  )
  const addNote = (event) => {
    event.preventDefault()
    console.log('button clicked', event.target)
  }

  return (
    <div>
      <h1>Notes</h1>
      <ul>
        {notes.map(note =>
          <Note key={note.id} note={note} />
        )}
      </ul>
      <form onSubmit={addNote}>
        <input value={newNote} />        <button type="submit">save</button>
      </form>
    </div>
  )
}存储为newNote状态初始值的占位符文本出现在了input元素中,但输入框中的文本不能编辑。控制台显示了一个警告,提示了我们哪里可能出错:
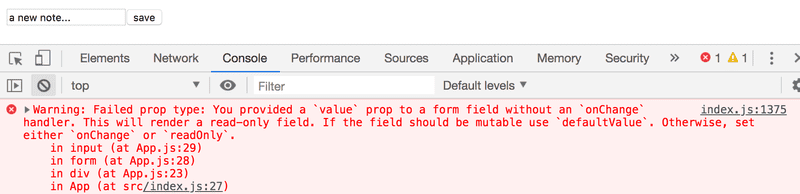
因为我们将App组件的一个状态片段赋值给input元素的value属性,App组件现在控制了input元素的行为。
为了实现对输入框元素的编辑,我们必须注册一个事件处理函数来将输入框的发生变化同步到组件的状态:
const App = (props) => {
const [notes, setNotes] = useState(props.notes)
const [newNote, setNewNote] = useState(
'a new note...'
)
// ...
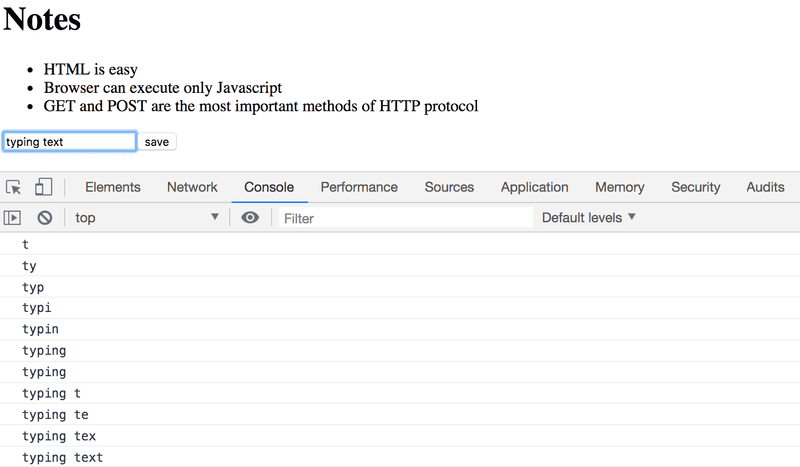
const handleNoteChange = (event) => { console.log(event.target.value) setNewNote(event.target.value) }
return (
<div>
<h1>Notes</h1>
<ul>
{notes.map(note =>
<Note key={note.id} note={note} />
)}
</ul>
<form onSubmit={addNote}>
<input
value={newNote}
onChange={handleNoteChange} />
<button type="submit">save</button>
</form>
</div>
)
}我们现在已经为表单的input元素的onChange属性注册了一个事件处理函数:
<input
  value={newNote}
  onChange={handleNoteChange}
/>每当input元素发生变化时都会调用事件处理函数。事件处理函数接收事件对象作为其event参数:
const handleNoteChange = (event) => {
  console.log(event.target.value)
  setNewNote(event.target.value)
}事件对象的target属性现在对应于被控制的input元素,而event.target.value指的是该元素的输入值。
注意我们不需要像在onSubmit的事件处理函数中那样调用event.preventDefault()方法。这是因为在输入框变化时没有默认动作,这与提交表单时不同。
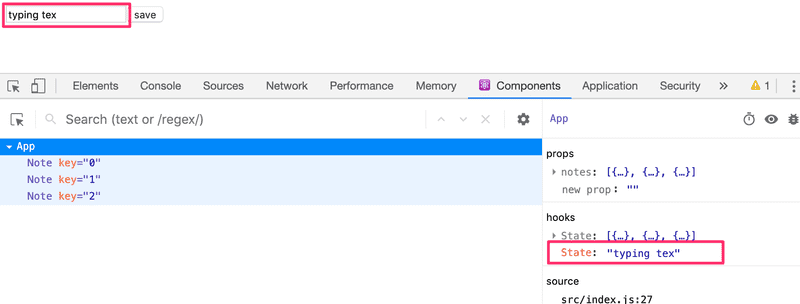
你可以盯着控制台,看看事件处理函数是如何被调用的:
记得安装React devtools了吧?很好。你可以直接在React Devtools标签页中查看状态是如何变化的。
现在App组件的newNote状态反映了输入框的当前值,这意味着我们可以完成创建新笔记的addNote功能了:
const addNote = (event) => {
  event.preventDefault()
  const noteObject = {
    content: newNote,
    important: Math.random() < 0.5,
    id: String(notes.length + 1),
  }

  setNotes(notes.concat(noteObject))
  setNewNote('')
}首先,我们为笔记创建一个新对象noteObject,它将从组件的newNote状态接收其内容。唯一标识符id是根据笔记的总数生成的。这种方法适用于我们的应用,因为笔记永远不会被删除。在Math.random()函数的帮助下,我们的笔记有50%的几率被标记为重要的。
新笔记通过第1章节中介绍过的concat数组方法添加到笔记列表中:
setNotes(notes.concat(noteObject))该方法并不改变原始的notes数组,而是创建一个新的数组副本,将新项添加到最后。这很重要,因为在React中我们必须永远不要直接改变状态!
事件处理函数也通过调用newNote状态的setNewNote函数来重置受控input元素的值:
setNewNote('')你可以在这个GitHub仓库的part2-2分支中找到我们当前应用的全部代码。
筛选展示的元素
让我们为我们的应用添加一些新功能,让我们可以选择只查看重要的笔记。
让我们向App组件中添加一个状态片段来跟踪哪些笔记应该被显示:
const App = (props) => {
  const [notes, setNotes] = useState(props.notes)
  const [newNote, setNewNote] = useState('')
  const [showAll, setShowAll] = useState(true)
  // ...
}让我们改变这个组件,让它在notesToShow变量中存储一个要显示的所有笔记的列表。列表的内容取决于组件的状态:
import { useState } from 'react'
import Note from './components/Note'

const App = (props) => {
  const [notes, setNotes] = useState(props.notes)
  const [newNote, setNewNote] = useState('')
  const [showAll, setShowAll] = useState(true)

  // ...

  const notesToShow = showAll    ? notes    : notes.filter(note => note.important === true)
  return (
    <div>
      <h1>Notes</h1>
      <ul>
        {notesToShow.map(note =>          <Note key={note.id} note={note} />
        )}
      </ul>
      // ...
    </div>
  )
}notesToShow变量的定义相当紧凑:
const notesToShow = showAll
  ? notes
: notes.filter(note => note.important === true)该定义使用了条件运算符,在许多其他编程语言中也有。
该运算符的功能如下。如果我们有:
const result = condition ? val1 : val2如果condition为true,result变量将被设为val1的值。如果condition为false,result变量将被设为val2的值。
如果showAll的值为false,notesToShow变量将被赋值为一个只包含important属性为true的笔记的列表。筛选的过程是借助数组方法filter完成的:
notes.filter(note => note.important === true)比较运算符实际上是多余的,因为note.important的值不是true就是false,这意味着我们可以简写成:
notes.filter(note => note.important)我们之所以先展示比较运算符,是为了强调一个重要的细节:在JavaScript中,val1 == val2并不是在所有情况下都与预期一样。因此,只用val1 === val2进行比较会更安全。你可以在这里阅读更多关于这个主题的内容。
你可以通过改变showAll状态的初始值来测试筛选的功能。
接下来,让我们添加让用户能够从用户界面上切换应用的showAll状态的功能。
相关的改变如下:
import { useState } from 'react'
import Note from './components/Note'

const App = (props) => {
  const [notes, setNotes] = useState(props.notes)
  const [newNote, setNewNote] = useState('')
  const [showAll, setShowAll] = useState(true)

  // ...

  return (
    <div>
      <h1>Notes</h1>
      <div>        <button onClick={() => setShowAll(!showAll)}>          show {showAll ? 'important' : 'all' }        </button>      </div>      <ul>
        {notesToShow.map(note =>
          <Note key={note.id} note={note} />
        )}
      </ul>
      // ...
    </div>
  )
}显示的笔记(所有的或者重要的)是用一个按钮控制的。这个按钮的事件处理函数非常简单,所以就直接在按钮元素的属性中定义了。该事件处理函数将showAll的值从true切换到false,或者反过来,从false切换回true。
() => setShowAll(!showAll)按钮的文本取决于showAll状态的值:
show {showAll ? 'important' : 'all'}你可以在这个GitHub仓库的part2-3分支中找到我们当前应用的全部代码。
练习 2.6.~2.10.
在第一道练习中,我们将开始一个将在后面的练习中进一步开发的应用。在相关的练习集中,只要上交你应用的最终版本即可。你也可以在完成练习集的每一部分后就在git中提交一次,但不强求。
2.6:电话簿 第1步
我们来创建一个简单的电话簿。在这一部分,我们只会向电话簿中添加名字。
让我们从实现在电话簿中添加人的功能开始。
你可以用下面的代码作为你应用的App组件的起点:
import { useState } from 'react'

const App = () => {
  const [persons, setPersons] = useState([
    { name: 'Arto Hellas' }
  ])
  const [newName, setNewName] = useState('')

  return (
    <div>
      <h2>Phonebook</h2>
      <form>
        <div>
          name: <input />
        </div>
        <div>
          <button type="submit">add</button>
        </div>
      </form>
      <h2>Numbers</h2>
      ...
    </div>
  )
}

export default AppnewName状态是用来控制表单的input元素的。
有时为了调试的目的,把状态和其他变量渲染成文本是很有用的。你可以暂时在渲染的组件中加入以下元素:
<div>debug: {newName}</div>好好利用我们在第一章节调试React应用一章中学到的东西也很重要。React开发者工具扩展对于跟踪应用的状态变化非常有用。
在完成这道练习后,你的应用应该如下所示:
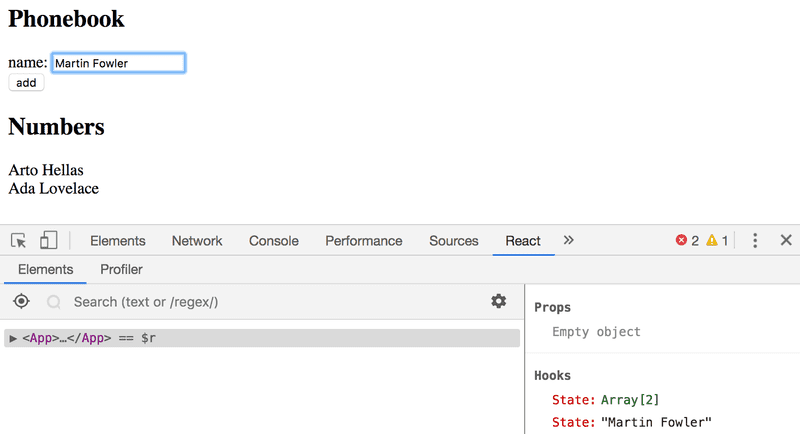
注意上图中React开发者工具扩展的使用!
注意:
-
你可以用人的名字作为key属性的值
- 记得防止提交HTML表单的默认动作!
2.7:电话簿 第2步
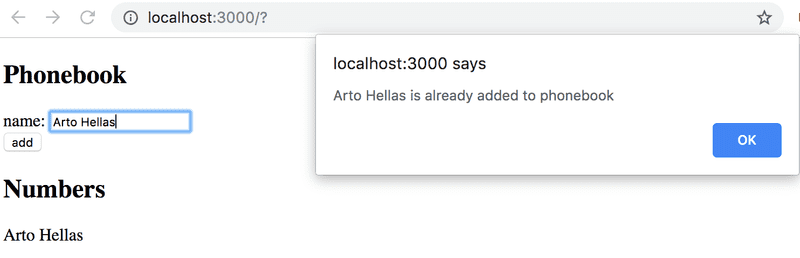
防止用户添加已经存在于电话簿中的名字。JavaScript数组有许多合适的方法来完成这个任务。记住在Javascript中是怎么比较对象是否相等的。
当用户试图向电话簿中添加已存在的名字时,用alert命令发出警告:
提示:当你在构建包含变量值的字符串时,建议使用模板字符串:
`${newName} is already added to phonebook`如果newName变量的值是Arto Hellas,模板字符串表达式返回字符串
`Arto Hellas is already added to phonebook`同样的事也可以用更像Java的方式通过加号运算符完成:
newName + ' is already added to phonebook'使用模板字符串是更符合语言习惯的选择,也是真正的JavaScript专家的标志。
2.8:电话簿 第3步
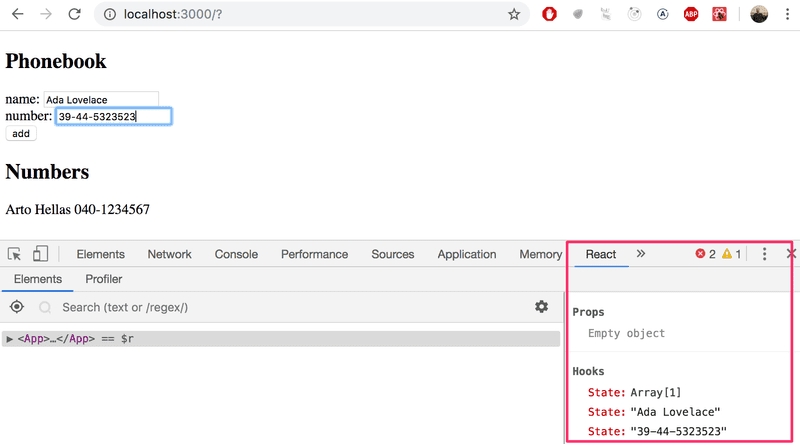
扩展你的应用,允许用户向电话簿中添加电话号码。你需要在表单中添加第二个input元素(以及它自己的事件处理函数):
<form>
  <div>name: <input /></div>
  <div>number: <input /></div>
  <div><button type="submit">add</button></div>
</form>现在该应用可能如下所示。图片中还借助React开发者工具显示了应用的状态:
2.9*:电话簿 第4步
实现一个搜索字段,可以用来按名字筛选人的列表:
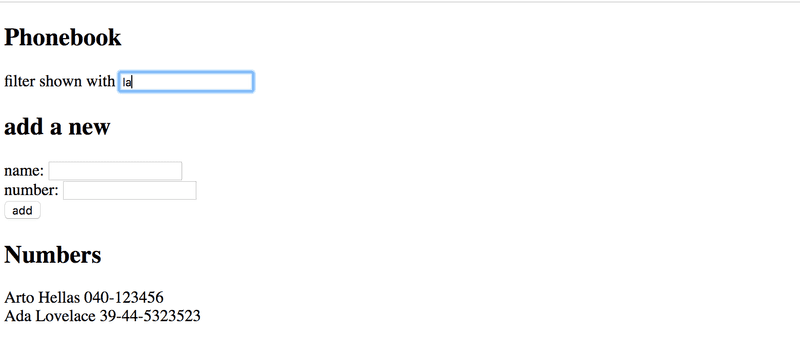
你可以将搜索字段实现为一个input元素,放在HTML表单之外。图片中显示筛选的逻辑是大小写不敏感的,意味着搜索arto也会返回包含大写A的Arto的结果。
注意:当你开发新的功能时,在你的应用中“硬编码”一些样本数据往往是有用的,例如:
const App = () => {
  const [persons, setPersons] = useState([
    { name: 'Arto Hellas', number: '040-123456', id: 1 },
    { name: 'Ada Lovelace', number: '39-44-5323523', id: 2 },
    { name: 'Dan Abramov', number: '12-43-234345', id: 3 },
    { name: 'Mary Poppendieck', number: '39-23-6423122', id: 4 }
  ])

  // ...
}
这可以使你在测试新功能时不必手动将数据输入到你的应用中。
2.10:电话簿 第5步
如果你是在单个组件中实现你的应用的,通过提取合适部分到新的组件中来重构应用。在App根组件中维护应用的状态和所有事件处理函数。
从应用中提取三个组件即可。提取这些组件都是不错的选择,例如,搜索筛选器、向电话簿添加新人的表单、显示电话簿中所有人的组件,以及显示一个人详细资料的组件。
在重构之后,应用的根组件可能看起来类似下面。下面这个重构后的根组件只渲染标题,其余的部分则让提取的组件来处理。
const App = () => {
  // ...

  return (
    <div>
      <h2>Phonebook</h2>

      <Filter ... />

      <h3>Add a new</h3>

      <PersonForm
        ...
      />

      <h3>Numbers</h3>

      <Persons ... />
    </div>
  )
}注意:如果你在“错误的地方”定义你的组件,你就可能会在这道练习中遇到问题。现在是实践一下上一章节的不要在组件中定义组件章节的好时机。